You’ll want to check your local planning rules before breaking ground, since the requirements depend on what materials you choose. Permeable options like gravel or porous asphalt typically skip the permission step, but solid concrete needs approval if it covers more than 5 square metres. Once you’ve cleared that hurdle, apply for a dropped kerb from your highways authority—this usually costs between £100 and £300 and lets water drain properly onto the street.
Hiring an NRSWA-accredited contractor keeps everything above board and protects your wallet if something goes wrong. Material costs vary widely depending on what surface you want: gravel runs about £1.75 per square foot, while pavers jump up to around £20 per square foot. The contractor will lay down a 4 to 6 inch stone base for drainage, which prevents water from pooling and cracking your surface later.
For sizing, plan on two standard parking spaces measuring 9 by 18 feet each, giving you enough room to actually open car doors without scraping your neighbor’s fence. Installation typically takes 3 to 10 days from start to finish, though this depends heavily on your soil type and local weather patterns. Since conditions vary by location, talking through specifics with your contractor before they start prevents expensive surprises midway through the project.
Do You Need Planning Permission for Your Front Garden Driveway?
 1")
Before you grab a shovel or call a contractor, you’ll want to check what your local planning rules actually say. Different councils have different requirements, and what works in one area might not fly in another.
Different councils have different requirements—what works in one area might not fly in another.
Here’s where things get interesting: you’ve got permitted development rights that can work in your favor. If you use permeable materials like gravel, porous asphalt, or permeable block paving, you typically won’t need planning permission for your front garden driveway. These materials let water drain through instead of pooling on the surface, which is why they get the green light.
Non-permeable surfaces are the catch. If you’re laying down standard concrete or solid asphalt that’s larger than 5 square metres, you’ll need proper drainage systems and almost certainly need to apply for planning permission. The reason is practical: hard surfaces without drainage can cause flooding issues on neighboring properties and overwhelm local water systems.
Living in a conservation area or near a listed building brings extra considerations into play. These areas have stricter rules to protect their character, so what’s allowed elsewhere might be restricted there.
Don’t forget about your dropped kerb. You need approval from your local highways authority before cutting into the pavement, and this typically costs between £100 and £300.
The safest move is contacting your local planning authority before starting any work. Site-specific factors matter more than general guidelines, and getting approval upfront saves you the headache of having to undo work later.
Getting a Dropped Kerb: The Application Process
 2")
Getting a dropped kerb starts with submitting an application to your local highways authority, which typically costs between £100 and £300. They’ll assess whether your property can actually support one, checking things like ground conditions and access angles. Once you get the green light, you’ll hire a New Roads and Street Works Act accredited contractor to do the actual work. These contractors know the official standards inside and out, so you’re not gambling on quality.
Before any digging touches your garden, call an 811 utility locating service. They’ll map out where pipes and cables run underneath your property, which sounds boring but prevents genuinely expensive and dangerous mistakes. Hitting a water main or electrical line turns a straightforward project into a nightmare pretty fast. The locating service marks everything clearly on the ground so your contractor knows exactly where it’s safe to dig.
Application Requirements And Costs
What’s actually stopping you from getting that driveway sorted? Usually it’s a dropped kerb application and figuring out what paperwork matters. You’ll submit everything to your local highways authority, and they’ll want an application fee ranging from £100 to £300 depending on where you live.
They’re going to ask for a detailed site plan that shows your property layout and exactly where you want that kerb crossing to happen. Before anyone picks up a shovel, utilities need checking—gas pipes, water mains, and electrical cables hide underground and cost a fortune to replace if damaged.
Your contractor needs NRSWA accreditation, which basically means they’ve got the proper training for street works and know what they’re doing. The actual construction of the kerb crossing itself runs about £800 to £1,500 on top of your application fee. Planning permission rules shift depending on your location, so get in touch with your local authority early rather than assuming what applies to your neighbor’s house applies to yours. Sorting these details at the start keeps frustration low and your project moving forward without unexpected delays.
Accredited Contractor Selection Process
Finding the right contractor starts with knowing where to look. Your local planning authority maintains approved contractor lists, which means real people have already checked their qualifications and track records for you. This saves you the work of vetting from scratch.
When you’re ready to move forward, request quotes from up to three contractors so you can actually compare what they’re offering—scope of work, timeline, and price all lined up side by side. Look closely at each proposal to make sure it matches your planning permission and local regulations.
Here’s the non-negotiable part: your contractor must hold New Roads and Street Works Act accreditation. This isn’t a nice-to-have credential. It’s the legal baseline for anyone digging in or near public roads and utility areas.
Before any digging equipment shows up, call 811 utility location services. They’ll come out and mark where your underground pipes and cables actually run. This 20-minute step prevents the kind of rupture that costs thousands to repair and leaves you without water or power for days. It’s worth the brief wait.
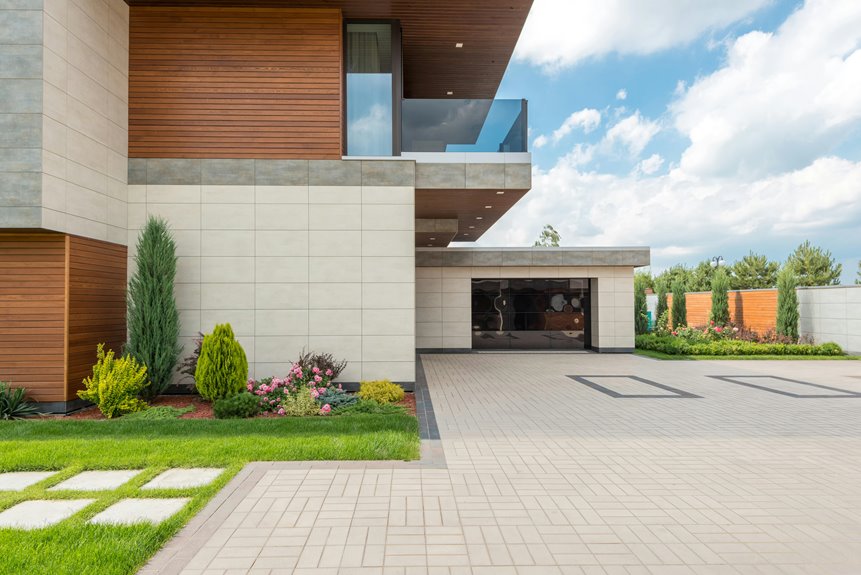
What Space Do You Have? Assessing Parking Needs and Layout
 3")
Before you break ground on your new driveway, take a hard look at what you’re actually working with. Your space assessment determines everything—from parking needs to curb appeal success.
Start by measuring your front garden honestly. How many cars do you regularly park there? Most households need space for two vehicles, plus room for visitors turning around comfortably. A standard car needs about 9 feet of width and 18 feet of length for a parking space, so don’t skimp on turning radius. A tight squeeze today becomes a frustration tomorrow.
Consider these practical elements:
Driveway layout options come down to two main types. Rectangular designs pack more parking into tight spaces, while curved layouts soften your home’s appearance by following the natural lines of your property. Think about which matters more to your situation.
Bin storage needs a dedicated spot where wheelie bins won’t block parking or make it hard to access your front door. A 3-by-4-foot recessed area or a covered bin enclosure keeps things neat and functional.
Planting zones let you balance the hard surface of pavement with greenery for visual interest. Leave space around the edges for shrubs or ornamental grasses rather than paving over every inch.
Planning permission requirements vary by location and driveway size. Check with your local council about regulations before finalizing your dimensions. Some areas have rules about how much of your front garden can become hardscape.
Your driveway should fit your home’s style and complement the surrounding street. This thoughtful planning means your new driveway meets everyday functionality while fitting naturally into your neighborhood.
Front Garden Driveway Materials: What Fits Your Home
 4")
Now that you’ve mapped out your space and planned the layout, it’s time to pick the materials that’ll actually cover that ground. Your options range from budget-friendly gravel to premium pavers, and each one brings different perks to the table.
Permeable materials like permeable concrete blocks, porous asphalt, and gravel driveways are worth your attention. They handle water drainage beautifully and often skip the planning permission requirement—especially helpful if you’re covering under five square metres. Gravel paired with honeycomb panels keeps everything stable while letting water drain right through.
Cost-wise, gravel is your wallet’s best friend, while asphalt runs $2.25–$3.50 per square foot, concrete lands at $4.85–$7.25, and pavers cost $12–$20. Beyond the price tag, think about SuDS compliance and what your local climate throws at you. Permeable surfaces support local wildlife and stay cooler than solid finishes, which matters if you care about reducing heat in your neighborhood. Pick materials that match your home’s style while respecting environmental goals.
Drainage Solutions for Your Front Garden Driveway
 5")
When you’re converting your front garden to a driveway, permeable materials like porous asphalt, permeable gravel, or block paving handle rainwater far better than solid concrete. These surfaces let water soak through instead of pooling on top, which means fewer puddles and better drainage overall.
A soakaway system works by collecting that water and directing it away from your home’s foundation, where moisture can cause real damage over time. Most councils now require drainage solutions that meet SuDS (Sustainable Drainage Systems) standards, so installing one keeps your project compliant without extra hassle down the road.
Pairing your permeable surface with gravel grids or soft landscaping around the edges gives you practical benefits beyond just looks. These materials reduce how much heat your driveway absorbs and radiates back, protect tree roots from getting damaged by compacted soil, and create visual interest that a plain concrete slab simply can’t match. The combination keeps water moving through your setup rather than sitting on top of it.
Permeable Materials & Water Management
Have you thought about what happens to all that rainwater pooling on your new driveway? When you choose permeable materials like permeable concrete block paving, porous asphalt, or gravel, your driveway becomes a functional drainage system that actually works with water instead of fighting it. You’re preventing floods while meeting SuDS (Sustainable Drainage Systems) requirements and helping your local environment at the same time.
Permeable paving options reduce surface runoff by allowing water to drain through the surface rather than running off into storm drains. Materials like permeable asphalt or concrete blocks sit over a 4-6 inch base layer of crushed stone, which acts as a temporary water storage zone. Water filters down through this layer at roughly 1-2 inches per hour, depending on your soil type, then either soaks into the ground or moves toward your soakaway system.
Soakaway installation directs water away from your home’s foundation by creating a pit or trench filled with gravel, typically 3-4 feet deep and 2-3 feet wide. This acts as a holding area where water can slowly percolate into the surrounding soil, reducing the risk of water pooling near your house. The deeper the soakaway, the better it handles heavy rainfall, though your local drainage engineer can advise on the right size for your property.
Permeable grids beneath gravel are plastic or recycled composite frameworks that hold loose gravel in place while allowing water to pass through. These grids prevent gravel from scattering across your lawn or clogging nearby drains, and they protect tree roots from being damaged by vehicles or foot traffic.
Traditional solid driveways absorb and retain heat, raising surface temperatures by 20-30 degrees Fahrenheit on hot days. Permeable surfaces stay cooler because water moves through them and evaporates, which naturally lowers the temperature in your immediate outdoor area.
SuDS Compliance And Soakaway Integration
Your permeable driveway’s real power comes from meeting actual regulations while keeping water away from your home. That’s where SuDS compliance and soakaway integration come into play. Many areas now mandate SuDS-compliant driveways for new installations, so checking your local planning permission requirements is worth your time.
Soakaways are underground chambers, typically 1 to 2 meters deep and filled with gravel or recycled aggregate, that collect rainwater from your permeable surface and let it seep naturally into the ground. They work quietly beneath your driveway, capturing runoff and filtering it back into the soil ecosystem. This setup reduces flooding risk while supporting biodiversity by returning clean water to the ground rather than overwhelming storm drains.
When you integrate soakaways into your design, you’re doing two things at once: meeting regulatory requirements and building climate resilience directly into your front garden. The water management happens one permeable square at a time, with each rainfall absorbed and dispersed rather than pooled or diverted elsewhere.
Planting and Greenery That Soften Hardscape
 6")
A new driveway doesn’t have to look like a concrete island sitting in your front garden. You can blend the hard surfaces with living plants that feel purposeful and inviting instead.
Start by integrating planting pockets within permeable materials like gravel or recycled asphalt. These 12 to 18-inch-wide strips create visual breaks while keeping water moving through the surface where it belongs. This approach supports local insects and small animals without eating into your parking space. Pick evergreen shrubs and low-maintenance plants that match your home’s personality—ornamental grasses, sedums, and compact junipers work well because they ask very little of you once established.
Border plantings serve double duty: they help water drain away from the driveway edge while cooling the surrounding ground naturally through shade and moisture. Ground covers like creeping thyme or low-growing sedums soften hard edges and create that appealing green carpet look. Native, drought-tolerant selections cut down on watering and weeding once they settle in, which means less work for you over time.
Plan your driveway layout around existing mature trees rather than removing them. Their root systems hold soil in place and prevent erosion, while their canopy blocks sun and keeps the area cooler on hot days. This balanced approach turns your driveway into a practical, good-looking extension of your home that actually works with the natural landscape instead of fighting against it.
Protecting Existing Trees During Construction
Those mature trees you’re keeping around your new driveway deserve real protection while construction happens. Before you break ground, check whether your trees have a Tree Preservation Order or if they’re close to your planned layout—talking with an arborist at this stage saves headaches later.
Start by installing temporary fencing around the root zones, typically extending 1 foot outward for every 1 inch of trunk diameter. This creates a clear boundary that keeps heavy equipment completely away from where tree roots spread underground. Your crew needs to see these markers clearly, so use bright flagging tape or paint to make the exclusion zones obvious.
A tree protection grid placed beneath gravel surfaces works well for driveways and parking areas. These plastic or metal grids sit on top of the soil and distribute weight more evenly, which means less compaction crushing roots. The grid also lets water drain through to keep roots hydrated, addressing two problems at once.
During site prep and surface installation, restrict all machinery movement within those root zones you’ve marked. Compacted soil makes it harder for roots to absorb water and oxygen, which weakens tree stability over time. By keeping heavy traffic away from these areas, you’re protecting the underground structure that holds your tree upright and healthy for the next couple of decades.
Where Bins Go: Storage and Access Planning
 7")
When you’re converting your front garden into a driveway, figure out where your wheelie bins will live before you pour concrete. A bin store built from recycled bricks or a simple wooden frame works well positioned against your house, keeping bins hidden from street view while staying accessible for collection day. The key is building it about 1.2 meters wide and 0.8 meters deep—big enough for two standard 240-liter bins with room to swing the lids open.
Position your bin store so the collection crew can reach it without walking across freshly laid driveway or squeezing past parked cars. Leave at least 1.5 meters of clear pathway from the street to your bins, and think about how the truck’s mechanical arm swings when grabbing bins from the curb. You’ll also want smooth, direct routes to your front door and enough turning radius for cars—probably 4 to 5 meters minimum depending on your driveway length. This keeps bins and planting from becoming obstacles that residents, visitors, or delivery drivers need to navigate around.
Bin Storage Layout Planning
Where should your bins actually go? During your driveway conversion, thinking through bin storage placement keeps your front garden looking neat while keeping things practical. You’ll want to build a dedicated storage area near your driveway’s edge, using recycled bricks to create concealing walls that blend with your existing landscaping.
Position bins away from parking spaces and your front door entirely, since you don’t want them visible when you’re coming and going. A good storage alcove measures about 4 feet wide by 3 feet deep, which comfortably fits two standard 240-liter wheelie bins side by side. This size works because collection day access stays simple without blocking pedestrian pathways or traffic flow around your property.
Use planter features and trailing plants like ivy or clematis to disguise the storage area while adding visual interest to that corner of your garden. The combination of brick walls, soft landscaping, and strategic plant placement makes the bin area feel intentional rather than like a last-minute storage solution. You’ll also appreciate how a concealed storage spot means your driveway conversion actually delivers on both looks and practical function, with every element pulling its weight in the space.
Concealing Bins With Planting
How can you hide something that needs to be visible on collection day? Strategic planting paired with a sturdy structure does the job well. Build an enclosure from recycled bricks—roughly 3 to 4 feet tall and 4 feet wide works for standard wheelie bins—positioned to screen them from street view while keeping them easily accessible.
Climbing plants like ivy or clematis work wonderfully here, softening those hard brick lines while adding real visual interest to your front garden. As the plants grow and spill naturally over the edges, they’ll disguise the structure’s angular appearance without requiring constant trimming.
Position your enclosure slightly recessed from your main pathway, about 12 to 18 inches back, so visitors have clear passage while your bins stay out of sight. This spacing also lets your bins slide out smoothly during collection without blocking driveway or front door access. The key is thoughtful placement—screen them from the street view without making collection day a hassle or creating obstacles for daily foot traffic.
This approach turns necessary bin storage into a landscape feature that genuinely improves how your home looks from the street.
Access Routes And Pathways
Once you’ve hidden those bins behind climbing ivy and brick, it’s time to think about how people and deliveries actually move through your front garden. This is where smart planning pays off.
Start with a dedicated pathway from the street to your front door that’s roughly 1.2 metres wide—wide enough for two people side-by-side or someone using a walker. Permeable materials like gravel or permeable pavers work best here because they let water drain through instead of pooling on the surface, which keeps your garden from getting waterlogged during heavy rain. They’re also easier on the knees than concrete.
Your driveway deserves its own thought. Route it so it doesn’t funnel people right past your bin storage. Instead, tuck those wheelie bins on the side of your driveway or toward the rear where they’re genuinely convenient on collection day but out of sight from the street. This balance—easy access for the bin lorry without visual clutter—is worth the extra planning.
Permeable surfaces do double duty by supporting natural drainage and giving ground-dwelling insects and small creatures places to burrow. Clear routes matter too. They make your garden genuinely accessible for people with mobility aids and reduce tripping hazards on collection days when everyone’s rushing about. When water can drain properly through your pathways, you’re protecting your garden beds and the hardscaping around them from the kind of waterlogging that causes cracks and settling over time.
What Does Installation Cost? Breaking Down Materials and Labor
 8")
So what’s going to hit your wallet when you’re converting that front garden into a proper driveway? Your costs depend heavily on the materials and labor you choose. Ground preparation and drainage are the foundation work that costs £40–£70 per m², and honestly, this step matters because a solid base keeps your driveway from cracking and settling unevenly down the road.
Material prices swing wildly depending on what you pick. Gravel sits at the budget end at £1.75–£2.85 per square foot, which works if you don’t mind occasional raking and topping up. Asphalt runs £2.25–£3.50 per square foot and handles British weather reasonably well. Concrete costs £4.85–£7.25 per square foot and lasts longer with less maintenance. Pavers are the premium choice at £12.00–£20.00, but they look polished and let water drain through naturally.
Installation labor usually takes 1–3 days for simpler surfaces like gravel or asphalt, though paving work takes considerably longer since each stone needs proper placement. A 30m² driveway typically runs £9,500–£11,500 total when you add materials, labor, and site prep together. If you’re thinking bigger with a 60m² project, budget £14,500–£16,000. Non-permeable surfaces like asphalt and concrete need a separate drainage system costing £700–£1,700 to handle water runoff properly and prevent pooling.
The real trick is matching your material choice to what your site actually needs and what fits your budget realistically.
Installing Your Front Garden Driveway: Preparation and Timeline
 9")
Now that you’ve figured out your budget and chosen your materials, it’s time to actually get the work done—and that starts way before anyone picks up a shovel.
You’ll need planning permission and a solid site plan before breaking ground. Contact 811 first to locate any buried gas or electric lines, because hitting one of those is genuinely bad news. Submit your site plan to local inspectors showing your drainage slope (typically 1-2% grade for water runoff), drive width, and distance measurements from property lines. Once you secure permits and get official approval, you can schedule installation, which usually takes 3–10 days depending on weather and how complex your project is.
After the installation finishes, inspectors will check that your drainage slope works properly and your base layer is compacted well. A properly compacted base prevents that annoying settling and shifting that happens when soil underneath isn’t stable. Getting these details right from the start means your driveway will stay level and functional for years instead of developing cracks and ruts down the road.
How Much Value Does a Driveway Really Add?
 10")
A concrete pad might seem simple, but it affects your home’s resale value in real ways. When you add off-street parking through a driveway, you’re looking at a solid 5–10% property value boost, with urban areas seeing even higher gains where parking is scarce. That’s because buyers genuinely worry about theft and vandalism risks when they can’t park off the street.
A driveway adds 5–10% to your home’s value by offering buyers the parking security and theft protection they’re seeking.
The neighborhood you’re in makes a big difference here. Building a driveway pays off most when on-street parking is limited in your area. If everyone on your block competes for curb spots, your private driveway becomes genuinely valuable to potential buyers.
Local regulations and planning permission requirements will shape what you can actually build. Before you pour concrete, check with your city or county about setback distances, drainage rules, and material specifications. These requirements exist partly to protect your long-term resale value.
The materials you choose matter for both appeal and durability. Permeable concrete or porous asphalt lets water drain naturally, which keeps your driveway looking fresh longer and prevents water pooling that can damage the surface. This type of upkeep supports your resale value over time.
Combining your driveway with a patio amplifies your returns by giving buyers both parking and outdoor living space in one shot. Rather than treating them as separate projects, thinking about how they work together helps you get more value from your investment.
Mistakes That Cost Money: What to Avoid Before You Start
 11")
Before you break ground on your driveway, here’s the hard truth: a few overlooked details early on can turn a straightforward project into a money pit.
Skipping planning permission checks invites costly retrospective approvals, especially for non-permeable surfaces over 5 m². Drainage and SuDS requirements matter just as much—inadequate soakaways worsen flood risk and drain your wallet later. Using non-accredited contractors for dropped kerb work risks illegal access and failed inspections that derail everything.
Most homeowners stumble over the same pitfalls. Forgetting to map bin and wheelie storage space beforehand means cramped corners later. Installing without proper subsoil compaction and base layers creates soft spots that crack within a season. Neglecting permeable materials in conservation areas triggers enforcement notices. Rushing ahead without accurate measurements or site plans leads to costly corrections.
The payoff for spending time upfront is real—it costs far less than fixing mistakes after the fact. Map your space properly, pull the right paperwork, hire accredited professionals, and use materials suited to your area’s rules. The work moves smoothly when these pieces fit together from the start.
Keeping Your Front Garden Driveway in Shape
 12")
Your new driveway isn’t a set-it-and-forget-it investment—it’ll need regular attention to stay looking sharp and functioning properly. Think of maintenance as protecting what you’ve built.
If you’ve chosen permeable materials like gravel or porous asphalt, you’re already ahead on drainage. Replenish your gravel base annually to maintain proper water infiltration and prevent pooling. After heavy rain, monitor for dips and soft spots—they’re drainage red flags that need attention.
Weeds establish roots quickly, so tackle them promptly, especially around planting pockets. These soft landscaping areas boost curb appeal while keeping maintenance manageable with ground covers like creeping thyme or ajuga that spread about 12 inches per season.
Your local planning permission requirements often include ongoing maintenance obligations, so check those guidelines regularly. This keeps you on the right side of regulations while protecting your investment’s long-term appearance and function.


