A plant nursery grows young plants from seeds, cuttings, or grafts inside controlled greenhouses, then sells them ready to transplant into your garden or landscape. Think of it as a specialized production facility that handles all the fussy early stages so you can skip ahead several weeks in the growing season.
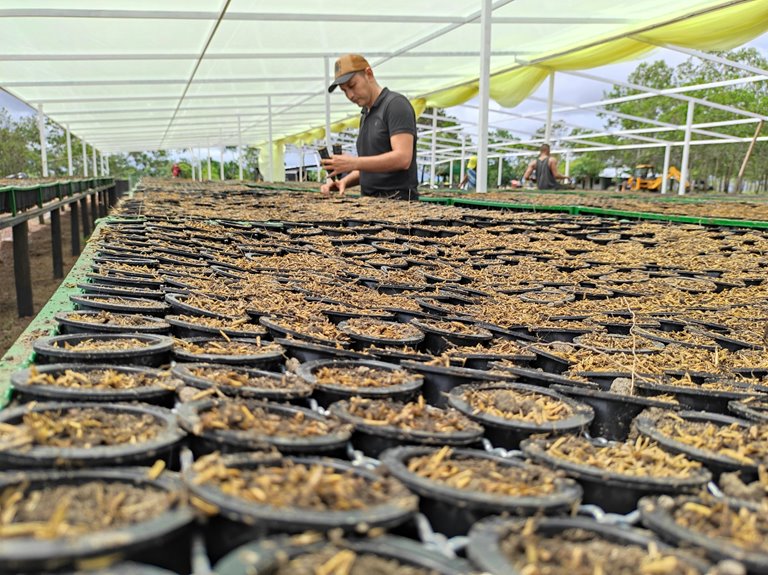
The nursery uses a specific soil blend to get seedlings off to a strong start: roughly 40% compost for nutrients, 30% sand for drainage, and 30% perlite for air pockets. This mix lets roots develop quickly without sitting in soggy conditions. The staff manages watering systems carefully, monitors for pests and diseases, and gradually exposes plants to outdoor air and sunlight through a process called hardening off. Without this gradual adjustment, tender greenhouse plants would shock and wilt if you planted them straight outside.
What you get when you buy from a nursery is a plant that’s already past its most vulnerable phase. Instead of babysitting seeds indoors under grow lights for weeks or months, you bring home a established young plant ready to settle into your garden with minimal fuss.
What Plant Nurseries Do and Why They Matter

Ever wonder where all those healthy seedlings and saplings come from before they land in gardens and fields? Plant nurseries are the real source. These operations focus on propagation—growing plants from seeds or cuttings—to create transplant-ready stock for farmers, landscapers, and home gardeners.
What makes nurseries so practical is their ability to maintain stock quality through controlled environments, careful watering schedules, and targeted pest management. They operate across multiple market channels, from retail garden centers to wholesale operations and forestry suppliers. When you buy a nursery plant, you’re getting a head start on your growing season since much of the hard propagation work is already done.
Nurseries handle the time-intensive tasks like seed stratification, rooting hormone application, and monitoring young plants through their vulnerable early stages. They manage factors like soil pH levels, fertilizer ratios, and light exposure that would otherwise eat up months of your time at home. Without these specialized growers, establishing healthy plants in your garden would take significantly longer and involve considerably more trial and error.
Types of Nurseries and Plant Specializations
Not all nurseries grow the same plants or serve the same purpose—and that’s what keeps the industry interesting. Agricultural nurseries focus on producing hardy seedlings for food crops, timing plant growth to match your harvest schedule and improve farming productivity. They use techniques like controlled-temperature propagation chambers and nutrient-dense growing media to develop stocky seedlings that transplant well into field conditions.
Forest nurseries cultivate species like pines, oaks, and firs in quantities ranging from hundreds to thousands of seedlings per acre. These operations support ecosystem restoration by providing genetically appropriate trees for your regional climate and help build resilience against drought and disease. The seedlings typically grow for 1-3 years before reaching transplant size.
Ornamental nurseries specialize in decorative plants—roses, ferns, bonsais—supplying landscaping contractors and interior designers. They work with precise spacing requirements and custom pruning methods to shape plants according to client preferences, whether you need a 2-foot topiary or specimen-quality specimens for feature plantings.
Medicinal and specialized nurseries produce plants for natural remedies and pharmaceutical applications, growing species like echinacea, ginseng, or valerian with specific harvesting protocols to preserve active compounds. These operations often follow regulated growing standards to meet quality requirements for herbal product manufacturers.
When choosing a nursery, knowing their specialization helps you find plants matched to your actual needs. Each type develops different techniques and knowledge—understanding this difference means you’ll get plants genuinely suited to your specific goals and local growing conditions.
How Nurseries Propagate Plants: Seeds, Cuttings, and Grafting

How do nurseries turn one plant into hundreds of identical copies ready to sell? The answer lies in understanding two distinct pathways: starting from seed and using asexual methods.
| Method | Best For |
|---|---|
| Seeds | Affordable, uniform genetics |
| Cuttings | Exact clones, variable traits |
| Grafting | Superior rootstocks, disease resistance |
| Layering | Minimal skill required |
| Division | Bulbs, perennials, quick results |
Seed Propagation
Growing from seed keeps costs low, but it demands attention to detail. You’ll need to disinfect seeds properly and work with germination media that drains well—usually a mix of peat moss and perlite in roughly equal parts. The payoff is worth it: you get affordability and genetic uniformity in your final plants.
Asexual Methods for Perfect Copies
When you need exact replicas of a specific plant—like a heritage rose or a rare cultivar that won’t breed true from seed—asexual propagation is your answer. Nurseries rely on stock plants maintained year-round specifically for generating propagation material. During winter, workers prune these plants hard, which triggers the growth of abundant shoots in spring that are perfect for cutting.
Cuttings and Grafting
Taking cuttings means snipping healthy stem segments and rooting them in controlled conditions where humidity stays consistently high and temperature remains steady. Grafting works differently: it joins a superior variety onto a sturdy rootstock, combining the best traits of both plants. Specialized propagating houses provide the stable environment these methods need, giving young plants optimal conditions from day one.
From Seedling to Sale: Nursery Production Timelines
Once your seeds are sprouting or cuttings are rooting in the propagating house, the real work begins—the part where you learn to balance speed with careful attention. Seedlings need consistent watering and controlled conditions to build strong root systems before you move them along. You’ll progress through distinct stages: roots developing in trays, then shifting into individual containers, and finally gradually exposing them outdoors to harden off.
This step-by-step transition matters because it slowly prepares plants for the actual weather and light they’ll encounter after customers take them home. Skipping the hardening-off phase means you’ll end up with tender plants that struggle in the real world.
Throughout propagation and growth, you’re watching substrate moisture levels (aiming for that sweet spot between wet and dry), checking for pests, and maintaining your mix quality. Think of yourself as a guide helping young plants become independent. Once seedlings reach the right size for transplanting—usually when they’ve got their second set of true leaves—you’ll prepare them for final sizing, whether that’s bare-root or container-grown, then package them for delivery to wholesalers and garden centers.
Timing shapes everything in this phase. A seedling that’s ready to go out at week eight will fill out a 4-inch pot nicely by week twelve, hitting that perfect market window. Wait too long, and you’ve got overgrown plants taking up greenhouse space. Rush it, and they’re weak and won’t sell well.
What You Need to Start: Greenhouses, Irrigation, and Growing Systems

Building a nursery means investing in the physical infrastructure that keeps your plants healthy year-round. You’ll need climate-controlled greenhouses to maintain steady temperatures, humidity levels, and light exposure without the daily fluctuations that stress young plants.
Next comes irrigation. Automated drip or misting systems deliver water right where it’s needed without oversaturating the soil, which quickly kills tender seedlings. These setups save you hours each week and give you consistent moisture levels that hand-watering simply can’t match.
For your growing systems, start with a propagation media blend of roughly 40% compost, 30% sand, and 30% perlite. This mixture drains well while holding enough moisture for young roots to establish. Fill sterilized propagation beds with this blend to protect your cuttings from fungal diseases and pest damage that spread rapidly in damp conditions.
Maintain stock plants on-site so you have a reliable source of cuttings whenever you need them. Prune your stock plants down to ground level each winter, which encourages them to produce abundant, vigorous new growth come spring. These fresh shoots make the best cuttings for propagation. This setup—controlled climate, precise water delivery, quality growing media, and accessible stock plants—creates a system that produces healthy plants efficiently and predictably.
Daily Nursery Operations: Soil, Pests, and Plant Hardening

Daily nursery work really comes down to three things that matter most: getting your soil mix right, staying on top of pests before they multiply, and hardening off seedlings properly so they handle outdoor conditions without shock.
Start with your soil. A good nursery mix needs drainage above all else, which is why perlite and compost work so well together. Perlite opens up the soil structure—think of it like adding tiny air pockets—while compost feeds your plants and holds just enough moisture without becoming soggy. Mix them in roughly equal parts, maybe 40-50% compost and 30-40% perlite, with the rest being base soil or coir depending on what plants you’re growing.
Pest management separates the nurseries that stay healthy from those that spiral downward. Rather than reaching for chemical sprays, focus on prevention first. Keep your work area clean—remove dead leaves, clear out fallen debris, and space plants so air flows between them. This simple sanitation cuts pest problems by half before they even start. When you do spot problems, biological controls like ladybugs for aphids or neem oil for mites work without poisoning your soil or seedlings.
Your irrigation system deserves daily attention because moisture balance makes or breaks a nursery. Drip lines deliver water precisely where roots need it, hitting that sweet spot between wilting and waterlogging. Check your lines each morning for leaks or clogs, and adjust timing as temperatures shift—seedlings need more frequent watering in summer heat but less in cooler months.
Hardening off takes 7 to 14 days and matters more than people realize. Move seedlings outdoors for a few hours the first day, gradually increasing their time in open air and wind. This process strengthens their stems and prepares their leaves for direct sun, so they don’t collapse when you plant them for real. These daily practices separate the operations that produce healthy stock from those that watch their plants struggle.
Soil Preparation And Management
What’s the real heart of a good plant nursery? Getting your soil right from the start. You’ll want to build beds that are loose and crumbly, packed with compost so roots can push through easily and plants slip out of the ground without stress.
Mix organic matter generously into your nursery beds. Think sawdust, shredded leaves, and aged manure—these materials break down over time and feed your soil while improving its structure. For container growing, the game is different because you need a potting mix that does two jobs at once: it drains quickly so water doesn’t pool around roots, but it also holds enough moisture so plants don’t dry out between waterings. Blend quality compost with sand, perlite, or biochar until you find that balance that works for your setup.
When you’re starting seeds or cuttings, use sterile propagation media. This one choice cuts down fungal diseases by a lot because you’re starting with a clean slate. You might also sterilize your seeds themselves—it stops pathogens from spreading while they’re germinating, giving young plants a fighting chance.
Here’s the thing about drainage: it’s not optional. Poor drainage is basically an invitation for root rot and disease to move in. When water sits in soil, roots suffocate and fungi thrive. Spend time getting this part right, and your nursery stock will be healthier, stronger, and ready to perform well once customers get them home.
Integrated Pest Control Methods
Once your soil’s dialed in and your plants are doing well, pests show up like uninvited guests—but you don’t need harsh chemicals to handle them. Integrated Pest Management, or IPM, works by stacking several tactics together instead of relying on one quick fix.
Start by scouting your nursery twice a week, looking under leaves and checking stems for early signs of aphids, spider mites, or fungal spots. Catching problems when populations are small keeps them from exploding into real headaches. Keep your growing area clean by removing dead leaves, fallen debris, and plant material where pests hide and breed. Wipe down benches and tools with a 10% bleach solution to eliminate pest eggs and spores.
Introduce beneficial insects like ladybugs and parasitic wasps that eat common pests for food—a single ladybug can consume 50 to 60 aphids per day. Choose plant varieties bred for disease resistance whenever your crop list allows it, since these plants naturally fight off problems that susceptible varieties can’t handle.
When you do need to spray, pick low-toxicity options like neem oil or insecticidal soap and apply them in early morning or late evening when beneficial insects aren’t active. Spray only affected areas rather than coating everything, and follow the label mixing rates exactly. Control humidity by spacing plants 6 to 12 inches apart for good airflow, water at soil level instead of overhead to keep leaves dry, and prune lower branches to improve air circulation underneath the canopy. This balanced approach keeps your crops healthy while protecting the helpful ecosystem you’re building.
Hardening Plants For Transplanting
Your seedlings and potted plants have been living pretty comfortably indoors with steady temperatures, filtered light, and no wind to worry about—but they’re not quite ready for the harsh outdoor world yet. That’s where hardening comes in. This acclimatization process gradually exposes your plants to outdoor conditions over 7–14 days, which reduces transplant shock and builds their strength for the big move.
During this transition period, you’ll want to monitor temperature swings, light intensity, humidity levels, and wind exposure with a careful eye. Use shade cloths or temporary shelters made from burlap or frost cloth to simulate the gradual increase in outdoor light and conditions your plants will eventually face. This slow introduction prevents leaves from getting scorched and helps roots adjust at their own pace.
Keep watch for pests during this vulnerable time, since moving plants around makes them more susceptible to insects and disease. Scout the undersides of leaves and stems regularly, and remove any pests you spot by hand or with a quick spray of neem oil if needed.
Water your plants thoughtfully during hardening—you want to build their drought tolerance gradually without drowning the roots. Let the soil dry out slightly more than you would indoors, but not so much that leaves wilt. This mild stress actually strengthens plants and prepares them for less-frequent watering outdoors.
Finally, match your transplanting timeline to your local weather patterns and soil conditions. Spring soil that’s still cold and soggy will shock warm-loving plants, so wait until soil temperature reaches at least 60°F before moving anything permanent outside. This deliberate preparation turns tender greenhouse plants into sturdy outdoor growers ready for whatever comes their way.
Nursery Business Basics: Licenses, Costs, and Profitability
Turning plant passion into a legal business starts with paperwork. In New York, getting a nursery license takes about two hours and costs $100 for a two-year term. Expect periodic inspections checking for pests and invasive species—this protects both your reputation and your neighbors’ plants.
The financial entry point is genuinely low. You can begin with seeds and cuttings you already have, spending nothing upfront. Start by test-growing 10 to 20 units to see what customers actually want before you quit your day job. This approach lets you learn the market without risking serious money.
Once you’re ready to scale, costs come from stock plants, pots, soil, irrigation systems, and greenhouse space. A basic setup might include 4-inch pots, potting mix, drip lines, and shelving—expenses that grow directly with how many plants you want to produce. Calculate these costs per unit so you know your actual expenses before setting prices.
You’ll sell to different buyers: individual gardeners, garden centers, landscapers, and wholesale operations. Seeds, cuttings, potted plants, and bare-root specimens each appeal to different customers. Your reputation becomes your biggest sales tool—word-of-mouth from satisfied customers brings repeat business and referrals.
Staying legal means following state import and export rules plus pest regulations specific to your region. These rules exist for good reason, and following them keeps your operation running smoothly without surprise shutdowns or fines.


