Plant bare-root roses in late March or April by soaking the roots overnight first. This softens them up and helps them absorb water before going into the ground. Set the graft union—that knobby spot where the rose was grafted onto rootstock—about two inches below the soil surface. This protects it from winter damage and encourages stronger root development.
Summer’s your window for container roses since they’re already established and ready to go. Dig a hole deep enough to accommodate the entire root ball without cramping it. Water twice weekly during hot spells, checking the soil two inches down to see if it’s dry before you water again.
Fall planting works well for bare-root varieties, but time it carefully. Plant at least six weeks before your first hard frost so the roots can settle in before the ground freezes solid. After planting, spread three to four inches of mulch around the base—wood chips or shredded bark work nicely. This layer insulates the roots and keeps soil moisture from evaporating during temperature swings. Different seasons each have their own rhythm, and matching your planting to the calendar means your roses spend their energy growing roots instead of fighting stress.
Choosing Your Rose and Site Before You Plant

Choosing Your Rose and Site Before You Plant
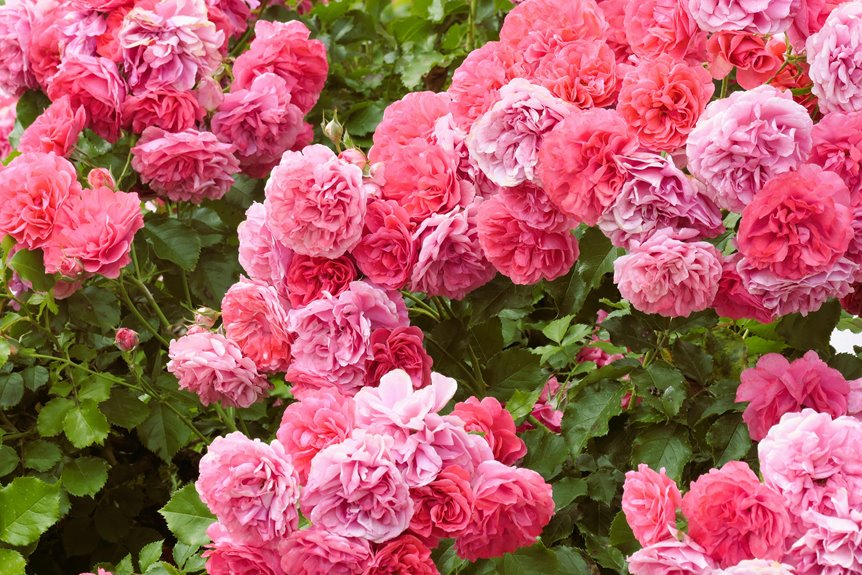
Start by picking hardy varieties suited to your climate. Shrub roses are particularly good choices if you want low-maintenance plants that won’t demand constant attention. Once you’ve settled on a type, find a spot that gets 6–8 hours of direct sunlight daily—roses really do need this amount to produce healthy blooms and strong growth.
Hardy shrub roses thrive in low-maintenance gardens when planted in spots receiving 6–8 hours of daily direct sunlight.
Your soil setup matters just as much as location. Roses prefer earth that drains well while holding onto nutrients, so work 4–6 inches of compost or aged manure into the top 8–12 inches of your planting bed. This amendment gives roots both the food they need and the drainage space they want, preventing the soggy conditions that lead to root rot.
Timing affects your planting approach too. Bare-root roses demand immediate planting when they arrive at your door, while container roses give you flexibility to plant anytime during the growing season. Space each plant at least 3 feet apart—this breathing room lets air circulate around the stems and leaves, reducing disease problems before they start.
Spring: Plant Bare-Root Roses Before Growth Begins

Plant your bare-root roses in late March or April, right when spring arrives but before new growth starts. Soak those dormant roots overnight first—this rehydrates them after their time in storage and prepares them for planting.
Dig a hole wide and deep enough to spread the roots comfortably without bending them. Set the graft union (that knobby joint where the rose variety connects to the rootstock) about 2 inches below the soil surface. This positioning protects the graft from temperature swings and encourages the plant to develop its own roots above the graft point, which creates a stronger root system overall.
Backfill with a mix of peat moss and your garden soil, pressing gently as you go to eliminate air pockets. Water thoroughly after planting to settle everything in place and help roots make contact with the soil. This initial watering also gets the whole establishment process moving, giving your roses the moisture they need during those critical first weeks of growth.
Timing for Spring Planting
When should you get those bare-root roses into the ground? The timing really does matter more than you might expect. You’ll want to plant them in early spring, right before new growth starts, since this window gives your roots the best chance to establish themselves throughout the growing season.
Bare-root roses need immediate attention once you bring them home. Soak those roots overnight in water before planting—think of it as refreshing them after their journey to your garden. Keep them moist and protected in a cool spot until you’re ready to dig.
Dig your planting hole deep and wide enough to spread the roots out comfortably without bending them. Position your graft two inches below the soil surface. This depth protects the graft union and encourages stronger growth from below ground.
Fill the hole with a mix of quality soil and organic matter like compost or aged bark. Water thoroughly to settle everything down and remove air pockets. Gently firm the soil with your hands rather than stomping, which helps everything make good contact without compacting things too much.
Preparing Bare-Root Plants
Because bare-root roses arrive completely dormant, they’re like sleeping plants waiting for spring’s wake-up call. Timing matters tremendously when you’re working with them. Before planting, soak those bare roots overnight in water to rehydrate them after their shipping journey. Think of it as giving them a refreshing drink before their big move into your garden.
Plant in early spring right as soil becomes workable. Prune away any winter damage first, which signals the plant that growth time has arrived. Dig your hole and position the rose so the graft union sits exactly two inches below ground level. This specific depth protects roots from dehydration and the damage that comes from repeated freeze-thaw cycles.
After settling everything in place, water thoroughly to eliminate air pockets and establish firm contact between roots and soil. This simple step gives your roses their best foundation for healthy growth.
Establishing Root Systems
With your bare-root roses soaked and ready, it’s time to plant them while they’re still dormant. This is when they’ll establish roots most effectively, so timing really does matter here.
Dig a hole twice as wide as your root system and equally deep. Fill the bottom halfway with a soil and peat moss mix—this combination holds moisture while still draining well enough to prevent rot. Position the graft union about 2 inches below soil level, which protects it from winter freezes that would otherwise kill the plant right at that vulnerable spot.
Now settle the rose into the hole and water thoroughly before backfilling. As you refill with soil, create a slight channel or basin around the base. This little depression catches water and directs it down to the roots rather than letting it run off across the surface.
The key to success during establishment is keeping the soil consistently moist but not soggy. Check the soil a few inches down with your finger every few days—it should feel like a wrung-out sponge. Your attention to watering in these first weeks pays off with stronger, deeper roots that support healthier plants down the road.
Summer: Plant Container Roses and Maintain Consistent Care

How’s your garden looking as temperatures climb? Summer between April and midsummer is ideal for planting container roses, and the work you put in now pays off all season. Start by digging holes deep and wide enough to accommodate the entire root ball comfortably. Mix the bottom layer with equal parts peat moss, garden soil, and compost to give roots a nutrient-rich foundation they can settle into easily.
Consistency becomes your best friend once plants go in the ground. Water deeply at least twice weekly during hot, dry periods, and more often during heat waves when the soil dries faster. Always water at the soil base using soaker hoses when possible, since wet foliage invites mildew and fungal problems. Apply 2 to 3 inches of mulch around each plant to lock in moisture and keep roots cooler when the sun beats down hard.
Good air circulation around your roses prevents disease and lets them breathe. Keep the soil immediately surrounding each plant free of weeds, which compete for water and nutrients your roses need. This blend of regular watering, thoughtful mulching, and basic maintenance builds plants with strong root systems that produce better blooms throughout the season.
Fall: Plant Roses Six Weeks Before the First Frost

You’ll want to plant your bare-root roses at least six weeks before your area’s first expected frost, which gives those roots time to settle in before winter arrives. Keep your soil consistently moist—not waterlogged—and add a thick 2-4 inch layer of mulch around the base to insulate roots from the cold. Mulch also helps rainfall soak in gradually rather than running off, doing some of the watering work for you. During dry spells, water deeper to encourage strong root establishment before the ground freezes.
Timing Before First Frost
Before winter locks the ground solid, fall gives you the perfect window for planting roses. You’ll want to get bare-root roses in the ground at least six weeks before your first frost date. This timing matters because it gives roots those essential weeks they need to establish themselves before winter dormancy sets in.
Here’s why this deadline actually works:
Cooler soil temperatures slow down top growth while roots develop underground without competing for energy. Autumn rainfall naturally supports root establishment, which means you’re not out there watering constantly through the season. Bare-root roses planted in fall develop stronger root systems that handle winter better than roses planted the following spring. You’re also working with the rose’s natural dormancy cycle, which makes the whole process smoother.
After planting, deep watering settles the soil around the roots and removes air pockets that could damage them. Once that’s done, pile on 3 to 4 inches of mulch around the base of each plant. This insulation protects the graft union from wild temperature swings and keeps soil moisture more consistent through freeze-thaw cycles.
When spring warmth returns and the rose breaks dormancy, those established roots are ready to push out vigorous new growth. That’s when you’ll see the payoff from your fall timing work.
Watering And Moisture Management
Once your bare-root roses settle into their holes, water becomes quietly important to root development. Keep soil moisture consistent—think of it like a wrung-out sponge, not a swamp. During fall planting, natural autumn rainfall often handles much of the work, but don’t get lazy about it. Check two inches down into the soil; if it’s dry, you need to water.
This is where mulch steps in as your reliable partner. Layer three to four inches around the base, leaving a few inches of space near the stem to prevent rot and disease. Mulch acts as insulation that locks in moisture while temperatures drop and wind picks up. You’ll water less frequently because the mulch does some of the work for you, while also protecting those new roots from wild temperature swings.
Water deeply but less often rather than giving shallow sprinkles every day. Deep watering pushes roots downward into cooler soil, which builds the kind of root system that handles winter dormancy well. Shallow, frequent watering keeps roots near the surface where they’re more vulnerable to frost damage and drying winds.
Mulching For Root Insulation
How does mulch become your roses’ winter bodyguard? The answer lies in a simple practice that experienced gardeners rely on year after year: piling generous mulch around your rose bases before cold weather hits.
Here’s what this protective layer actually does for your plants:
- Pine bark mulch insulates roots when temperatures drop below freezing, keeping soil warmer than the air around it
- It slows down moisture loss from the soil during those dry, cold months
- The barrier keeps soil temperature from swinging wildly between freezing nights and warmer days, which stresses dormant plants
- It blocks weeds from competing with your roses for limited water and nutrients
About six weeks before your first frost date, mound pine bark mulch 3–4 inches deep around each rose’s base, but keep it a few inches away from the canes themselves. This layer holds soil moisture steady while protecting those tender roots from the worst winter has to offer. You’re not just piling on mulch—you’re giving your roses the conditions they need to emerge healthy come spring.
Winter: Protect Roses and Plan Ahead

As temperatures drop and your garden shifts into dormancy, your roses actually need you most. Most modern roses—hybrid teas, grandifloras, and floribundas—require winter protection to survive cold months reliably. Start protective measures in mid-November by mounding soil or mulch around the base, about twelve inches high, to insulate roots from harsh freezes.
Most modern roses require winter protection to survive cold months—mound soil or mulch around the base by mid-November.
After the first killing frost, remove fallen leaves and flower debris that harbor overwintering diseases. This cleanup step prevents fungal problems from spreading when you prune in spring. Skip fall pruning entirely; save that task for spring instead, when you can see which canes survived winter and which didn’t.
Rabbits, mice, and voles girdle bark and snap stems during winter months. Install protective barriers or fencing around vulnerable plants to keep these animals from damaging your canes.
Winter offers perfect timing for planning ahead. Browse catalogs and seed companies while sitting by a warm window, select hardy cultivars that match your climate zone, and sketch next year’s garden design on paper. You’re not just protecting roses right now—you’re thinking through spring’s possibilities while the garden rests.
Rose Care Calendar: Month-by-Month Tasks

Now that you’ve tucked your roses in for winter, it’s time to map out what you’ll actually do month by month to keep them happy year-round. A solid care calendar means you’re working with the seasons instead of constantly guessing what comes next.
Spring (March–May)
Early spring is when you’ll plant bare-root roses, making sure to set the graft union about 2 inches below soil level. This positioning protects that vulnerable spot from temperature swings and drying winds. Water deeply twice weekly during this season—that means soaking the soil 6 to 8 inches down rather than sprinkling the surface. Container-grown roses can go in the ground anytime during spring, though planting in morning or late afternoon prevents transplant shock from the day’s heat.
Summer (June–August)
Keep the soil consistently moist through the heat, checking the top inch with your finger before watering. A 3 to 4-inch layer of mulch (wood chips or shredded bark work well) keeps roots cooler and reduces water loss on hot days. Morning watering is better than evening since it gives leaves time to dry before nightfall, which helps prevent fungal issues.
Fall (September–November)
Bare-root roses need planting at least 6 weeks before your first frost date so roots can settle in before the freeze. Rich soil matters here—mix in 2 to 3 inches of compost or aged manure before planting to give roots something good to establish into. Space plants 3 feet apart to account for their mature size and allow air circulation between them.
Winter (December–February)
Non-hardy varieties need protection in cold climates. Mound soil or mulch 8 to 10 inches high around the base of each plant, or use rose cones or burlap wrapping in areas where temperatures drop below zero. This isn’t optional if your roses won’t survive your winter cold—it’s just practical plant survival.


