Pick a spot that gets eight to ten hours of sunlight daily and has soil that drains well—standing water will rot your crowns. Dig a trench six inches deep and mix compost into the bottom, which gives your asparagus the organic matter it needs to establish strong roots. Create a small soil mound inside the trench to help the roots spread naturally.
Space your crowns about eighteen to twenty-four inches apart, fan the roots out flat against the mound, then cover them with just two to three inches of soil at first. Water thoroughly after planting, but don’t pack the soil down hard since roots need air pockets to grow. As the shoots emerge over the coming weeks, gradually add more soil to fill the trench completely.
The real work happens after planting. You’ll need to pull weeds consistently for two full years while the bed develops its root system and strength. This patience pays off because a well-established asparagus bed can produce for fifteen to twenty years once it gets going, so putting in the early effort saves you constant replanting down the road.
Step 1: Choose a Sunny, Well-Drained Site for Your Asparagus Bed

The right location sets up your asparagus bed for success, so pick your spot thoughtfully. You’re hunting for a sunny spot that gets eight to ten hours of sunlight each day—full sun is what asparagus really wants to produce well.
Next, think carefully about soil drainage. Asparagus plants hate sitting in water, so skip any low spots where puddles stick around after rain. Poor drainage invites crown rot, which can wipe out your whole bed in one season. Dig down twelve to eighteen inches and mix in plenty of organic matter—compost, aged manure, or peat moss work nicely—to loosen the soil and help water move through it.
While you’re working the soil, check the pH too. Asparagus prefers slightly alkaline conditions, right around 7.0 to 7.2. This pH range lets the plant grab nutrients it needs without struggling. Getting these details right now means you’re setting yourself up for steady harvests year after year.
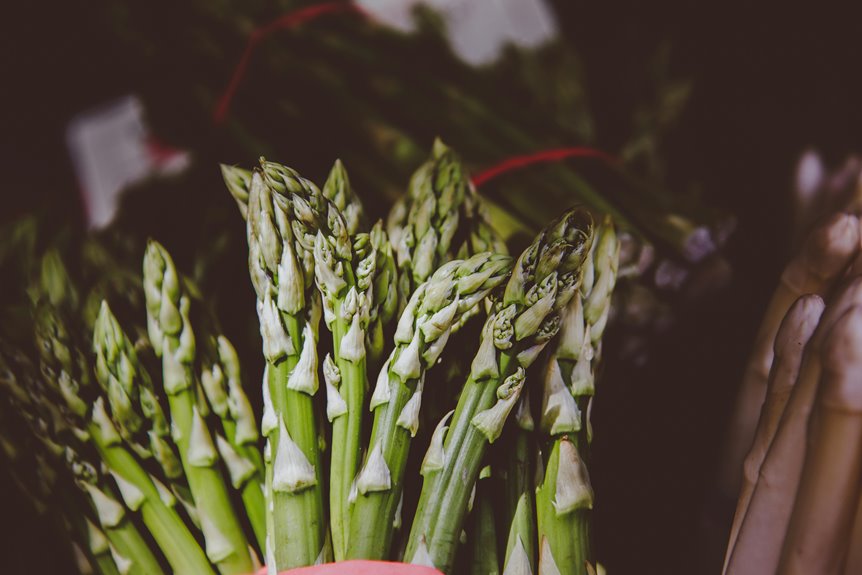
Step 2: Dig Your Trench and Mix in Compost

Now that you’ve picked your perfect sunny spot with great drainage, it’s time to get your hands dirty—literally. Dig a trench that’s 6 inches deep and 12–15 inches wide, giving your asparagus crowns plenty of room to stretch their roots. Mix compost or well-rotted organic matter into the trench bottom and sides to build that nutrient-rich foundation your plants need for strong growth and better soil structure.
Create a small mound of soil in the center of your trench. Position your asparagus crowns on top with buds facing upward—think of it as giving them a throne to sit on. Spread the roots evenly over the mound so they make good contact with the soil, then cover with 2–3 inches of soil to finish the job. You’re basically building the perfect home for your future harvests.
Step 3: Position Your Crowns and Spread the Roots

Place each asparagus crown on a small mound of soil in your trench, positioning them about 6 inches deep and spacing them 18–24 inches apart. This spacing gives roots plenty of room to spread without competing for nutrients. Spread the roots outward evenly across the soil, almost like fanning them out with your fingers. Good contact between roots and soil matters because it helps the plants establish themselves faster and stronger.
Cover the roots with just 2–3 inches of soil at first—resist the urge to bury them completely right away. As spring growth begins and shoots emerge, you’ll gradually add more soil or compost in layers, adding about 2 inches each time. This step-by-step approach prevents the crowns from sitting in waterlogged soil while still giving them the coverage they need. By gradually filling the trench over the growing season, you’re setting up your asparagus plants for years of solid harvests down the road.
Step 4: Backfill the Trench and Water Thoroughly

Once you’ve spread those roots out like a fan across the soil mound, it’s time to fill in the trench and water everything in. Start backfilling with soil, covering the crowns with about 2 inches initially. This shallow depth protects your roots while they’re getting established in their new home.
Water generously once you’ve completed the backfill. This settles the soil around your roots and pushes out air pockets that could interrupt growth. You’re looking for that sweet spot—moist soil that drains reasonably well, not a swampy mess that sits soggy.
A few things to keep in mind during this step. Don’t pack the soil down hard as you’re filling the trench, since compacted soil makes it harder for new roots to push through. Maintain even moisture levels throughout the backfill area without waterlogging things. Spring will bring new shoots poking up through the soil, and you’ll gradually add more soil on top as growth appears—this gradual covering helps your shoots reach for the light while the crowns stay protected underneath.
Step 5: Keep Your Bed Weed-Free for the First Two Years (No Harvesting)

What’s the hardest part about growing asparagus? Patience. For two full years, you’ll watch those tender spears push through your soil and resist the urge to harvest them.
Your asparagus crowns need this time to build a strong root system underground, and that foundation determines how well your bed produces for the next decade. It feels counterintuitive, but skipping the harvest now means way more spears later.
Spread four to six inches of straw or shredded leaves across your bed to do two jobs at once: it locks in moisture around your plants and blocks weeds from competing for nutrients that your developing crowns need. Walk through regularly during those early growth weeks and pull out any weeds by hand before they get established. The weeds might seem small, but they’re hungry for the same resources your young plants are.
Water your bed regularly since moisture matters a lot right now. When your plants start coming up, add a light layer of balanced fertilizer or compost, but don’t go overboard with heavy feeding. Your crowns are building roots, not storing energy for massive top growth yet.
The payoff for holding back comes in year three and beyond, when your well-established bed starts producing the abundant harvests that make asparagus worth growing.


