We’ve all walked through stunning gardens and wondered how to achieve that perfect blend of natural beauty and structured elegance. The secret often lies in one versatile material that’s been transforming outdoor spaces for centuries: bricks. These humble building blocks offer endless possibilities for creating focal points pathways and functional features that’ll make your neighbors stop and stare.
Brick garden projects aren’t just about aesthetics—they’re about creating lasting value in your outdoor space. Whether you’re working with a sprawling backyard or a cozy urban plot we’ll show you how bricks can solve common landscaping challenges while adding character and charm. From simple border edging to elaborate raised planters these earthy materials work beautifully with any garden style.
Ready to transform your garden into a masterpiece? We’re diving into creative brick ideas that’ll help you build the outdoor sanctuary you’ve always dreamed of without very costly.
Create Stunning Brick Garden Pathways and Walkways
Brick pathways transform ordinary gardens into elegant outdoor spaces that guide visitors through your industry design. These durable walkways combine practicality with timeless beauty to create focal points that enhance your garden’s overall appeal.
Herringbone Pattern Walkways
Herringbone brick patterns create sophisticated pathways that add visual interest and texture to any garden space. This classic design uses rectangular bricks arranged in a zigzag formation where each brick sits at a 90-degree angle to its neighbors.
Installation benefits include:
- Enhanced slip resistance due to interlocking brick placement
- Superior structural stability for high-traffic areas
- Timeless aesthetic appeal that complements traditional and modern gardens
- Easy maintenance with individual brick replacement options
We recommend using standard clay bricks measuring 4 inches by 8 inches for optimal herringbone results. Start your installation by creating a level sand base approximately 2 inches deep. Place each brick tightly against adjacent pieces to minimize gaps and prevent weed growth.
Cost considerations typically range:
| Project Size | Material Cost | Labor Cost | Total Investment |
|---|---|---|---|
| 50 sq ft | $150-250 | $200-400 | $350-650 |
| 100 sq ft | $300-500 | $400-800 | $700-1,300 |
| 200 sq ft | $600-1,000 | $800-1,600 | $1,400-2,600 |
Curved Brick Garden Paths
Curved pathways create flowing movement through garden spaces while softening harsh geometric lines in industry design. These graceful walkways work particularly well in cottage gardens, woodland settings, and informal outdoor spaces.
Design techniques for successful curves include:
- Using flexible edging materials like plastic or metal strips
- Cutting bricks at angles to accommodate tight radius turns
- Creating gentle sweeping curves rather than sharp angular changes
- Planning sight lines to reveal garden features around each bend
Soldier course edging provides the most effective method for maintaining clean curve boundaries. Install bricks vertically along the pathway edges to create defined borders that prevent spreading and maintain structural integrity over time.
Popular curve styles feature:
- Serpentine paths that wind through planted areas
- Gentle arcs connecting garden rooms or activity zones
- S-shaped designs that maximize walking distance in small spaces
- Circular patterns around focal points like fountains or sculptures
Mixed Material Path Combinations
Mixed material pathways combine bricks with complementary materials to create unique design statements and reduce overall project costs. These combinations offer endless creative possibilities while maintaining the classic appeal of brick construction.
Effective material pairings include:
- Brick borders with gravel or crushed stone centers
- Alternating brick sections with natural flagstone panels
- Brick edging with decomposed granite walking surfaces
- Reclaimed brick accents within concrete pathway designs
Stepping stone patterns work exceptionally well when combining bricks with groundcover plants like creeping thyme or moss. Space individual brick sections 18 to 24 inches apart to allow comfortable walking while creating planted gaps between each stepping area.
Installation considerations require:
- Proper drainage planning for different material absorption rates
- Consistent height leveling across all surface materials
- Appropriate base preparation for each material type
- Weather-resistant jointing compounds for material transitions
Cost savings of 30 to 50 percent become achievable when mixing expensive materials like natural stone with affordable brick elements. Plan your material ratios carefully to maximize visual impact while staying within budget constraints for your garden pathway project.
Build Beautiful Brick Garden Borders and Edges

Brick borders transform ordinary garden spaces into polished landscapes with defined structure and visual appeal. We’ll explore three essential techniques that create stunning boundaries while solving common gardening challenges.
Raised Garden Bed Borders
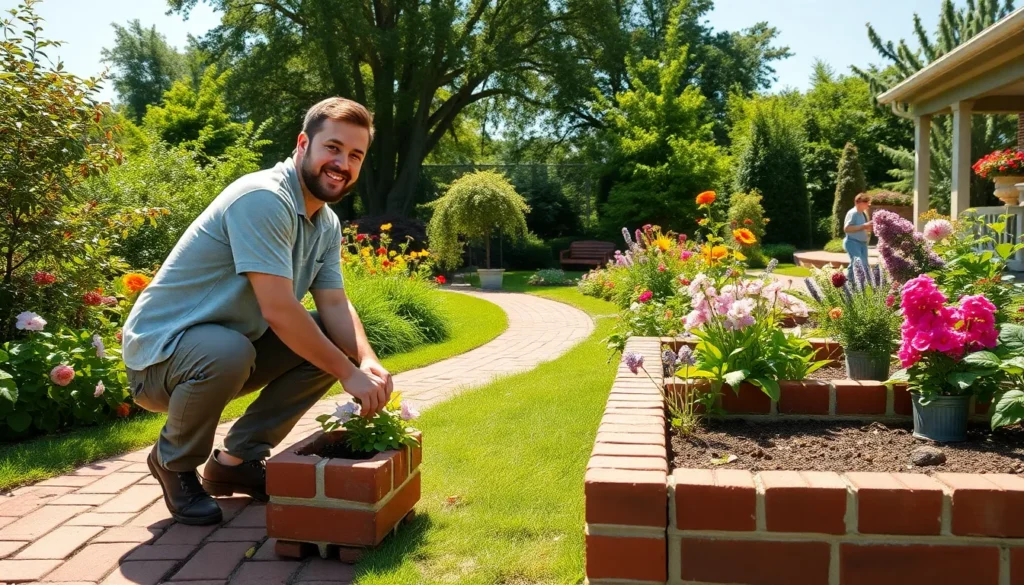
Double stacking bricks creates elevated borders that contain soil effectively while adding architectural interest. We recommend this approach for gardeners seeking both function and beauty in their planting areas. The raised structure prevents soil erosion and provides additional growing space for shallow rooted plants like herbs and lettuce.
Customizing border height depends on your garden’s exact needs and aesthetic preferences. Multi level brick stacking supports cascading plants such as trailing petunias or decorative stones for enhanced visual texture. This technique works particularly well for vegetable gardens where contained soil helps maintain consistent moisture levels.
Two tier configurations offer the perfect balance between practicality and visual impact. The elevated design makes weeding and harvesting easier while creating clear separation between different plant zones. We’ve found that raised brick borders reduce maintenance time by preventing mulch from washing away during heavy rains.
Lawn Edge Definition
Laying bricks along lawn perimeters creates crisp transitions between grass and garden beds. This edging technique prevents grass from encroaching into flower beds and makes mowing significantly easier. The clean lines instantly make yards appear more organized and professionally maintained.
Brick barriers act as protective boundaries that maintain lawn integrity over time. We’ve observed that homeowners with brick edging spend less time on yard maintenance because the defined borders eliminate the need for frequent re edging. The bricks create a mowing strip that allows lawn equipment to run smoothly along garden bed edges.
Installation involves setting bricks flush with ground level for seamless mower operation. This positioning ensures that mower blades won’t catch on raised edges while maintaining the visual boundary between planted areas and turf. The technique works equally well for both formal and informal garden designs.
Tree Ring Enclosures
Circular brick edging around trees highlights their architectural presence while protecting root systems. We recommend this technique for showcasing specimen trees like Japanese maples or flowering dogwoods. The enclosure prevents damage from lawn equipment and creates a dedicated space for tree care activities.
Root protection becomes essential for maintaining tree health in active garden areas. The brick barrier prevents soil compaction around the tree base and helps retain moisture and mulch where it’s needed most. This technique particularly benefits newly planted trees that require consistent watering and soil conditions.
Companion planting within brick enclosures adds color and texture around tree bases. We suggest using shade tolerant plants like hostas or coral bells inside the circular borders for year round interest. Single or tiered layer designs accommodate different tree sizes and can be expanded as trees mature and their canopies spread.
Design Eye-Catching Brick Garden Walls and Structures

Taking your garden design beyond simple borders and pathways opens up exciting possibilities for creating stunning vertical features. We can transform ordinary outdoor spaces into architectural masterpieces using strategic wall construction and decorative elements.
Retaining Wall Construction
Brick retaining walls provide essential structure for sloped gardens while creating distinct zones throughout your industry. We recommend using traditional red bricks to build walls that support elevated garden beds and prevent soil erosion on hillsides. Slanted brick walls add dramatic visual interest by following the natural contours of your garden’s slope, creating a seamless transition between different elevation levels.
Building these functional structures requires proper foundation work and drainage considerations to ensure long term stability. We suggest incorporating drainage pipes behind retaining walls to prevent water buildup that could compromise the structure. Height restrictions typically limit DIY retaining walls to 3 feet, making them perfect for most residential garden applications.
Privacy Wall Features
Brick boundary walls enhance both privacy and curb appeal by creating elegant barriers around your property perimeter. We can design front facing brick walls that complement your home’s exterior architecture while providing security and noise reduction. Curved garden walls work exceptionally well around outdoor dining areas and patios, offering intimate spaces for entertaining while maintaining visual flow.
Installing brick garden walls with steps creates grand entrances that welcome guests with impressive architectural detail. Red brick construction paired with matching steps on either side establishes a formal garden entrance that increases property value significantly. These privacy features typically range from 4 to 6 feet in height for optimal screening without overwhelming smaller garden spaces.
Decorative Garden Wall Accents
Brick planters built into garden walls create stunning focal points while providing growing space for flowers, succulents, and herbs. We can construct these planters in geometric shapes like rectangles and circles, or design more creative curved forms that complement your garden’s overall aesthetic. Brick arches and pergolas serve as dramatic architectural features that provide both shade and structural interest throughout the growing season.
Metal and brick combinations offer modern design flexibility by mixing materials like dark stained wood posts with traditional brick columns. We recommend incorporating brick seating areas directly into wall designs to create natural gathering spots that blend seamlessly with your garden’s style. These decorative accents transform basic retaining structures into multifunctional garden features that serve both practical and aesthetic purposes.
Construct Functional Brick Planters and Raised Beds

Building with bricks creates lasting garden features that enhance both beauty and functionality. Custom-made planters offer versatility in various shapes like squares, rectangles, and circular designs perfect for flowers, succulents, and herbs.
Corner Planter Boxes
Corner spaces become valuable garden real estate when we transform them with strategic brick planters. These structures efficiently use areas that often remain underused in traditional garden layouts.
Designing corner planters requires careful consideration of both square and rectangular configurations. Square designs work exceptionally well in tight spaces while providing maximum planting area. Rectangular corner boxes extend along fence lines or property boundaries.
Building these planters involves creating sturdy foundations that support soil weight and plant growth. Proper drainage prevents water accumulation that damages both plants and brick structures. Corner placement naturally provides wind protection for delicate plants like herbs and succulents.
Tiered Garden Bed Systems
Multiple levels create dramatic visual impact while maximizing growing space in compact areas. Brick tiered systems allow us to establish distinct planting zones for different plant types and growing requirements.
Constructing tiered beds starts with the lowest level foundation and builds upward systematically. Each tier requires independent drainage systems to prevent water overflow between levels. Height variations create natural focal points that draw attention throughout the garden.
Planning these systems involves considering mature plant sizes and growth patterns. Lower tiers accommodate spreading plants while upper levels showcase specimen plants and vertical growers. Accessibility remains crucial for maintenance tasks like watering and pruning.
Built-In Seating Planters
Combining seating with planters creates multifunctional garden elements that serve both practical and aesthetic purposes. These integrated designs establish natural gathering spaces while maintaining growing areas for plants.
Bench style planters incorporate comfortable seating heights between 16 and 18 inches for optimal comfort. Planter sections can flank seating areas or integrate directly into bench designs. Strategic placement near patios or along pathways creates natural rest stops.
Construction requires reinforced foundations to support both soil weight and human occupancy. Proper spacing between seating and planting areas prevents overcrowding while maintaining easy access. Weather resistant materials ensure longevity in outdoor conditions year round.
Install Charming Brick Patio and Seating Areas

We can transform our outdoor living spaces by creating stunning brick patios that serve as the foundation for memorable gatherings and relaxation.
Traditional Brick Patio Layouts
Traditional layouts feature symmetrical designs that bring timeless elegance to our outdoor spaces. We often use classic patterns like herringbone or running bond to add visual interest and create a warm, inviting atmosphere. These layouts can be enhanced with brick borders or edging around the patio perimeter, creating clean lines that define the space.
Pairing traditional layouts with complementary garden elements like planters or fountains creates a cohesive look throughout our outdoor area. We find that symmetrical designs work particularly well with formal garden styles, providing structure and balance to the overall industry design.
Fire Pit Surrounds
Fire pit surrounds built with bricks create cozy gathering spots for chilly evenings and year round entertainment. We can construct these surrounds to contain the fire pit while adding a rustic touch that complements our garden’s natural elements.
Brick surrounds offer excellent heat retention and safety features compared to other materials. We recommend building circular or square designs that accommodate seating arrangements around the perimeter. These structures typically require 2 to 3 courses of bricks to provide adequate containment while maintaining an appropriate height for comfortable seating.
Garden Bench Foundations
Garden bench foundations made from bricks ensure our seating remains stable and secure throughout all seasons. We create these sturdy foundations to support benches in areas with heavy foot traffic, preventing settling or shifting over time.
Building brick foundations involves laying a level base that distributes weight evenly across the ground surface. We typically construct foundations that extend 6 inches beyond the bench dimensions on all sides, providing maximum stability. These foundations work particularly well in areas where the ground may be uneven or prone to erosion, ensuring our seating areas remain functional and attractive for years to come.
Create Unique Brick Water Features and Fountains

Water features add tranquil sounds and visual interest to any garden space. Brick construction provides the perfect foundation for creating stunning aquatic elements that blend seamlessly with your industry design.
Brick Fountain Bases
Building a sturdy foundation transforms any ordinary fountain into a striking garden centerpiece. We recommend constructing your base using traditional red bricks, which offer exceptional durability and complement most garden styles naturally.
Start by excavating a circular area approximately 6 inches deep and 2 feet wider than your fountain diameter. Create a level gravel base using 4 inches of compacted stone, then lay your first course of bricks in a circular pattern. Each subsequent layer should overlap the joints below, ensuring structural stability for years to come.
Consider incorporating electrical conduit during construction to safely route power cables to your fountain pump. This planning prevents future excavation and maintains the professional appearance of your water feature. Most brick fountain bases require 3-4 courses of bricks to achieve proper height and visual proportion.
Installation costs typically range from $200-500 for materials, depending on your chosen fountain size and brick quality. Professional installation adds $300-800 to the total project cost, though many homeowners successfully complete this as a weekend DIY project.
Pond Edge Treatments
Decorative brick edging transforms simple water gardens into sophisticated industry features that enhance your property value significantly. We’ve found that properly installed brick pond edges provide both functional benefits and aesthetic appeal that lasts for decades.
Position your bricks flush with the pond liner edge, creating a seamless transition between water and garden areas. This technique prevents liner exposure while providing a stable walking surface around your pond perimeter. Use a rubber mallet to ensure each brick sits level and secure.
Mortar joints between bricks create professional results and prevent shifting over time. Apply weatherproof mortar specifically designed for outdoor water applications, smoothing joints with a pointing tool for consistent appearance. Allow 24-48 hours for complete curing before filling your pond.
Creative patterns like herringbone or basket weave add visual interest without overwhelming smaller pond designs. These patterns work especially well for ponds measuring 8×10 feet or larger, where the pattern detail becomes clearly visible from typical viewing distances.
Drainage Channel Answers
Strategic brick drainage channels solve common water management problems while adding attractive hardscape elements to your garden design. We’ve successfully used these answers to redirect rainwater, prevent erosion, and create interesting visual pathways throughout industry projects.
Construct channels by laying bricks in a V-shaped pattern, creating natural water flow toward designated drainage areas. This method works particularly well for managing roof runoff or redirecting water away from foundation plantings. Each channel should maintain a minimum 2% grade to ensure proper water movement.
French drain integration with brick channels provides both surface and subsurface water management capabilities. Install perforated drainage pipe beneath your brick channel, surrounding it with gravel before laying your decorative brick surface. This dual system handles heavy rainfall while maintaining visual appeal.
Decorative channel designs can incorporate curved patterns that follow natural industry contours beautifully. These organic curves complement garden plantings while effectively managing water flow during storm events. Most residential drainage channels require 100-200 bricks for typical 50-foot installations.
Maintenance involves annual inspection and occasional brick releveling, typically costing $50-100 for professional servicing. Regular cleaning prevents debris buildup that could compromise drainage effectiveness during heavy rainfall periods.
Add Decorative Brick Accents and Artistic Elements

We can transform our gardens into stunning artistic showcases by incorporating decorative brick elements that serve as both functional features and eye-catching focal points. These creative applications go beyond basic construction to celebrate the artistic potential of bricks in garden design.
Mosaic Brick Patterns
Patterned paths using herringbone or basket weave designs create visually striking walkways that add texture and sophistication to our outdoor spaces. We can arrange bricks in these traditional patterns to guide visitors through different garden areas while showcasing our attention to detail.
Creating brick mosaic art pieces allows us to express personal creativity through permanent garden installations. We might design a mosaic tabletop using broken brick pieces in colorful arrangements or create intricate wall art that complements our garden’s theme.
Installing geometric brick patterns in sitting areas or courtyards establishes defined spaces with artistic flair. We can combine different brick colors and sizes to create medallion patterns or radiating designs that serve as natural gathering spots.
Sculptural Brick Arrangements
Building brick columns throughout our gardens provides vertical interest while supporting climbing plants or serving as standalone architectural features. We can vary column heights and widths to create rhythm and movement across the industry.
Designing decorative brick archways creates natural transitions between different garden rooms or frames scenic views. We can construct these structures at entry points or use them to highlight special plantings or water features.
Constructing brick maze layouts or labyrinth patterns offers interactive garden experiences that engage visitors while providing meditative walking paths. We can scale these designs to fit available space and incorporate low plantings between brick sections.
Vintage Brick Display Features
Using reclaimed bricks to create rustic planters brings historical character and sustainable practices to our garden designs. We can arrange these weathered materials in casual, organic shapes that complement cottage garden styles or informal industry themes.
Building vintage brick borders with intentionally irregular patterns celebrates the imperfect beauty of aged materials. We can mix different brick sizes and colors to create borders that look naturally weathered and established.
Creating display walls using antique bricks as backdrop features showcases special plants or garden collections while adding textural interest. We can arrange these bricks with wider mortar joints or stack them without mortar for a more casual, rustic appearance.
Incorporate Recycled and Reclaimed Brick Projects

Transform your garden sustainably by utilizing salvaged materials that bring both character and environmental benefits to your outdoor space. We’ll explore how recycled bricks can create stunning features while reducing waste.
Salvaged Brick Applications
Construct dramatic retaining walls using salvaged bricks to provide essential structure in sloped gardens while adding visual appeal. These walls prevent soil erosion and create level planting areas that maximize your garden’s potential.
Build impressive arches and pergolas that serve as architectural focal points throughout your industry. Salvaged bricks create sturdy frameworks for climbing plants like roses, clematis, and honeysuckle that transform into living sculptures over time.
Design custom garden planters in squares, rectangles, or circles using reclaimed materials. These versatile containers work perfectly for flowers, succulents, or herbs while adding textural interest to patios and walkways.
Create low dividing walls that separate different garden zones such as seating areas, vegetable patches, or meditation spaces. We recommend heights between 12-18 inches for optimal functionality without blocking sightlines.
Weathered Brick Character
Embrace the rustic elegance that weathered bricks bring to garden features through their naturally aged appearance. Time creates unique patina and color variations that new materials simply can’t replicate.
Enhance water features by incorporating weathered bricks around fountains, ponds, or streams. The aged texture complements flowing water while providing slip resistant surfaces for safety.
Develop authentic vintage aesthetics that blend seamlessly with established gardens and mature plantings. Weathered bricks naturally harmonize with existing stone features, wooden structures, and organic garden elements.
Achieve instant character in new garden installations by selecting bricks with varied weathering patterns, moss growth, or natural staining. Each piece tells its own story while contributing to your garden’s unique personality.
Eco-Friendly Garden Answers
Reduce environmental impact by choosing recycled and reclaimed bricks instead of purchasing new materials. This sustainable approach diverts construction waste from landfills while creating beautiful garden features.
Minimize maintenance requirements since brick structures naturally resist weather damage, pest infiltration, and structural degradation. We’ve found that properly installed brick features require virtually no upkeep for decades.
Extend material lifespan by repurposing bricks from demolished buildings, old chimneys, or construction projects. Quality clay bricks often outlast the structures they originally supported.
Lower carbon footprint compared to manufacturing new landscaping materials. Reclaimed bricks eliminate energy intensive firing processes while transportation costs decrease when sourcing locally.
| Eco-Benefit | Impact | Maintenance |
|---|---|---|
| Waste Reduction | Diverts 80-90% from landfills | Annual cleaning only |
| Durability | 50+ year lifespan | Minimal repairs needed |
| Energy Savings | Zero manufacturing emissions | No replacement required |
Maintain and Care for Your Brick Garden Features

Proper maintenance ensures your beautiful brick garden features continue to enhance your outdoor space for years to come. We’ll share essential care strategies that protect your investment and keep your brick elements looking their absolute best.
Cleaning and Preservation
Regular cleaning forms the foundation of effective brick maintenance. Sweeping brick pavers weekly removes dirt and debris before they can cause permanent staining or damage. Power washing your brick features occasionally provides deep cleaning that restores their original appearance and removes stubborn grime buildup.
Weed control requires consistent attention to prevent unsightly growth. Using polymeric sand in paver joints creates an effective barrier against weed germination while stabilizing your brick installation. Manually removing weeds as soon as they appear prevents root systems from damaging your carefully laid brickwork.
Sealing protects your brick investment from weather damage and staining. Applying a quality paver sealer enhances the natural color of your bricks while creating a protective barrier against moisture penetration. Reapplying sealer every few years maintains this crucial protection and keeps your brick features looking vibrant.
Seasonal Maintenance Tips
Spring maintenance focuses on post winter recovery and preparation for active growing season. Inspecting your brick features for winter damage allows you to identify cracked or shifted pavers that need immediate attention. Thoroughly cleaning all brick surfaces after winter removes salt residue and accumulated debris that could cause long term deterioration.
Summer care emphasizes proper drainage and ongoing weed management. Ensuring adequate drainage prevents water from pooling around your brick installations during heavy rainfall periods. Maintaining consistent weed control during peak growing season keeps your brick pathways and borders looking professionally maintained.
Fall preparation protects your brick features from harsh winter conditions ahead. Cleaning fallen leaves and organic debris from brick surfaces prevents staining and moisture retention that can cause freeze thaw damage. Inspecting joints and surfaces for potential weak points allows you to make necessary repairs before winter weather arrives.
Winter protection focuses on moisture management and damage prevention. Protecting pavers from excessive moisture accumulation requires ensuring proper drainage channels remain clear and functional. Avoiding harsh deicing chemicals on brick surfaces prevents chemical damage and premature deterioration of your investment.
Long-Term Durability Strategies
Selecting appropriate materials ensures your brick features withstand decades of use. Choosing pavers that complement your home’s architectural style while meeting durability requirements creates lasting beauty and structural integrity. Matching brick selection to your exact climate conditions prevents premature weathering and extends the lifespan of your installation.
Proper foundation planning prevents costly structural problems down the road. Using adequate gravel or sand base layers provides essential drainage and prevents water accumulation that causes shifting and settling. Planning for thermal expansion and seasonal ground movement protects your brick features from cracking and displacement.
Professional installation guarantees optimal performance and longevity of complex projects. Hiring experienced contractors for intricate brick installations ensures proper leveling and grading that prevents water pooling and structural issues. Investing in professional expertise for challenging projects saves money on future repairs and replacements while ensuring your brick features perform as intended.
Conclusion
We’ve explored countless ways to transform your outdoor space with the timeless appeal of brick. From creating stunning pathways to building functional raised beds these versatile materials offer endless possibilities for every garden size and budget.
The beauty of working with bricks lies in their ability to blend seamlessly with any industry design while providing lasting durability. Whether you choose new materials or embrace the character of reclaimed options you’ll create features that stand the test of time.
Remember that proper maintenance ensures your brick investments continue to enhance your garden for years to come. With the right care and attention your brick features will remain beautiful focal points that add both value and charm to your outdoor sanctuary.
Frequently Asked Questions
What are the main benefits of using bricks in garden design?
Bricks offer exceptional versatility, durability, and aesthetic appeal for outdoor spaces. They create lasting value by providing slip-resistant surfaces, structural stability, and easy maintenance. Brick features enhance both functionality and beauty while being cost-effective compared to other materials. They work well in gardens of any size and can be used for pathways, borders, walls, planters, and decorative accents.
How much do brick pathway projects typically cost?
Brick pathway costs vary significantly based on project size, brick type, and installation complexity. Simple straight pathways are more affordable than elaborate curved designs with intricate patterns. DIY installation reduces labor costs, while professional installation ensures optimal results. Mixed material pathways combining bricks with other materials can provide cost savings while creating unique designs.
What’s the best brick pattern for garden walkways?
The herringbone pattern is highly recommended for garden walkways due to its enhanced slip resistance, superior structural stability, and attractive appearance. This interlocking pattern distributes weight evenly, reduces shifting, and provides excellent traction. It’s also relatively easy to maintain and repair compared to other complex patterns while offering timeless aesthetic appeal.
Can I use recycled bricks for my garden projects?
Yes, recycled and reclaimed bricks are excellent choices for garden projects. They offer unique character with weathered patina, provide environmental benefits by reducing waste, and often cost less than new bricks. Reclaimed bricks work beautifully for retaining walls, planters, and decorative features while contributing to sustainable gardening practices and lower carbon footprints.
How do I maintain brick garden features?
Regular maintenance includes cleaning debris, controlling weeds, and applying sealant to protect against weather damage and staining. Seasonal care involves spring inspections, summer drainage checks, fall preparation, and winter moisture management. Proper foundation planning, quality materials, and professional installation when needed ensure long-term durability and optimal performance of brick features.
What drainage considerations are important for brick planters?
Proper drainage is crucial for brick planters to prevent water damage and plant health issues. Install drainage holes or channels at the base, use appropriate gravel layers, and ensure water can flow away from the structure. Consider the planter’s location, surrounding soil conditions, and accessibility for maintenance when planning drainage systems.
Can brick features work in small gardens?
Absolutely! Brick features are perfect for small gardens as they maximize space efficiency while adding visual interest. Simple border edging, compact raised beds, small seating areas, or decorative accents can transform tiny spaces. Bricks help define areas, create vertical interest, and provide functional solutions without overwhelming limited garden space.
What’s the difference between new and weathered bricks for gardens?
New bricks offer uniform appearance, consistent quality, and predictable performance but may lack character. Weathered or reclaimed bricks provide unique patina, varied textures, and rustic elegance that harmonizes naturally with garden elements. Weathered bricks often have superior drainage properties and blend seamlessly with existing landscape features while offering environmental benefits.
