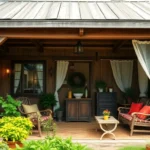
Transform your outdoor space into a stunning industry with railway sleepers – the versatile garden design solution that’s taking backyards everywhere by storm. We’ve discovered that these robust wooden beams aren’t just practical; they’re the secret ingredient to creating professional-looking garden features without very costly.
Whether you’re dreaming of raised flower beds bursting with color or sturdy retaining walls that’ll stand the test of time, garden sleepers offer endless possibilities for both novice gardeners and seasoned landscapers. We’ll show you how these affordable materials can dramatically enhance your garden’s functionality while adding that rustic charm everyone’s raving about.
From edging pathways to building impressive terraced gardens, sleepers have become our go-to recommendation for clients seeking durable and attractive garden answers. Ready to discover why these simple wooden beams are revolutionizing modern garden design?
Raised Garden Beds Using Railway Sleepers
Railway sleepers transform ordinary garden spaces into structured planting areas that maximize growing potential while adding rustic charm to outdoor landscapes.
Creating Tiered Planting Areas
Designing multiple levels gives us the ability to accommodate plants with different growing requirements in a single compact area. We can stack sleepers to create two or three tier systems that work perfectly for herbs, vegetables, and flowering plants.
Starting with the bottom tier requires us to position the first row of sleepers directly on level ground or a gravel base. Each subsequent level sits back approximately 6 to 12 inches from the edge below, creating natural stepping stones for plant access.
Planning plant placement becomes easier when we organize crops by height and water needs across different tiers. Tall plants like tomatoes and beans thrive in back tiers, while lettuce and herbs flourish in front sections where we can easily reach them for harvesting.
Implementing proper drainage between tiers prevents water from pooling and causing root rot in lower levels. We achieve this by drilling drainage holes through sleepers or leaving small gaps between joints where excess water can escape.
Building Corner Joints and Connections
Securing corner connections determines the long term stability of our raised bed structures. We recommend using galvanized coach bolts or heavy duty screws that penetrate at least 4 inches into the sleeper material for maximum holding power.
Creating overlapping joints provides the strongest corner configuration by alternating sleeper ends like building blocks. This method distributes weight evenly and prevents corners from separating under soil pressure or seasonal ground movement.
Using steel brackets offers an alternative connection method for gardeners who prefer not to drill large holes through their sleepers. L shaped brackets attach to the inside corners and remain hidden once we fill the beds with soil.
Reinforcing with rebar adds extra stability to taller raised beds by driving 2 foot lengths of rebar through pre drilled holes and into the ground below. This technique works especially well for beds exceeding 18 inches in height.
Choosing the Right Soil Depth
Determining minimum depths depends entirely on the root systems of plants we intend to grow in our raised beds. Shallow rooted crops like lettuce and radishes need only 6 to 8 inches of soil, while deep rooted vegetables require 12 to 18 inches.
Planning for root vegetables such as carrots and parsnips demands deeper soil preparations of 18 to 24 inches to allow proper root development. We can achieve these depths by stacking multiple sleepers or excavating existing ground before installation.
Considering drainage requirements means we should add an extra 2 to 4 inches beyond minimum plant needs to ensure proper water movement through the soil profile. This additional depth prevents waterlogged conditions that damage plant roots.
Calculating soil volume helps us budget for filling our raised beds efficiently. A standard 8 foot by 4 foot bed with 12 inch depth requires approximately 32 cubic feet of soil, which equals roughly 1.2 cubic yards of material.
Retaining Walls for Sloped Gardens
 1")
Railway sleepers excel at transforming challenging sloped terrain into functional garden spaces. We can create stunning tiered landscapes that maximize both beauty and usability on steep gradients.
Preventing Soil Erosion
Stabilizing sloped ground becomes effortless when we install railway sleeper retaining walls. These robust structures act as barriers against soil movement during heavy rain and strong winds. Ground cover plants like wildflowers establish naturally between wall sections, creating additional erosion protection while improving visual appeal.
Multiple tiers work more effectively than single tall walls for steep slopes. Each level reduces the pressure on the structure below, preventing catastrophic failures during extreme weather events. Stone and concrete materials can complement sleeper installations for mixed material designs that offer superior stability.
Rock gardens integrate seamlessly with sleeper retaining systems. Hardscaping features like staircases connect different levels while providing practical access throughout the terraced space.
Creating Level Planting Surfaces
Tiered retaining walls transform steep slopes into multiple horizontal planting zones. Each level accommodates different plant varieties, allowing us to create diverse garden ecosystems at varying heights. Upper tiers suit drought tolerant plants while lower sections work perfectly for moisture loving species.
Planting areas become more accessible when we break slopes into manageable sections. Maintenance tasks like weeding and harvesting require less physical strain on level surfaces compared to steep inclines. Different plant heights create natural visual layers that add depth and interest to the overall garden design.
Crushed rock walkways connect planting levels while natural flagstone landings provide stable footing. Basalt steps integrate beautifully with sleeper walls, creating organic transitions between garden zones that feel both planned and natural.
Installing Proper Drainage Systems
Water management prevents costly wall failures and plant root damage in sleeper retaining systems. We must incorporate weep holes every 6-8 feet along the wall length to allow water escape from behind the structure. French drains provide comprehensive drainage answers for longer retaining walls.
Gravel backfill creates drainage layers that prevent water buildup against sleeper walls. This aggregate material allows water to flow freely while maintaining structural support for the retained soil. Proper compaction of backfill materials ensures long term stability.
Drainage pipes connect to downhill outlets, directing water away from foundation areas. Surface water diversion becomes critical during heavy rainfall events when saturated soil creates maximum pressure against retaining structures.
Garden Steps and Pathways
 2")
Railway sleepers transform challenging terrain into navigable walkways while adding rustic character to your outdoor industry. These versatile materials create durable connections between different garden levels and zones.
Building Rustic Stair Treads
Building rustic stair treads with railway sleepers creates an authentic outdoor aesthetic that blends seamlessly with natural surroundings. Each step requires secure fastening to prevent slipping and ensure long-term stability. We recommend using galvanized bolts or heavy-duty screws to anchor treads firmly into place.
Level placement becomes crucial when constructing stepped pathways on sloped terrain. Railway sleepers naturally provide the ideal dimensions for comfortable step height and depth. The rustic texture offers excellent grip even in wet conditions, making them safer than smooth materials.
Construction involves measuring consistent rise and run dimensions for each tread. We suggest maintaining a 6-8 inch rise with 12-14 inch depth for optimal comfort and safety. Proper drainage underneath prevents water accumulation that could destabilize the structure over time.
Creating Natural Walking Paths
Creating natural walking paths with railway sleepers helps define distinct garden areas while maintaining an organic flow throughout your industry. Strategic placement guides visitors through carefully planned routes that showcase your best plantings and features. We position sleepers to create gentle curves that feel more natural than rigid straight lines.
Pattern variations add visual interest to pathway design. Alternating sleeper placement creates ever-changing movement while maintaining structural integrity. Single sleepers work well for narrow paths, while double-wide arrangements suit main thoroughfares.
Spacing considerations affect both aesthetics and functionality. We leave 2-3 inch gaps between sleepers for natural drainage and allow grass or ground cover to grow through. This integration softens the hardscape elements and creates a more cohesive garden design.
Adding Safety Features and Lighting
Adding safety features transforms basic sleeper pathways into secure navigation systems for nighttime use. Handrails constructed from matching sleeper materials maintain design consistency while providing essential support on stairs and elevated walkways. We install these railings at 36-inch height for optimal safety and comfort.
Lighting integration enhances both safety and ambiance throughout your sleeper installations. Solar-powered options eliminate wiring complications while providing sustainable illumination. Traditional low-voltage systems offer more consistent brightness but require professional installation for optimal results.
Strategic light placement prevents dark spots that could create safety hazards. We position lights every 6-8 feet along pathways and at each step landing for comprehensive coverage. Recessed fixtures within sleeper surfaces create subtle lighting that doesn’t overwhelm the natural aesthetic while ensuring clear visibility for safe navigation.
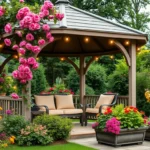
Outdoor Seating and Entertainment Areas
 3")
Railway sleepers transform ordinary gardens into inviting outdoor living spaces perfect for relaxation and gatherings. We’ll explore three key ways to create functional entertainment zones using these versatile materials.
Constructing Built-In Garden Benches
Building permanent seating with railway sleepers creates space-efficient garden furniture that seamlessly integrates into your industry design. We position these sturdy benches along garden paths, around mature trees, or as part of existing patio structures for maximum functionality.
Selecting weather-resistant materials ensures your sleeper benches withstand outdoor conditions year-round. Stone, brick, or treated wood options complement various garden styles while providing the durability needed for permanent installations. We recommend designing bench heights between 16-18 inches for optimal comfort and incorporating back supports where possible.
Adding soft furnishings transforms basic sleeper benches into comfortable seating areas. Outdoor cushions, weather-resistant pillows, and waterproof throws enhance comfort while contributing visual appeal to your garden space. We suggest choosing fabrics that coordinate with your overall outdoor design scheme for a cohesive look.
Building Fire Pit Surrounds
Creating fire pit surrounds with railway sleepers establishes a stunning focal point for outdoor entertaining during cooler months. We arrange seating in circular or semicircular patterns around the fire feature to encourage conversation and provide warmth for evening gatherings.
Choosing appropriate materials for fire pit construction prioritizes both safety and longevity. Stone, brick, concrete, or metal surrounds offer excellent heat resistance and durability for long-term use. We always ensure proper clearance between combustible sleeper seating and the fire pit itself, typically maintaining at least 6 feet of distance.
Integrating built-in bench seating around fire pits maximizes the entertainment potential of your sleeper installation. Movable chairs provide flexibility for different group sizes, while permanent sleeper benches offer consistent seating options that won’t blow away or require storage. We design these areas to accommodate 6-8 people comfortably for most residential applications.
Creating Outdoor Dining Spaces
Establishing outdoor dining areas with railway sleepers requires careful consideration of table size and seating arrangements for your available space. We recommend measuring your area first, then selecting appropriately sized furniture that accommodates your typical number of guests without overcrowding.
Incorporating shade answers enhances the comfort and usability of sleeper dining spaces throughout the day. Pergolas, umbrellas, or retractable awnings protect diners from intense sunlight while maintaining the open-air dining experience. We often integrate these shade structures directly with sleeper construction for a unified design approach.
Adding outdoor kitchen functionality near sleeper dining areas creates comprehensive entertainment zones perfect for hosting. Grilling stations, prep spaces, and storage answers for cooking tools allow hosts to prepare and serve meals without constantly traveling indoors. We position these features within easy reach of dining areas while maintaining proper ventilation and safety clearances.
Improving ambiance through strategic lighting and greenery transforms basic sleeper dining spaces into memorable alfresco experiences. String lights, lanterns, or solar-powered fixtures extend usability into evening hours, while carefully placed plants and flowers create intimate dining atmospheres that encourage longer gatherings.
Water Feature Borders and Pond Edging
 4")
We can transform our water features into stunning focal points by incorporating railway sleepers as attractive borders and structural elements. These versatile materials create natural transitions between water elements and surrounding industry while adding rustic charm to our outdoor spaces.
Framing Garden Ponds
Constructing a timber frame for our pond requires hardwood or pressure treated softwood due to water proximity. We’ll find that rectangular or square designs make liner installation significantly easier than curved alternatives. The sleeper frame effectively hides unsightly pond liners while creating a polished, professional appearance around the water’s edge.
Positioning sleepers around the pond perimeter creates a stable foundation for our water feature. We secure each sleeper using galvanized bolts or screws to prevent shifting during freeze and thaw cycles. The natural wood texture complements aquatic plants like water lilies and cattails beautifully.
Elevating the frame slightly above ground level improves drainage around our pond area. We can incorporate integrated planting pockets between sleepers for marginal plants such as iris and pickerel rush. This design approach creates seamless transitions between water and surrounding garden beds.
Building Waterfall Structures
Creating a natural looking base for waterfall structures involves strategic sleeper placement along water flow paths. We position sleepers to form terraced levels that guide water movement while blending the feature with existing garden surroundings. The timber framework supports heavy stone or concrete waterfall components effectively.
Establishing multiple tiers using sleepers allows us to control water velocity and sound quality. We can adjust the height and spacing between each level to create gentle cascades or dramatic drops. The wooden borders help contain splash zones while providing stable surfaces for decorative rocks and boulders.
Integrating sleeper borders around waterfall catch basins enhances the overall aesthetic appeal. We ensure proper sealing between wood and water contact points using marine grade sealants. This prevents water loss and maintains the structural integrity of our waterfall installation.
Creating Stream Bed Borders
Defining stream bed edges with sleepers creates clean lines that guide water flow naturally through our garden. We install sleepers parallel to the intended water path, securing them with rebar stakes driven into the ground. The timber borders prevent soil erosion while maintaining the stream’s intended course.
Varying sleeper heights along the stream bed adds visual interest and controls water depth. We can create shallow areas for wildlife access and deeper sections for fish habitat. The natural wood appearance complements river rocks and aquatic vegetation perfectly.
Building gentle curves using shorter sleeper sections allows our stream to meander naturally through the industry. We overlap joints between sleepers and secure connections with galvanized hardware for maximum stability. This technique creates organic looking waterways that enhance our garden’s natural character.
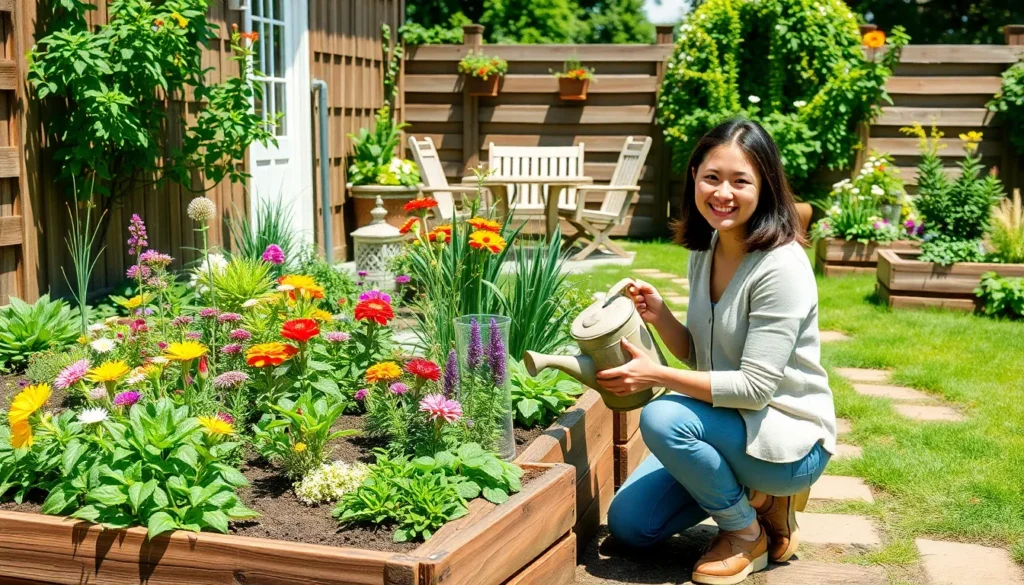
Vegetable Garden Plot Dividers
 5")
Sleepers create professional dividers that transform chaotic vegetable patches into organized growing spaces. We’ll explore how these sturdy wooden barriers can revolutionize your garden’s functionality and appearance.
Separating Different Crop Areas
Raised beds and borders become effortless when we use wooden sleepers to create elevated growing spaces. These structures improve drainage and soil quality while the high sides deter pests from reaching your vegetables. Strategic placement allows us to customize bed sizes for exact crops like tomatoes, carrots, and lettuce.
Crop area separation provides clear distinction between different planting zones using sleeper barriers. We can designate exact areas for root vegetables, leafy greens, and climbing plants without worrying about overcrowding. Visual organization makes garden maintenance easier and prevents accidental damage to neighboring plants.
Lawn edging defines the vegetable garden boundaries when we install sleepers along grass borders. This separation prevents grass from invading growing areas and creates a professional appearance. Clean lines help us maintain distinct zones for vegetables versus ornamental landscaping.
Creating Herb Garden Sections
Herb garden borders allow us to group similar herbs together using sleeper dividers for easy access and maintenance. Dedicated sections prevent aggressive spreaders like mint from overtaking delicate herbs such as basil and cilantro. Organized layouts make harvesting more efficient during cooking preparations.
Tiered herb beds create visually appealing gardens with varying heights for different herb varieties using stacked sleepers. We can position tall herbs like rosemary and sage in back sections while keeping low growing thyme and oregano in front areas. Multiple levels maximize growing space in compact garden areas.
Building Greenhouse Foundation Bases
Structural support around greenhouse areas benefits from sleeper installations for decorative bases and functional edging. We recommend using concrete or stone for actual greenhouse foundations due to structural integrity requirements. Sleepers work excellently for creating attractive borders and pathways surrounding greenhouse structures.
Garden paths leading to greenhouse entrances become more defined when we incorporate sleeper edging along walkways. These installations provide visual guidance and prevent soil spillage onto walking surfaces. Permanent borders reduce maintenance time and create professional appearances around growing structures.
Play Area Boundaries and Sandboxes
 6")
Railway sleepers excel at creating structured play environments that keep children safe while maximizing garden functionality. We’ll show you how these versatile materials transform chaotic outdoor spaces into organized zones perfect for family enjoyment.
Defining Children’s Play Zones
Garden edging becomes incredibly effective when we use sleepers to clearly separate play areas from landscaped sections. These sturdy borders prevent soil and mulch from spilling into adjacent spaces while creating visual boundaries that children naturally understand. Sleepers can be arranged in various configurations to accommodate different garden layouts and play equipment needs.
Zone separation works particularly well when we position sleepers between sandboxes and other play structures. This strategic placement helps contain sand while creating distinct activity areas that prevent conflicts between different types of play. We recommend using sleepers to establish buffer zones around swing sets or climbing equipment.
Play projects benefit significantly from incorporating sleepers alongside wooden poles to create comprehensive play structures. These materials work together to form climbing frames, obstacle courses, and slides that integrate seamlessly with garden boundaries. The combination provides both structural support and clear delineation of active play spaces.
Building Raised Sandbox Frames
Sleeper construction allows us to build sandbox frames at various heights to accommodate different age groups and play styles. These raised structures improve drainage while making sand changes easier for parents. We can design frames with grid covers on top to provide shade and protection from debris when the sandbox isn’t in use.
Height variations enable us to create multi level sandbox systems that grow with children’s developmental needs. Younger children benefit from lower frames that are easier to access, while older kids enjoy deeper sand areas for more complex building projects. Each level can be customized based on the exact play activities we want to encourage.
Drainage considerations become crucial when building raised sandbox frames with sleepers. We install small gaps between bottom sleepers to allow water drainage while using industry fabric to prevent sand loss. This approach maintains proper moisture levels for optimal sand consistency during play.
Creating Safe Garden Boundaries
Boundary markers help us establish clear transitions between different garden zones using sleeper installations. Children quickly learn to recognize these visual cues, which naturally guide them toward appropriate play areas and away from delicate plantings or maintenance zones. We position markers at key transition points throughout the garden layout.
Retaining walls provide essential safety benefits on uneven terrain by preventing soil erosion and creating stable play surfaces. These sleeper structures eliminate dangerous slopes while establishing level areas perfect for various play activities. We build retaining walls with proper drainage systems to ensure long term stability and safety.
Safety features require careful attention to detail when constructing sleeper boundaries for children’s areas. We sand all edges smooth and use secure fastening methods to prevent injuries from sharp corners or loose components. Regular maintenance checks ensure that all safety features continue to function properly over time.
Tree Planters and Large Container Gardens
 7")
Tree planters and large container gardens represent some of the most practical applications for railway sleepers in landscaping projects. These structures provide excellent growing environments while maintaining the rustic aesthetic that makes sleepers so popular.
Building Oversized Planter Boxes
Building oversized planter boxes creates elevated growing spaces that transform how we approach container gardening. These substantial structures accommodate larger root systems and provide better drainage than traditional planters.
Start by determining the dimensions based on your available space and intended plants. Most oversized planter boxes measure between 4 to 8 feet in length and 2 to 4 feet in width. Stack sleepers to create walls between 12 to 24 inches high for optimal soil depth.
Secure the corners using galvanized bolts or heavy duty brackets to ensure structural integrity. We recommend drilling pilot holes to prevent splitting and using weatherproof fasteners that’ll withstand seasonal changes.
Line the interior with industry fabric to prevent soil loss while allowing proper drainage. Add a layer of gravel at the bottom before filling with quality potting soil to create the ideal growing medium for your plants.
Creating Tree Surrounds
Creating tree surrounds helps contain mulch and soil while protecting existing trees from lawn equipment damage. These circular or square structures enhance the visual appeal of mature trees in your industry.
Position sleepers around the tree trunk maintaining at least 3 feet of clearance from the base. This spacing prevents root damage and allows adequate air circulation around the trunk area.
Connect sleeper ends using corner brackets or overlap joints for stability. We find that overlapping creates a more secure connection and maintains the rustic appearance of the installation.
Fill the enclosed area with organic mulch such as wood chips or shredded bark. Keep mulch 2 to 3 inches away from the tree trunk to prevent pest issues and moisture related problems.
Add decorative plants around the perimeter to create attractive understory plantings. Choose shade tolerant varieties like hostas or ferns that complement your tree’s growing conditions.
Constructing Vertical Garden Walls
Constructing vertical garden walls maximizes growing space in compact areas while creating stunning focal points. These structures work particularly well against fences or building walls where horizontal space is limited.
Stack sleepers horizontally creating shelves at different levels for plant placement. Leave gaps between each level to accommodate planting pockets and ensure adequate light penetration.
Secure each level to the structure behind using heavy duty brackets or anchor bolts. We recommend checking local building codes before constructing vertical walls over 4 feet in height.
Install drip irrigation systems between levels to ensure consistent watering throughout the vertical structure. This prevents water from pooling at lower levels and ensures even moisture distribution.
Choose trailing plants for upper levels and upright varieties for lower sections. Cascading plants like ivy or trailing petunias create beautiful visual flow while herbs and vegetables work well in the middle tiers.
Compost Bin Structures
 8")
Railway sleepers transform composting from a messy chore into an organized garden feature. These sturdy structures create professional-looking compost management systems that enhance both functionality and aesthetics.
Building Three-Bay Compost Systems
Three-bay compost systems maximize composting efficiency by dedicating each section to different decomposition stages. We recommend constructing these systems with railway sleepers to create three separate compartments measuring 4 feet wide by 4 feet deep each.
Building the first bay involves stacking sleepers three levels high to contain fresh organic materials like kitchen scraps, grass clippings, and garden debris. The middle bay houses actively decomposing materials that require regular turning and monitoring for proper moisture levels. Our third bay stores finished compost that’s ready for garden application, creating a continuous cycle of organic matter processing.
Connecting the bays requires leaving gaps between sleeper joints to promote airflow and drainage throughout the system. We secure corner connections using galvanized bolts or heavy-duty screws to ensure structural stability during regular use. Each bay should include removable front panels made from additional sleepers, allowing easy access for adding materials and harvesting finished compost.
Creating Tumbler Compost Frames
Tumbler compost frames provide stable support for rotating compost bins while maintaining the rustic aesthetic of sleeper construction. We build these frames using four railway sleepers arranged in a rectangular base measuring 6 feet by 3 feet for optimal stability.
Constructing the support posts involves positioning vertical sleepers at each corner, extending 4 feet above ground level to accommodate standard tumbler heights. These posts require concrete footings or deep soil anchoring to withstand the weight and movement of loaded tumblers. We recommend spacing the support arms 18 inches apart to match most commercial tumbler axle configurations.
Finishing touches include adding crossbeams between vertical posts for additional stability and creating a level platform beneath the tumbler for easy compost collection. The wooden frame provides a natural backdrop that complements garden landscaping while offering superior durability compared to metal alternatives.
Constructing Leaf Mold Containers
Leaf mold containers built from railway sleepers create dedicated spaces for converting fallen leaves into valuable soil amendment. We construct these simple enclosures using four sleepers arranged in a square formation measuring 4 feet on each side.
Assembly involves stacking sleepers two or three levels high depending on the volume of leaves you’ll be processing annually. Corner joints require secure fastening using carriage bolts or timber screws to prevent separation as leaves settle and decompose. We recommend leaving small gaps between sleeper courses to promote air circulation essential for proper leaf decomposition.
Operational considerations include creating removable front panels for easy access when turning leaf piles or harvesting finished leaf mold. The contained environment prevents leaves from scattering while creating ideal conditions for the slow decomposition process that produces nutrient-rich humus. These containers work particularly well when positioned in partially shaded areas where moisture levels remain consistent throughout the decomposition period.
Garden Storage and Tool Organization
 9")
Beyond their decorative applications, railway sleepers excel at creating functional storage answers that keep our gardening tools organized and accessible.
Building Potting Bench Foundations
Constructing a solid potting bench foundation transforms our gardening workflow by creating a dedicated workspace for transplanting and plant care. We can stack two sleepers horizontally to create a 16-inch high foundation that provides optimal working height for most gardeners. The 8-foot length of standard sleepers offers ample workspace for multiple seed trays and potting supplies.
Stabilizing the foundation requires proper ground preparation to prevent settling over time. We should excavate 2-3 inches of soil and add a gravel base for drainage before positioning the sleepers. Corner brackets and galvanized screws secure the frame structure, while additional cross braces every 3 feet prevent sagging under weight.
Installing a work surface completes the potting station with materials like marine-grade plywood or cedar planking. We can add storage compartments underneath using the sleeper frame as support, creating designated spaces for pots, tools, and soil amendments. Weather-resistant finishes protect the wood surface from moisture and soil contact.
Creating Tool Storage Areas
Designing tool storage areas with sleepers creates organized zones for garden equipment while maintaining the rustic aesthetic throughout our outdoor space. We can construct vertical tool racks by installing sleepers as posts and adding horizontal support rails at strategic heights. This design accommodates long-handled tools like rakes, shovels, and hoes.
Building enclosed storage sheds uses sleepers as foundation elements that elevate the structure above ground moisture. We should create a rectangular base using four sleepers joined at corners with carriage bolts, then add intermediate supports every 4 feet for larger structures. This foundation prevents rot and pest infiltration while providing a stable platform.
Incorporating open storage bays organizes different tool categories by creating separate compartments within the sleeper framework. We can install dividers between vertical posts to separate pruning tools from cultivation equipment, making it easier to locate exact items during busy gardening seasons.
Constructing Greenhouse Bases
Establishing greenhouse foundations with sleepers provides superior stability compared to traditional ground mounting systems. We should create a level rectangle using four sleepers, checking diagonal measurements to ensure perfect squareness before securing with galvanized hardware. The 8×6 inch sleeper dimensions offer excellent load distribution for glass or polycarbonate structures.
Installing proper drainage prevents water accumulation around the greenhouse perimeter that could compromise both the foundation and growing environment. We can slope the sleeper base slightly away from the center and add drainage channels using smaller timber pieces. Gravel backfill around the perimeter directs water away from the structure.
Anchoring the greenhouse frame requires strategic bolt placement through pre-drilled holes in the sleeper foundation. We should position anchor points to align with the greenhouse manufacturer’s specifications, typically every 2-3 feet along the perimeter. Galvanized foundation bolts create secure connections that withstand wind loads while allowing for seasonal expansion and contraction.
Conclusion
Railway sleepers offer us an incredible opportunity to transform our outdoor spaces with durability and style. From raised beds and retaining walls to children’s play areas and storage answers we’ve explored countless ways these versatile materials can enhance our gardens.
What makes sleepers truly special is their ability to serve both form and function. Whether we’re creating organized growing spaces managing slopes or building entertainment areas they provide the structural integrity and rustic charm our gardens deserve.
We encourage you to start with one project that addresses your most pressing garden need. Once you experience the satisfaction of working with railway sleepers you’ll likely find yourself planning additional projects to maximize your outdoor space’s potential.
Frequently Asked Questions
What are railway sleepers and why are they popular for garden projects?
Railway sleepers are sturdy wooden beams originally used to support railway tracks. They’ve become increasingly popular for garden projects due to their durability, cost-effectiveness, and rustic aesthetic appeal. These versatile materials can create professional-looking garden features while being accessible to both novice gardeners and experienced landscapers.
How can railway sleepers be used to create raised garden beds?
Railway sleepers are perfect for constructing raised garden beds and tiered planting areas. They can be stacked to create multiple levels, accommodating plants with varying growth requirements. The design maximizes growing potential while adding rustic charm. Proper drainage and secure corner joints are essential for stability and plant health.
Can railway sleepers help with sloped garden problems?
Yes, railway sleepers are excellent for transforming sloped gardens through tiered retaining walls. These structures prevent soil erosion by acting as barriers against soil movement during adverse weather. Multiple tiers provide better stability than single tall walls and create level planting surfaces for diverse ecosystems.
How do you use railway sleepers for garden pathways and steps?
Railway sleepers can transform challenging terrain into navigable walkways by creating rustic stair treads and natural walking paths. Secure fastening and proper dimensions are crucial for safety and comfort. Strategic placement and spacing enhance both aesthetics and functionality while adding character to outdoor spaces.
What outdoor living spaces can be created with railway sleepers?
Railway sleepers can create inviting outdoor living areas including built-in garden benches, fire pit surrounds, and outdoor dining spaces. They provide permanent seating that integrates seamlessly into garden designs and establish social gathering areas. Weather-resistant construction and proper planning enhance usability and comfort.
How can railway sleepers enhance water features?
Railway sleepers make attractive borders for water features and pond edging, providing both visual appeal and structural support. They can frame garden ponds, build waterfall structures, and create stream bed borders that guide water flow naturally. Strategic placement prevents soil erosion and creates wildlife habitats.
Are railway sleepers suitable for vegetable gardens?
Absolutely! Railway sleepers work excellently as vegetable garden plot dividers, transforming chaotic patches into organized growing spaces. They separate different crop areas, improve drainage, deter pests, and create clear distinctions between planting zones. They’re also perfect for herb garden sections and greenhouse foundation bases.
Can railway sleepers be used for children’s play areas?
Yes, railway sleepers are perfect for creating structured play environments. They can define play zones, build raised sandbox frames for different age groups, and create retaining walls for safety on uneven terrain. Proper construction with drainage considerations and regular maintenance ensures safe play surfaces.
How do you build planters and container gardens with railway sleepers?
Railway sleepers excel at creating tree planters and large container gardens with rustic aesthetics. You can build oversized planter boxes, tree surrounds, and vertical garden walls to maximize growing space. Proper dimensions, construction techniques, and drainage considerations are essential for healthy plant growth.
Can railway sleepers be used for composting systems?
Railway sleepers are excellent for building organized compost bin structures. You can create three-bay compost systems for efficient decomposition, tumbler compost frames for rotating bins, and leaf mold containers. Proper airflow, drainage, and structural stability are key to successful compost management.
What storage solutions can be built with railway sleepers?
Railway sleepers are perfect for garden storage and tool organization. You can build potting bench foundations for dedicated workspaces, design tool storage areas with vertical racks, and create enclosed sheds. They also work well for greenhouse bases, ensuring stability and proper drainage for optimal growing conditions.