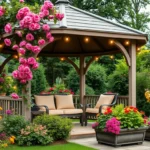
Wooden pallets have become the garden designer’s secret weapon and we’re here to show you why. These versatile structures that once transported goods across the globe are now transforming ordinary outdoor spaces into stunning garden showcases. Best of all they’re often free or incredibly affordable making them perfect for budget-conscious gardeners who don’t want to compromise on style.
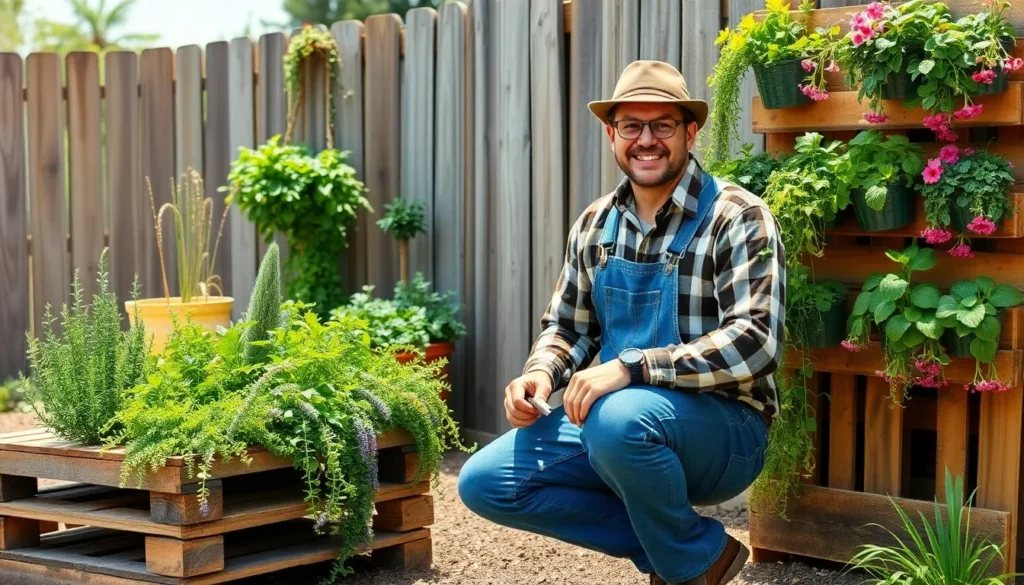
We’ve discovered that pallets offer endless possibilities for creative garden projects. From vertical planters that maximize small spaces to rustic furniture that adds charm to any backyard these wooden frameworks can be repurposed into functional art pieces. Whether you’re working with a tiny balcony or sprawling industry there’s a pallet project that’ll elevate your garden game.
The beauty of pallet gardening lies in its accessibility. You don’t need advanced woodworking skills or expensive tools to create impressive results. With basic supplies and a little creativity you’ll transform discarded shipping materials into garden features that look like they cost hundreds of dollars.
Build Raised Garden Beds With Pallets
Raised garden beds transform pallet gardening from simple vertical displays into functional growing spaces. We’ll show you how to create durable, productive raised beds that maximize your garden’s potential while keeping costs minimal.
Choose the Right Pallet Size for Your Space
Standard 48×40 inch pallets work best for most garden spaces. These dimensions provide adequate growing room for vegetables like tomatoes, peppers, and herbs without overwhelming smaller yards. We recommend measuring your available space before collecting pallets to ensure proper fit.
Consider your plants’ root depth when selecting pallet height. Most vegetables need 8 to 12 inches of soil depth, so standard pallet heights work perfectly for shallow rooted crops like lettuce, radishes, and spinach. Deeper rooted plants like carrots and potatoes require stacking two pallets or adding additional height with boards.
Match pallet size to your physical capabilities. Smaller pallets measuring 32×32 inches are easier to move and maintain, making them ideal for gardeners with limited mobility. Larger 48×48 inch pallets accommodate more plants but require more soil and become heavier when filled.
Prepare and Treat the Wood Properly
Sand all pallet surfaces to remove splinters and rough edges. We start with 80 grit sandpaper for initial smoothing, then finish with 120 grit for a clean surface. This process prevents injuries during planting and maintenance while creating better adhesion for treatments.
Apply food safe wood sealers to extend pallet lifespan. Linseed oil and beeswax combinations protect wood from moisture while remaining safe around edible plants. We avoid chemical stains and pressure treated lumber that can leach harmful substances into soil.
Check for and replace damaged boards before construction. Cracked or rotting slats compromise structural integrity and create weak points where soil can spill out. Fresh boards from hardware stores cost less than replacing entire sections later.
Create Drainage for Healthy Plant Growth
Line the bottom with industry fabric to prevent soil loss. This permeable barrier allows water drainage while keeping growing medium contained. We secure fabric with heavy duty staples every 6 inches around the perimeter and across support slats.
Add a 2 inch layer of gravel or broken pottery for drainage. This base layer prevents waterlogged soil that kills plant roots through oxygen deprivation. River rock, pea gravel, or recycled concrete chunks work equally well for this drainage foundation.
Drill additional drainage holes if natural gaps seem insufficient. We space half inch holes every 8 inches along the bottom boards when pallet slats fit too tightly together. Proper drainage becomes especially critical for plants sensitive to wet feet like Mediterranean herbs and succulents.
Construct Vertical Pallet Gardens for Small Spaces

Vertical pallet gardens transform unused wall space into productive growing areas perfect for balconies, patios, and compact outdoor areas. We can maximize our growing potential by converting standard pallets into space-efficient planters that use vertical surfaces rather than valuable ground space.
Design Living Walls With Herbs and Vegetables
Creating functional herb and vegetable walls starts with positioning herbs like basil, parsley, and cilantro at the top sections of our pallet structure. These aromatic plants thrive in the upper portions where they receive optimal sunlight and air circulation.
Lettuce and leafy greens work exceptionally well in the middle and lower sections of our vertical garden setup. We can plant varieties like spinach, arugula, and butter lettuce in these areas where they’ll benefit from consistent moisture levels.
Adding trailing flowers brings color and visual appeal to our living wall design. Flowers like petunias, nasturtiums, and trailing lobelia cascade beautifully from pallet openings while attracting beneficial pollinators to our garden space.
Customization options allow us to mix and match plants based on our cooking needs and aesthetic preferences. We can incorporate cherry tomatoes, strawberries, or small pepper plants alongside our herbs to create a diverse edible wall.
Install Proper Irrigation Systems
Drainage prevention requires us to install industry fabric along the back and bottom of our pallet planters before adding soil. This fabric barrier prevents soil loss while allowing excess water to escape through natural drainage points.
Soil composition should combine equal parts compost and well-draining potting mix to create an optimal growing medium. We avoid using heavy garden soil that retains too much moisture and can cause root rot in vertical growing conditions.
Watering techniques work best when we water slowly and evenly across all planting pockets to ensure uniform moisture distribution. Drip irrigation systems or soaker hoses can be installed along the top edge for consistent watering schedules.
Moisture management becomes easier when we add a thin layer of mulch to each planting pocket to reduce evaporation. Organic mulches like shredded bark or coconut coir help maintain consistent soil moisture between watering sessions.
Select Plants That Thrive in Vertical Growing
Herb varieties like basil, rosemary, thyme, and oregano adapt exceptionally well to vertical pallet gardens due to their compact root systems. These Mediterranean herbs actually prefer the improved drainage that vertical growing provides.
Leafy vegetables including lettuce, spinach, kale, and Swiss chard flourish in vertical conditions where they receive adequate light without competing for ground space. We can harvest these crops continuously by picking outer leaves while allowing centers to keep producing.
Trailing plants such as cherry tomatoes, strawberries, and peas create stunning cascading effects when planted in upper pockets. These vining varieties naturally grow downward, making them perfect candidates for our vertical garden design.
Flower selections like marigolds, alyssum, and trailing verbena add color while serving as companion plants that repel harmful insects. We can strategically place these flowering plants throughout our pallet garden to create both beauty and natural pest control.
Create Pallet Compost Bins for Organic Waste

Pallet compost bins offer an eco-friendly solution for managing organic waste while creating nutrient-rich soil amendments for our gardens. We can transform discarded pallets into functional composting systems that turn kitchen scraps and yard waste into valuable compost.
Build Three-Bin Systems for Continuous Composting
Three-bin composting systems maximize efficiency by allowing continuous decomposition cycles throughout the year. We position three pallets vertically to create separate compartments, each measuring approximately the same dimensions for optimal material rotation. The first bin holds fresh organic materials like vegetable scraps, coffee grounds, and grass clippings. Our second bin contains materials in active decomposition, requiring regular turning every 2-3 weeks. The third bin stores finished compost ready for garden application.
Each bin should accommodate roughly 3-4 cubic feet of organic matter to maintain proper heat generation during decomposition. We secure the pallets together using metal brackets or wooden screws to ensure structural stability. Corner posts made from 2×4 lumber provide additional support and prevent the bins from shifting during use.
Ensure Proper Ventilation and Drainage
Proper airflow prevents anaerobic conditions that create unpleasant odors and slow decomposition rates. We drill 1-inch holes every 6 inches along the pallet sides to promote oxygen circulation throughout the compost pile. Adequate ventilation maintains temperatures between 140-160°F in the active composting phase.
Drainage prevents waterlogged conditions that can kill beneficial microorganisms responsible for breaking down organic matter. We elevate the bins 2-3 inches off the ground using concrete blocks or treated lumber to allow excess moisture to escape. The bottom remains open to help natural drainage while maintaining contact with soil microbes that accelerate the composting process.
Position Bins for Easy Access and Maintenance
Strategic placement ensures convenient access for adding materials, turning compost, and harvesting finished product. We locate the bins within 50 feet of our kitchen to encourage regular use of food scraps and organic waste. A level surface near a water source simplifies maintenance tasks like moisture adjustment during dry periods.
The bins require protection from harsh weather conditions while maintaining adequate sunlight exposure for optimal decomposition temperatures. We position them in partial shade to prevent excessive drying while ensuring enough warmth for microbial activity. Clear pathways around each bin allow easy maneuvering of wheelbarrows and garden tools during regular maintenance activities.
Design Pallet Planters for Flowers and Herbs

Transforming pallets into dedicated flower and herb planters creates stunning garden features while maximizing our growing potential. We can disassemble pallets to create unique containers that perfectly suit our gardening needs.
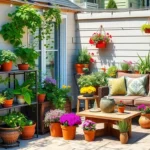
Create Hanging Pallet Planters for Patios
Hanging pallet planters bring vertical gardening directly to our outdoor living spaces. We attach sturdy ropes or chains to create suspended gardens that showcase our favorite plants at eye level. Metal brackets work exceptionally well for securing hanging systems to pergolas, deck railings, or wall-mounted hooks.
Essential supplies include:
- Heavy-duty rope or galvanized chains
- Eye bolts for secure mounting points
- Industry fabric to line the planter
- Quality potting mix for proper drainage
Filling these hanging gardens with aromatic herbs like basil, oregano, and thyme transforms our patios into fragrant retreats. Cascading flowers such as petunias and trailing nasturtiums create beautiful visual displays while attracting beneficial pollinators. We position hanging planters at varying heights to create ever-changing layers that add depth to our outdoor spaces.
Build Tiered Planter Boxes for Maximum Growing Space
Tiered pallet planters maximize our growing capacity by stacking multiple levels for increased planting area. We secure each tier with wood screws and metal brackets to ensure stability throughout the growing season. This design multiplies our planting space by 300% compared to single-level arrangements.
Construction involves positioning pallets at different heights to create distinct growing zones. We fill each level with appropriate soil depths based on our chosen plants’ root requirements. Shallow-rooted herbs thrive in the upper tiers while deeper-rooted vegetables flourish in lower sections.
Plant placement strategy:
- Top tier: Herbs and small flowers (4-6 inch soil depth)
- Middle tier: Leafy greens and compact vegetables (6-8 inch depth)
- Bottom tier: Root vegetables and larger plants (8-12 inch depth)
Drainage becomes crucial in tiered systems since water flows from upper to lower levels. We install gravel layers between each tier to prevent waterlogging and ensure proper moisture distribution throughout all planting zones.
Add Wheels for Mobile Garden Answers
Mobile pallet planters revolutionize our gardening flexibility by allowing us to relocate growing areas based on seasonal sun patterns. We attach heavy-duty casters or garden wheels to create portable growing stations that adapt to changing light conditions throughout the year.
Wheel specifications for different pallet sizes:
| Pallet Size | Recommended Wheel Type | Load Capacity | Mobility Rating |
|---|---|---|---|
| 40×48 inch | 4-inch swivel casters | 300 lbs | Excellent |
| 32×40 inch | 3-inch fixed wheels | 200 lbs | Good |
| 24×32 inch | 2-inch furniture wheels | 150 lbs | Fair |
Installing locking mechanisms prevents unwanted movement during windy conditions or when we’re tending to our plants. We position wheels at each corner for optimal weight distribution and smooth rolling across various surfaces including concrete patios, wooden decks, and packed soil paths.
These mobile answers prove invaluable during extreme weather events when we need to quickly move sensitive plants to protected areas. Spring seedlings benefit from following optimal sun exposure while mature plants can be relocated to shadier spots during intense summer heat.
Make Pallet Pathways and Garden Walkways

We can extend our pallet gardening projects beyond planters and storage by creating functional walkways that connect different areas of our outdoor space. These rustic pathways add charm while providing practical answers for handling through garden beds.
Cut and Arrange Pallets for Stable Walking Surfaces
We start by disassembling pallets carefully to salvage the individual boards for our pathway project. Cut the boards to your desired length using a circular saw or miter saw, ensuring each piece fits your garden’s layout and width requirements.
Arrange the cut boards in patterns that suit your aesthetic preferences, such as straight lines, herringbone designs, or staggered layouts. We recommend spacing boards approximately 1-2 inches apart to allow for natural expansion and contraction of the wood.
Create a stable foundation by leveling the ground and removing any rocks or debris that could cause uneven surfaces. Place the arranged pallet boards directly on the prepared ground, ensuring each piece sits flush and doesn’t rock when stepped on.
Fill Gaps With Gravel or Sand for Stability
We enhance pathway stability by filling the spaces between pallet boards with materials that prevent shifting and weed growth. Fine gravel works exceptionally well as it provides excellent drainage while creating a firm walking surface.
Sand offers another effective option for gap filling, particularly for pathways in areas with good drainage. We apply a layer of sand between boards, then sweep additional material over the entire surface to fill any remaining spaces.
Consider using pea gravel for decorative appeal combined with functionality, as its smooth texture feels comfortable underfoot while maintaining the rustic garden aesthetic. Rake the filling material level with the board surfaces to create seamless transitions between wood and aggregate.
Treat Wood to Withstand Weather Conditions
We protect our pallet pathway investment by applying weather-resistant treatments that extend the wood’s lifespan significantly. Choose waterproof sealants specifically designed for outdoor wood applications, applying them according to manufacturer instructions.
Natural oils like tung oil or linseed oil penetrate deep into the wood fibers, providing protection from moisture while maintaining the wood’s natural appearance. We recommend applying these treatments annually or as needed based on your climate conditions.
Consider using semi-transparent stains that offer both protection and color enhancement, allowing the wood grain to show through while providing UV protection. Apply treatments during dry weather conditions and allow adequate drying time before regular foot traffic resumes.
Build Pallet Garden Furniture and Seating

Building functional outdoor furniture from pallets extends your garden design while creating comfortable spaces for relaxation and work. We’ll transform these versatile structures into essential pieces that enhance both the aesthetic and practical aspects of your outdoor space.
Construct Simple Benches for Garden Relaxation
Garden benches become the centerpiece of any outdoor relaxation area when constructed from stacked pallets. Stack two pallets securely on top of each other to create the perfect height for comfortable seating. Add a wooden backrest by attaching a third pallet vertically behind the stacked base, ensuring proper support for extended garden contemplation sessions.
Pallet patio seats offer individual seating answers by cutting standard pallets in half and adding backrests. Cut your pallet cleanly through the middle boards, then attach the remaining half vertically to create an ergonomic backrest. This cost-effective approach provides practical outdoor seating that withstands various weather conditions.
Outdoor sofas emerge when we disassemble pallets completely and reassemble the boards into custom sofa frames. Remove all boards carefully, then reconstruct them into wider seating areas that accommodate multiple people. These versatile pieces work beautifully outdoors during warm months and can transition indoors when cold weather arrives.
Pallet armchairs deliver stylish individual seating perfect for small outdoor spaces and intimate garden corners. Design these chairs by modifying single pallets with added armrests cut from additional pallet boards. Cushions transform these rustic frames into comfortable seating that rivals store-bought outdoor furniture.
Create Tables for Potting and Garden Work
Potting tables revolutionize our gardening workflow when built from pallets equipped with practical storage answers. Construct these tables by standing pallets vertically and adding a flat work surface across the top boards. Install shelves between the pallet slats to store gardening tools, seed packets, and potting supplies within easy reach.
Workbenches provide dedicated spaces for garden maintenance tasks using sturdy pallet construction techniques. Build these benches by reinforcing pallet frames with additional cross-bracing and installing tool hooks along the sides. The natural gaps in pallet boards create perfect slots for hanging frequently used tools like trowels, pruning shears, and watering accessories.
Design Storage Answers for Garden Tools
Pallet shelves maximize vertical storage space by converting pallets into wall-mounted or freestanding organizational systems. Lean these shelves against garden walls or secure them as standalone units to store larger tools like rakes, shovels, and hoses. The built-in compartments between pallet boards naturally organize different tool categories without requiring additional dividers.
Toolboxes and storage chests keep smaller gardening items organized when constructed from disassembled pallet boards. Create these containers by reassembling pallet wood into custom-sized boxes perfect for storing seeds, gloves, plant labels, and other gardening accessories. Add hinged lids and interior compartments to maximize the organizational potential of each storage solution.
Construct Pallet Fencing and Privacy Screens

Transforming pallets into functional fencing creates an affordable solution for defining garden boundaries while maintaining the rustic charm we’ve been building throughout our outdoor space.
Install Vertical Fences for Property Boundaries
Pallet garden fences protect our vegetable patches from critters while establishing clear property lines at a fraction of traditional fencing costs. We can create cost-effective barriers for larger garden areas like vegetable patches by positioning pallets vertically along the perimeter.
Extra-tall pallet fences provide enhanced privacy when we stack pallets to achieve greater height. Placing these stacked structures in front of existing walls or hedges amplifies our privacy screening while maintaining visual appeal.
Mini pallet fence gardens transform existing wire fencing into productive growing space by layering pallet boards on top. We attach small pots filled with flowers like petunias or herbs such as basil and oregano directly to the pallet boards.
Built-in pallet planters integrate seamlessly into fence tops, creating decorative elements that serve dual purposes. Installing these planters allows us to grow small flowers like marigolds or edible herbs including thyme and parsley right at eye level.
Build Decorative Screens for Garden Sections
Pallet dividers create distinct zones within our garden spaces, separating areas designated for different plant types or garden activities. These screens add visual interest while organizing our outdoor areas into functional sections like herb gardens, flower beds, and vegetable plots.
Painted pallet fences bring classic charm to garden borders when we apply white paint or other complementary colors. Painting these structures helps them blend with existing garden features like flower beds and decorative elements while protecting the wood from weather damage.
Garden section screens establish boundaries between various growing areas without blocking airflow or natural light. We position these decorative barriers to guide foot traffic while maintaining the open feel of our garden space.
Add Gates and Access Points as Needed
Pallet gates provide convenient entry points to different garden sections while maintaining the cohesive look of our fencing system. Constructing these access points ensures we can easily reach all areas of our garden for maintenance and harvesting.
Pallet access points create functional pathways through garden spaces using individual pallet boards as stepping stones. These access answers connect different growing areas while protecting our planted beds from foot traffic damage.
Strategic gate placement ensures efficient garden navigation by positioning access points where we naturally move between growing areas. We install hinges and simple latching mechanisms to create functional gates that complement our overall pallet fencing design.
Create Pallet Trellises and Plant Support Systems

Pallet trellises transform unused pallets into functional growing supports that maximize vertical garden space. These structures provide essential support for climbing plants while adding visual interest to any garden design.
Design Climbing Structures for Vines and Vegetables
Climbing structures offer perfect support for beans, peas, cucumbers, and ornamental vines throughout the growing season. We position the pallet upright against a fence or wall to create immediate vertical growing space for these climbing varieties. Plants naturally weave through the pallet slats as they grow upward, creating a living screen that’s both functional and beautiful.
Securing the structure prevents wind damage and ensures plant safety during heavy fruiting periods. We anchor the base of each pallet into the ground using metal stakes or wooden posts driven at least 12 inches deep. Heavy producers like winter squash and large tomato varieties require additional bracing between multiple pallets to distribute weight evenly.
Plant spacing determines harvest success when using pallet climbing structures in vegetable gardens. We plant climbing beans every 6 inches along the base of each pallet, while peas need only 4 inch spacing for optimal growth. Cucumber plants require 12 inches between each plant to prevent overcrowding and ensure proper air circulation.
Build A-Frame Supports for Heavy Plants
A-frame supports handle the weight of heavy fruiting plants like tomatoes, peppers, and indeterminate squash varieties better than traditional stakes. We disassemble pallets completely and rebuild them into triangular A-frame structures that distribute plant weight across multiple contact points. This design prevents the toppling issues common with single-stake support systems.
Construction techniques require basic carpentry skills and standard wood screws for assembly of these heavy duty plant supports. We cut pallet boards to create two identical triangular frames, then connect them with horizontal cross braces for stability. The finished A-frame should measure approximately 6 feet tall and 4 feet wide at the base to accommodate full grown plants.
Plant training maximizes the effectiveness of A-frame supports throughout the entire growing season for optimal harvests. We tie plant stems to the frame using soft garden twine every 8 to 10 inches as they grow upward. Multiple tie points distribute weight and prevent branch breakage during storms or when plants are heavy with fruit.
Install Wall-Mounted Trellises for Limited Space
Wall-mounted trellises maximize growing potential in small patios, balconies, and narrow side yards where ground space is limited. We attach pallets directly to exterior walls using heavy duty brackets rated for outdoor use and plant weight loads. This vertical approach allows gardeners to grow climbing vegetables and flowering vines without sacrificing valuable floor space.
Installation requirements include proper wall anchoring and weatherproofing to ensure long term performance of mounted pallet trellises. We use galvanized lag bolts driven into wall studs or masonry anchors for concrete walls to support the combined weight of pallets, soil, and mature plants. Each mounting point should support at least 50 pounds to handle fully loaded growing systems safely.
Plant selection focuses on lightweight climbers that won’t overload wall-mounted pallet systems during peak growing periods. We recommend morning glories, sweet peas, and small-fruited varieties like cherry tomatoes for these vertical installations. Trailing herbs like nasturtiums and oregano also thrive in wall-mounted pallet gardens while providing fresh ingredients for cooking.
Conclusion
We’ve shown you how pallets can transform any garden space into a functional and beautiful outdoor haven. From raised beds and vertical planters to outdoor furniture and privacy screens these versatile materials offer endless possibilities for creative gardeners on any budget.
The beauty of pallet gardening lies in its accessibility – whether you’re building your first planter box or constructing an entire outdoor living space you can start with simple projects and gradually expand your skills. Each pallet project not only saves money but also gives new life to materials that might otherwise end up in landfills.
Your garden is waiting for that personal touch that only DIY pallet projects can provide. Start with one project that excites you most and watch as your outdoor space evolves into the garden of your dreams.
Frequently Asked Questions
What are the main benefits of using wooden pallets in garden design?
Wooden pallets offer exceptional versatility and affordability for garden projects. They can be repurposed into vertical planters, raised beds, furniture, and support structures with minimal woodworking skills required. This makes them perfect for budget-conscious gardeners who want to create stylish garden features from discarded materials.
What size pallets work best for raised garden beds?
Standard 48×40 inch pallets are recommended for most garden areas. When selecting pallets, consider the root depth requirements of your plants to determine the appropriate height. Proper preparation including sanding and applying food-safe sealers will extend the pallets’ lifespan in outdoor conditions.
How do I ensure proper drainage in pallet garden beds?
Create adequate drainage by lining the bottom of your pallet bed with landscape fabric and adding a layer of gravel. This prevents waterlogging while allowing excess water to escape, ensuring healthy plant growth and preventing root rot in your garden beds.
What plants work best in vertical pallet gardens?
Compact herbs like basil, thyme, and oregano thrive in vertical pallet gardens. Trailing plants such as strawberries, cherry tomatoes, and cascading flowers also work well. Choose plants with shallow root systems that don’t require extensive soil depth for optimal growth.
How do I build a pallet compost bin?
Construct a three-sided enclosure using pallets, ensuring proper ventilation between slats for air circulation. Add drainage by elevating the bin slightly off the ground. This eco-friendly solution efficiently manages organic waste while creating nutrient-rich compost for your garden.
Can I create mobile planters with pallets?
Yes, attach wheels to pallet planters for easy mobility. This allows you to relocate plants based on seasonal sun patterns and weather conditions. Mobile planters are especially useful for maximizing growing conditions and protecting plants during harsh weather.
How do I make pallet pathways for my garden?
Disassemble pallets and cut boards to uniform sizes. Arrange them in attractive patterns, filling gaps with gravel or sand for stability. Treat the wood with weather-resistant sealants to extend lifespan while maintaining the rustic garden appeal.
What outdoor furniture can I build from pallets?
Pallets can be transformed into benches, sofas, armchairs, and potting tables. These projects require basic assembly skills and create functional seating and work areas. Add cushions for comfort and weather-resistant finishes for durability in outdoor conditions.
How do I build effective pallet trellises for climbing plants?
Create vertical support structures by securing pallets upright and ensuring proper anchoring. Space slats appropriately for plant growth and consider A-frame designs for heavy plants. Wall-mounted options work well for limited spaces and can support beans, peas, and ornamental vines.
Are pallet fences effective for garden boundaries?
Yes, pallet fences provide affordable boundary solutions while maintaining rustic charm. They can protect vegetable patches, enhance privacy, and create distinct garden zones. Paint them for aesthetic appeal and add gates for easy access between garden sections.