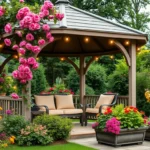
Garden logs aren’t just leftover tree debris – they’re versatile design elements waiting to transform your outdoor space. Whether you’ve got fallen branches from last season’s storm or deliberately sourced timber, these natural materials can become stunning focal points that blend seamlessly with your industry.
We’ve discovered that repurposing logs in gardens offers both practical and aesthetic benefits. From creating rustic seating areas to building raised beds, logs provide an eco-friendly alternative to expensive hardscaping materials. They’ll naturally weather over time, developing character while supporting your garden’s network.
The best part? Most log projects require minimal tools and experience. You don’t need professional landscaping skills to create impressive results. With a few creative ideas and basic techniques, we’ll show you how to turn ordinary logs into extraordinary garden features that’ll have your neighbors asking for advice.
Create Natural Garden Borders With Log Edging
Log borders deliver a rustic charm that seamlessly defines garden spaces while maintaining natural aesthetics. We’ll show you how to select, install, and maintain wooden edging that transforms ordinary landscaping into organized outdoor areas.
Choose the Right Log Size and Type
Cedar logs work best for garden borders because they resist decay and insects naturally. We recommend selecting logs with 6 to 8 inch diameters for optimal visual impact and structural integrity. Pine and oak alternatives cost less but require treatment to prevent rot within two to three years.
Length matters when planning your border layout, so choose 4 to 6 foot sections for easier handling and installation. We prefer logs with minimal knots and straight grain patterns that create clean lines along garden beds. Freshly cut logs contain more moisture and settle better into soil compared to seasoned timber.
Bark removal depends on your aesthetic preferences and maintenance commitment. We suggest keeping bark on cedar logs for natural texture while removing it from softer woods like pine to prevent pest harboring. Debarked logs last longer but lose some rustic appeal that many gardeners desire.
Install Logs for Maximum Stability
Excavation depth determines border longevity, so we dig trenches 4 to 6 inches deep along planned border lines. Pack soil firmly around each log to eliminate air pockets that cause shifting over time. Level each section using a spirit level to maintain consistent height across the entire border.
Anchoring systems prevent log movement during freeze thaw cycles and heavy rainfall. We drive 18 inch rebar stakes through pre drilled holes every 4 feet for maximum stability. Galvanized industry spikes work well for smaller logs but may not penetrate harder wood types effectively.
Joining techniques create seamless borders when connecting multiple log sections together. We overlap joints by 6 inches and secure them with galvanized carriage bolts for permanent installation. Alternatively, notch connecting ends with a chainsaw to create interlocking joints without hardware.
Maintain Your Log Borders Over Time
Annual inspections help identify problems before they compromise border integrity. We check for loose sections, pest damage, and rot spots each spring when ground conditions stabilize. Replace damaged sections immediately to prevent issues from spreading to adjacent logs.
Cleaning routine extends log life and maintains attractive appearance throughout growing seasons. We power wash borders annually to remove dirt buildup and apply wood preservative every two years on untreated timber. Avoid harsh chemicals near planting areas that could harm beneficial soil organisms.
Winter preparation protects borders from freeze damage and ice expansion forces. We clear debris from around logs and ensure proper drainage to prevent water accumulation. Apply additional soil around settled sections before ground freezes to maintain consistent support levels.
Build Raised Garden Beds Using Stacked Logs

Stacked logs create naturally beautiful raised beds that integrate seamlessly with organic garden design. We’ll show you how to construct durable, stable garden beds using sustainable materials that enhance soil health over time.
Select Logs That Resist Rot and Decay
Cedar logs offer the best longevity for raised garden beds due to their natural resistance to moisture and decomposition. We recommend cedar as our top choice because it naturally resists rot and decay, lasting many years in garden environments without chemical treatments.
Locust wood provides exceptional durability and ranks as another excellent option for garden bed construction. Locust logs resist moisture damage and maintain structural integrity through multiple growing seasons.
Oak logs deliver solid performance for garden beds when properly installed, though they require more attention to drainage and soil contact areas. We’ve found oak particularly useful for larger bed structures where weight and stability matter most.
Black walnut logs offer natural durability but require careful consideration of plant compatibility. Black walnut contains juglone, which can inhibit growth in sensitive plants like tomatoes, peppers, and potatoes.
Stack Logs Safely for Structural Integrity
Dig shallow trenches about the width of your logs and half as deep to create a stable foundation. We backfill soil around the base of each log to prevent rolling and stabilize the entire structure.
Choose larger logs whenever possible as they provide better shape retention and overall durability compared to smaller diameter wood. Larger logs also require fewer stacking layers to achieve desired bed height.
Use partially rotted wood strategically if it contains established fungi and mycelium, as this enriches soil over time. We ensure logs aren’t so decayed that they collapse or lose structural stability under soil pressure.
Drive wooden stakes vertically on both sides of stacked logs for additional reinforcement. We secure these stakes using screws or metal brackets when necessary to maintain bed shape and prevent log shifting.
Fill and Plant Your Log-Raised Beds
Mix soil, compost, and organic matter to create the ideal growing medium for your stacked log beds. We don’t fill beds completely at once, instead adding layers as organic matter decomposes or as more materials become available.
Build soil gradually by layering materials over time, which helps establish proper soil structure and fertility. This approach allows natural decomposition processes to enhance soil quality continuously.
Plant vegetables, herbs, or flowers once the bed has settled and soil levels have stabilized. We find that natural materials within the log structure break down slowly, providing ongoing nutrients and promoting long term soil health.
Consider the hugelkultur method for advanced gardeners wanting maximum soil benefits. This technique involves layering decaying logs and woody material at the bottom, then adding compost, soil, and mulch layers on top to create fertile, moisture retaining garden beds.
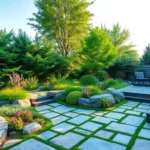
Design Rustic Garden Pathways With Log Rounds

We’ll transform ordinary logs into stunning pathway elements that blend seamlessly with natural garden aesthetics. Log rounds create an organic stepping stone effect that complements woodland-style gardens beautifully.
Cut Logs Into Even Stepping Stone Sections
Uniform thickness ensures safe footing and creates a polished appearance throughout your pathway. We recommend cutting logs into sections between 2-4 inches thick for optimal stability and comfort. Each section should maintain consistent diameter measurements to prevent wobbling when stepped on.
Sharp chainsaw blades produce clean cuts that resist splitting and weathering over time. Measure and mark each cutting point before beginning to ensure uniform spacing. Sand rough edges lightly to prevent splinters while preserving the natural wood texture.
Prepare the Ground for Log Path Installation
Ground preparation determines pathway longevity and prevents future maintenance headaches. We start by clearing all debris, vegetation, and rocks from the designated path area. Level the ground using a rake or shovel to eliminate uneven surfaces that could cause log rounds to shift.
Excavate approximately 1-2 inches deep to create a stable foundation for each log round. Install weed barrier fabric across the entire pathway area to prevent unwanted vegetation growth. This barrier extends the life of your log pathway significantly by reducing moisture retention and root intrusion.
Compact the soil firmly using a hand tamper or your foot to create a solid base. Add a thin layer of coarse sand over the weed barrier for improved drainage and easier log positioning.
Create Patterns and Layouts for Visual Appeal
Strategic placement transforms simple log rounds into captivating garden features that guide visitors naturally. We design straight pathways using uniform log spacing for classic, formal garden settings. These linear arrangements work particularly well in geometric garden designs.
Winding paths create mysterious, inviting routes that encourage exploration and discovery. Place log rounds in gentle curves that follow natural industry contours for authentic woodland appeal. Vary the spacing slightly between rounds to create organic rhythm and movement.
| Layout Pattern | Best Use Case | Spacing Distance |
|---|---|---|
| Straight Line | Formal gardens | 18-24 inches |
| Curved Path | Woodland style | 16-20 inches |
| Alternating Sizes | Textured interest | 12-18 inches |
Incorporate focal points using larger log rounds or decorative stones at pathway intersections. Fill gaps between log rounds with pebbles, moss, or small ground cover plants for added texture and visual interest. These elements create cohesive transitions between hardscape and planted areas.
Construct Log Retaining Walls for Sloped Gardens

Transforming challenging slopes into functional garden spaces becomes achievable with properly constructed log retaining walls. We’ll guide you through creating durable, attractive walls using pressure-treated logs like Scottish pine that resist rot and provide lasting structural support.
Assess Your Garden’s Slope and Drainage Needs
Measuring the steepness of your garden slope determines the height and reinforcement your log wall will require. We recommend using a level and measuring tape to calculate the exact grade percentage, as slopes exceeding 30% typically need buttress supports for added strength.
Observing water flow patterns during heavy rain reveals critical information about natural drainage paths in your yard. Walk through your garden after storms to identify where water pools or runs off, since these areas will need exact drainage considerations behind your log wall.
Evaluating soil composition helps predict how water moves through your garden and whether additional drainage materials will be necessary. Clay soils retain more water and create pressure behind retaining walls, while sandy soils drain more freely but may require different foundation techniques.
Secure Logs Properly for Long-Term Stability
Creating a level foundation forms the cornerstone of any stable log retaining wall project. We dig down 6-8 inches below ground level and add a layer of compacted gravel to create a solid base that prevents shifting over time.
Interlocking log systems like WoodBlocX provide exceptional stability without requiring power tools or mortar for assembly. These modular systems feature pre-cut notches that lock logs together securely, making installation accessible for DIY gardeners.
Anchoring each course with galvanized rebar or wooden stakes driven through the logs and into the ground adds crucial structural integrity. We typically place anchors every 4-6 feet along the wall length, depending on the height and soil conditions.
Reinforcing curved or tiered designs requires additional buttress supports placed perpendicular to the main wall. These supports should extend back into the hillside at least 3 feet and be secured with the same interlocking or anchoring methods used for the primary structure.
Incorporate Drainage Answers Behind Log Walls
Installing geotextile fabric directly against the back of your log wall prevents soil from washing through gaps while allowing water to pass freely. We overlap fabric sections by 6 inches and secure them to the logs before backfilling with drainage materials.
Layering gravel or crushed stone behind the geotextile creates an effective drainage zone that prevents water buildup and hydrostatic pressure. A 12-18 inch layer of coarse gravel works best, gradually transitioning to finer materials as you move away from the wall.
Creating water exit points at regular intervals directs excess water away from your log wall foundation. We install perforated drainage pipes or weep holes every 8-10 feet along the wall base, ensuring these outlets lead to safe drainage areas.
Connecting to existing drainage systems maximizes the effectiveness of your log wall drainage and prevents water from accumulating elsewhere in your garden. French drains or dry creek beds can carry water from your retaining wall outlets to appropriate discharge points away from structures.
Transform Logs Into Unique Garden Planters

Converting logs into distinctive planters adds rustic charm while creating functional growing spaces throughout our garden. We can repurpose fallen trees or reclaimed wood to create unique containers that complement any outdoor design.
Hollow Out Logs for Planting Space
Hollowing out logs requires strategic planning to create adequate growing space for our plants. We start by selecting logs with a diameter of at least 8 inches to provide sufficient soil volume for root development. Power drills equipped with large spade bits work effectively for smaller logs, while angle grinders handle larger specimens that need extensive hollowing. We remove wood in sections, creating a cavity approximately 4 to 6 inches deep depending on our chosen plants’ root requirements. Maintaining wall thickness of 2 to 3 inches ensures structural integrity while maximizing planting space. We sand rough edges smooth to prevent injury during planting and maintenance activities.
Add Drainage and Soil for Healthy Plant Growth
Drainage systems prevent water accumulation that leads to root rot and plant failure in log containers. We drill multiple holes measuring ½ inch in diameter across the bottom surface, spacing them 3 to 4 inches apart for optimal water flow. Creating a drainage layer using small stones or gravel helps excess water escape efficiently. We fill our hollowed logs with high quality potting soil mixed with compost in a 2:1 ratio for enhanced nutrition. This soil combination provides proper drainage while retaining adequate moisture for plant health. We leave approximately 1 inch of space between the soil surface and log rim to prevent overflow during watering.
Choose Plants That Thrive in Log Containers
Selecting appropriate plants ensures successful growth in the unique environment of log planters. Succulents like sedum and echeveria perform exceptionally well due to their preference for well draining conditions and tolerance for container restrictions. Herbs including thyme, oregano, and rosemary thrive in log planters while providing culinary benefits for our kitchen. Small flowering plants such as marigolds, petunias, and nasturtiums add color without overwhelming the rustic aesthetic. We avoid deep rooted vegetables and large perennials that require extensive soil depth beyond what standard log planters can provide. Shallow rooted plants adapt better to the 4 to 6 inch growing depth typical in most log containers.
Create Functional Garden Seating From Logs

Transform your ordinary garden logs into comfortable seating areas that blend seamlessly with your outdoor industry. We’ll show you practical techniques for creating sturdy log benches that serve as both functional furniture and natural design elements.
Position Logs for Comfortable Garden Benches
Position logs strategically to maximize comfort and stability throughout your garden seating arrangement. We recommend placing logs side by side to create bench seating for fire pits or along garden paths, using them either as whole logs or split in half to create flat surfaces.
Bury support logs directly in the ground to ensure your bench remains stable and prevents wobbling during use. Dig holes approximately 6-8 inches deep for the support logs, then pack soil firmly around them to create a solid foundation. Mark the exact placement before digging to maintain proper spacing and alignment across your seating area.
Create the ideal seating height by selecting logs with diameters between 12-16 inches, which provide comfortable seating for most adults. Level the ground beneath each log position to prevent rocking and ensure consistent height across the entire bench length.
Add Cushions and Weather-Resistant Finishes
Enhance your log benches with cushions and protective finishes that extend their lifespan while improving comfort levels. Apply weather-resistant wood stains or sealers to protect the logs from moisture, UV damage, and temperature fluctuations that cause cracking and decay.
Choose outdoor-rated cushions specifically designed for garden furniture, selecting materials like polyester or acrylic fabrics that resist fading, mildew, and moisture absorption. Secure cushions with ties or Velcro strips to prevent them from shifting during windy conditions or regular use.
Stain the cut ends of your logs to prevent splitting and stabilize the wood against moisture penetration. Use a penetrating wood stain that soaks deep into the grain rather than sitting on the surface, which provides longer-lasting protection against the elements.
Maintain your log seating by reapplying protective finishes annually and inspecting cushions for wear, replacing them as needed to keep your garden seating looking fresh and inviting.
Combine Multiple Logs for Extended Seating Areas
Combine multiple logs to create spacious seating arrangements that accommodate larger groups in your garden space. Arrange logs in staggered or linear formations to provide ample seating while maintaining visual interest and natural flow throughout the area.
Create L-shaped or U-shaped configurations using three or more logs positioned at right angles to each other, which encourages conversation and creates intimate gathering spaces. Space individual log benches 2-3 feet apart to allow comfortable movement between seats while maintaining the cohesive appearance of your seating area.
Use logs of varying diameters to add visual depth and accommodate different seating preferences, with larger logs serving as primary benches and smaller ones functioning as footrests or side tables. Connect separate log sections by placing them on level ground with consistent spacing to create the appearance of built-in outdoor furniture.
Design extended seating areas that follow the natural contours of your garden, curving around fire pits, water features, or planted areas to maximize both functionality and aesthetic appeal.
Build Garden Structures and Features With Logs

We can transform our gardens into stunning outdoor sanctuaries by incorporating larger log structures that serve both practical and aesthetic purposes.
Construct Log Arbors and Garden Gates
Building log arbors creates natural support systems for climbing plants while adding rustic charm to our garden entrances. We position sturdy vertical logs as posts and connect them with horizontal crossbeams to form the classic arbor framework. Natural wood joints work best for these structures since they allow the wood to expand and contract with seasonal changes.
Garden gates constructed from logs complement our natural landscaping perfectly and provide security without compromising visual appeal. We select logs of similar diameter to maintain consistency in our gate design. Splitting larger logs lengthwise creates flat surfaces that work well for gate panels and reduce the overall weight of the structure.
Joining techniques for log arbors and gates require basic woodworking skills and simple tools like a chainsaw and drill. We create mortise and tenon joints by cutting rectangular slots in one log and shaping the end of another to fit snugly. Metal brackets can reinforce these connections when we need additional structural support for heavier gates or wider arbor spans.
Create Decorative Log Sculptures and Art
Log planters offer versatile containers for our favorite plants while showcasing the natural beauty of wood grain. We hollow out logs using various tools from simple chisels to power tools depending on the log’s hardness and our desired planter size. Cedar logs work exceptionally well for planters because they resist rot and insects naturally.
Carved log sculptures transform ordinary timber into focal points that reflect our personal style and garden theme. We start with softer woods like pine or basswood when learning carving techniques since they’re easier to shape. Simple designs like mushrooms, animals, or abstract forms add personality to our garden spaces without requiring advanced artistic skills.
Functional art pieces combine beauty with utility in our log garden features. We create log bird houses, garden tool holders, or decorative plant stands that serve dual purposes. Stacking logs of varying sizes creates interesting sculptural elements that can double as seating or display platforms for container plants.
Install Log Pergolas for Climbing Plants
Log pergolas provide substantial support for heavy climbing plants like grapes, wisteria, or climbing roses while creating shaded garden rooms. We establish the pergola footprint by marking corner positions and ensuring the structure aligns with our garden’s existing features. Post holes should extend at least 2 feet deep for stability in most soil conditions.
Vertical support posts require logs with diameters of 8 to 12 inches to handle the weight of mature climbing plants and weather loads. We set these posts in concrete or compact gravel depending on our soil drainage characteristics. Level installation ensures our pergola will age gracefully and maintain its structural integrity over time.
Horizontal beams and crosspieces complete the pergola framework and determine the final appearance of our structure. We space rafters 18 to 24 inches apart to provide adequate climbing support while allowing sufficient light penetration. Notching techniques help secure beam connections and prevent shifting as the wood settles and seasons naturally.
Plant selection for log pergolas influences both the structure’s longevity and maintenance requirements. We choose climbing varieties that won’t overwhelm the wooden framework with excessive weight or aggressive growth patterns. Annual vines like morning glories work well for new pergolas while we wait for slower growing perennial climbers to establish themselves.
Establish Wildlife Habitats Using Garden Logs

Garden logs transform unused spaces into thriving ecosystems that support local wildlife populations. Decaying wood provides essential resources for countless species while reducing garden maintenance needs.
Create Log Piles for Beneficial Insects
Building effective log piles starts with selecting logs at least 100 mm (3.9 inches) thick with bark still attached. This combination creates diverse microhabitats that support beetles, woodlice, and other beneficial insects throughout different decay stages.
Stacking logs loosely allows air circulation while maintaining the humid conditions insects require. We recommend creating multiple layers with gaps between logs to accommodate species of varying sizes. Different log types like oak, birch, and pine offer unique textures and decay rates that attract distinct insect communities.
Adding leaf litter around log piles encourages exploration by hedgehogs and other small mammals seeking insects. Fresh leaves decompose quickly and provide additional food sources while creating protective cover. Mixing deciduous and evergreen materials extends the habitat’s appeal across seasons and supports year round wildlife activity.
Position Logs to Attract Birds and Small Animals
Strategic placement near existing food sources or water features maximizes wildlife visits to log habitats. Birds naturally forage around decaying wood for insects and larvae hiding beneath bark. Positioning log piles within 20 feet of bird feeders or water sources creates convenient hunting grounds.
Damp, shady locations under trees or shrubs provide ideal microclimates for amphibians and moisture loving insects. These spots maintain consistent humidity levels that support diverse species while protecting smaller animals from predators. South facing slopes should be avoided as excessive sun exposure dries out logs too quickly.
Creating connecting corridors between log piles and other garden features helps wildlife navigate safely through outdoor spaces. Dense plantings or additional natural materials like stone piles extend habitat networks. This approach supports beneficial predators like snakes, ladybugs, and centipedes that help control pest populations throughout gardens.
Maintain Wildlife Log Areas Throughout Seasons
Keeping log piles consistently damp during dry spells ensures optimal conditions for resident wildlife populations. Light watering during extended drought periods prevents logs from drying out completely. Natural moisture retention improves when logs rest partially buried in soil or surrounded by mulch materials.
Seasonal monitoring reveals which species visit log habitats at different times throughout the year. Spring brings increased insect activity as temperatures warm and reproduction cycles begin. Summer months support peak wildlife diversity while autumn additions of fallen leaves refresh food sources.
Replacing severely decomposed logs maintains habitat structure while allowing natural succession to continue. We suggest adding one or two fresh logs annually rather than completely rebuilding pile systems. This gradual renewal process supports established wildlife communities while providing new resources for incoming species.
Use Logs as Natural Mulch and Soil Amendment

We can transform ordinary garden logs into powerful soil builders that naturally suppress weeds while enriching our growing spaces. Decomposing logs gradually release nutrients and organic matter directly into the soil, creating an efficient system that reduces both weeding and fertilization needs.
Understand the Benefits of Hugelkultur Gardening
Hugelkultur gardening revolutionizes how we build raised beds by placing logs at their core as long-term moisture and nutrient reservoirs. This ancient technique allows logs to decompose slowly over years, releasing nutrients continuously while reducing our need for frequent fertilization. Water retention becomes incredibly efficient with this method, making hugelkultur beds perfect for dry climates or water-wise gardening approaches.
Heat generation occurs naturally during the decomposition process, extending our growing season in cooler regions and creating warmer soil conditions. Buried logs act like sponges, absorbing water during wet periods and slowly releasing it during dry spells. Root systems develop deeper and stronger in hugelkultur beds as they navigate around decomposing wood, accessing nutrients at various soil levels.
Layer Logs With Organic Matter for Soil Building
Layering logs with organic materials creates a natural woodland decomposition system that mimics forest floor conditions. We alternate layers of logs and branches with compost, leaves, grass clippings, and manure to enhance soil structure and boost nutrient content. This stratified approach ensures continuous organic matter breakdown while maintaining proper aeration throughout the growing medium.
Earthworms and beneficial microbes flourish in these layered systems, further improving soil health through their natural activities. Branches and smaller woody debris fill gaps between larger logs, creating diverse decomposition zones that support various beneficial organisms. Organic materials like kitchen scraps and garden waste can be added to upper layers, providing immediate nutrients while logs supply long-term soil building components.
Monitor Decomposition and Nutrient Release
Decomposition rates vary based on log species, moisture levels, and environmental conditions, requiring regular monitoring to maintain optimal soil fertility. We observe changes in log texture and firmness to gauge when additional organic material or mulch may be needed. Fresh logs temporarily deplete nitrogen during initial decomposition stages, but this effect balances out as the process continues over time.
| Nutrient | Release Timeline | Garden Impact |
|---|---|---|
| Nitrogen | 6-12 months | Initial depletion, then steady release |
| Phosphorus | 12-24 months | Gradual availability for root development |
| Potassium | 18-36 months | Long-term soil fertility enhancement |
Testing soil pH annually helps us track changes as logs break down and release organic acids. Visual inspection of log surfaces reveals fungal activity and decomposition progress, indicating healthy soil network development. Adding supplemental nitrogen sources during the first year compensates for temporary nutrient tie-up while logs establish their decomposition cycle.
Conclusion
Transforming your garden with logs opens up endless possibilities for both beauty and functionality. We’ve explored how these versatile natural materials can create everything from practical pathways and retaining walls to wildlife habitats that support local ecosystems.
The beauty of working with logs lies in their accessibility and sustainability. Most projects require only basic tools and can be completed by gardeners of any skill level while providing long-lasting results that improve with age.
Whether you’re building raised beds using hugelkultur methods or crafting decorative sculptures that serve as focal points your garden will benefit from the rustic charm and practical advantages that logs provide. These natural elements seamlessly blend with existing landscapes while offering cost-effective answers for common gardening challenges.
Start with simple projects like log edging or stepping stones then gradually work toward more complex structures as your confidence grows. Your garden will thank you for these thoughtful additions that enhance both its ecological value and visual appeal.
Frequently Asked Questions
What are the main benefits of using logs in garden design?
Garden logs offer both practical and aesthetic benefits as versatile design elements. They provide an eco-friendly alternative to expensive hardscaping materials while creating rustic charm in outdoor spaces. Logs can be repurposed for seating areas, raised beds, pathways, and borders. Most log projects require minimal tools and experience, making them accessible to gardeners of all skill levels while adding natural beauty to any landscape.
Which type of wood is best for garden log projects?
Cedar logs are the top choice for garden projects due to their exceptional durability against decay and insects. They naturally resist rot and weather damage, making them ideal for long-term outdoor use. Other viable options include locust, oak, and black walnut logs, each offering specific benefits. For retaining walls, pressure-treated logs like Scottish pine provide additional protection against moisture and soil contact.
How do I create stable log borders for my garden?
To create stable log borders, select appropriate log sizes and dig trenches to one-third of the log’s diameter for proper anchoring. Use wooden stakes or rebar to secure logs and prevent movement. Cedar logs work best for their rot resistance. Regular maintenance includes annual inspections, cleaning debris, and winter preparation to protect against freeze damage and ensure long-lasting, attractive borders.
What is the hugelkultur method mentioned for raised beds?
Hugelkultur is an advanced gardening technique that uses logs as the foundation layer in raised beds. Decaying logs act as moisture and nutrient reservoirs, improving water retention and soil fertility over time. This method involves layering logs with organic matter like compost and soil, creating a rich growing environment that supports beneficial organisms and extends the growing season naturally.
How do I prepare the ground for log pathway installation?
Ground preparation is crucial for pathway longevity. Start by clearing all debris and vegetation from the planned route. Level the ground to ensure even stepping stones, then install a weed barrier to prevent unwanted plant growth. Cut logs into uniform thickness sections for safety and stability. Consider adding decorative elements between log rounds to enhance the overall aesthetic appeal.
What drainage considerations are important for log retaining walls?
Proper drainage is essential for log retaining wall stability. Install geotextile fabric and gravel layers behind the wall to prevent water buildup. Assess your garden’s slope and observe natural water flow patterns before construction. Connect to existing drainage systems when possible to maximize effectiveness. Without adequate drainage, water pressure can compromise the wall’s structural integrity and lead to failure.
How do I create planters from logs?
To create log planters, select appropriately sized logs and carefully hollow them out while maintaining structural integrity. Install drainage holes in the bottom to prevent root rot. Fill with a nutrient-rich soil mix combining compost and organic matter. Choose suitable plants like succulents, herbs, and small flowering plants. Avoid deep-rooted vegetables and large perennials that may outgrow the container.
Can logs be used to attract wildlife to my garden?
Yes, logs create excellent wildlife habitats when strategically placed. Build log piles to attract beneficial insects, ensuring proper air circulation between logs. Position logs in quiet garden areas to provide shelter for birds and small animals. Different log sizes accommodate various wildlife species. Regular seasonal maintenance helps maintain optimal conditions while supporting local biodiversity and creating thriving garden ecosystems.
How do logs benefit soil health as they decompose?
Decomposing logs act as natural soil amendments, enriching the earth with nutrients while suppressing weeds. They function as moisture reservoirs, improving water retention during dry periods. As logs break down, they feed beneficial organisms like earthworms, creating rich soil environments. The decomposition process releases nutrients gradually over several years, providing long-term soil fertility and supporting healthy plant growth naturally.
What maintenance do log garden features require?
Log garden features need regular maintenance to ensure longevity. Conduct annual inspections to check for damage, rot, or pest issues. Clean debris and dirt buildup regularly to prevent moisture retention. Apply weather-resistant finishes to exposed surfaces when needed. Prepare features for winter by clearing drainage paths and protecting against freeze damage. Monitor decomposition rates in soil-contact applications.