When we step into our gardens we want to enjoy every moment regardless of what Mother Nature throws our way. That’s where smart garden shelter ideas come into play – transforming our outdoor spaces into year-round havens that protect us from scorching sun blazing rain and chilly winds.
We’ve all experienced that frustration of planning the perfect garden party only to have unexpected weather crash the celebration. Or maybe we’ve watched helplessly as our favorite outdoor furniture takes a beating from the elements season after season. The good news? Creating effective garden shelter doesn’t require a massive budget or extensive construction skills.
From simple DIY answers using everyday materials to stunning permanent structures that add serious value to our property we’ll explore shelter options that fit every garden size style and budget. Whether we’re looking to create a cozy reading nook or protect an entire entertaining area these practical ideas will help us maximize our outdoor living potential.
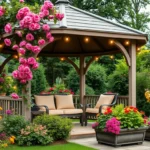
Build a Classic Garden Gazebo for Timeless Elegance
Garden gazebos represent the pinnacle of outdoor shelter elegance and transform any yard into a sophisticated retreat. These permanent structures offer year-round protection while creating a stunning focal point that increases property value.
Choose Between Wood, Metal, or Vinyl Materials
Cedar and redwood gazebos provide natural beauty and excellent weather resistance without requiring frequent maintenance. Cedar costs approximately $15-25 per square foot and naturally repels insects while developing an attractive silver-gray patina over time.
Pressure-treated pine offers the most budget-friendly wood option at $8-15 per square foot but requires annual staining or sealing to prevent rot and insect damage. Pine gazebos typically last 15-20 years with proper maintenance.
Aluminum gazebos deliver exceptional durability and require virtually no maintenance while resisting rust and corrosion. These structures cost $20-35 per square foot and easily support heavy snow loads in northern climates.
Steel gazebos provide maximum strength for large structures but need powder coating or galvanizing to prevent rust. Steel options range from $25-40 per square foot and can support elaborate roof designs.
Vinyl gazebos combine low maintenance with clean aesthetics and never require painting or staining. Vinyl materials cost $18-30 per square foot and resist fading, cracking, and insect damage for decades.
Consider Size and Placement for Maximum Impact
Eight-foot octagonal gazebos accommodate 4-6 people comfortably and work perfectly in smaller gardens without overwhelming the space. These compact structures require only 64 square feet of ground space.
Ten-foot gazebos seat 6-8 people and provide ideal proportions for medium-sized yards while leaving room for outdoor furniture and movement. Most homeowners find this size offers the best balance of functionality and space usage.
Twelve-foot gazebos create spacious entertaining areas for 8-12 people and support full dining sets or lounge furniture arrangements. These larger structures work best in yards exceeding 1,000 square feet.
Strategic placement maximizes both views and protection by positioning gazebos 15-20 feet from the house with clear sightlines to gardens or water features. Corner locations often provide natural windbreaks while maintaining privacy.
Foundation requirements include level ground with proper drainage and concrete footings extending below the frost line in cold climates. Gravel pads work well in areas with good drainage and mild winters.
Add Curtains or Screens for Weather Protection
Outdoor curtains create instant privacy and wind protection while adding color and softness to hard gazebo lines. Weather-resistant fabrics like Sunbrella or polyester blends resist fading and mildew in outdoor conditions.
Retractable screens offer flexible protection from insects and light rain while maintaining open-air feeling when not needed. These systems cost $200-500 per opening and operate with simple pull-cord mechanisms.
Clear vinyl panels provide wind and rain protection while preserving views and natural light throughout all seasons. Removable panels allow easy storage during mild weather and cost $50-100 per panel.
Bamboo roll-up shades deliver natural sun protection and create tropical ambiance while filtering harsh afternoon light. These budget-friendly options cost $30-80 each and complement wood gazebo materials perfectly.
Mosquito netting transforms gazebos into bug-free sanctuaries during summer evenings and costs only $40-100 for complete coverage. Fine mesh materials allow airflow while blocking even the smallest insects.
Create a Simple Garden Pergola for Climbing Plants

Building a simple garden pergola offers us an elegant way to create natural shade while supporting our favorite climbing plants. We can construct this classic structure using vertical posts and horizontal beams that provide the perfect framework for vegetation to flourish.
Select Appropriate Wood Treatment for Longevity
Choosing durable wood materials like cedar or redwood ensures our pergola withstands weather conditions for years to come. We must treat the wood with appropriate sealants or stains to protect against rot and pest damage that can compromise structural integrity.
Applying wood treatment products creates a protective barrier that extends the lifespan of our pergola significantly. Regular maintenance becomes crucial for preserving the structure’s appearance and functionality over time.
Weather resistance improves dramatically when we use proper treatment techniques on our pergola materials. We should reapply protective coatings every few years to maintain optimal protection against moisture and UV damage.
Design for Your Favorite Climbing Vines
Selecting climbing plants that thrive in our local climate ensures successful growth and coverage for our pergola structure. We can choose English ivy or Boston ivy for cooler climates while wisteria works beautifully in warmer regions.
Plant selection directly impacts the visual appeal and functionality of our pergola shelter. We need to consider mature plant size and growth patterns when designing the structure’s dimensions and spacing.
Support systems within our pergola design must accommodate the weight and spread of fully grown climbing vines. We should install additional horizontal supports or wire guides to help plants establish proper climbing patterns.
Growing conditions like sunlight exposure and soil quality affect how quickly our chosen vines will cover the pergola structure. We can enhance plant growth by incorporating proper irrigation and fertilization into our garden maintenance routine.
Incorporate Retractable Canopy Options
Adding retractable canopy features to our pergola creates flexible shade options that we can adjust based on weather conditions. We can attach fabric panels or canvas materials to the pergola’s horizontal beams for easy operation.
Canopy functionality should allow us to open and close the covering quickly when weather changes unexpectedly. We need to choose weather resistant fabrics that can withstand wind and rain without tearing or fading.
Installation of pulley systems or track mechanisms makes operating our retractable canopy effortless and convenient. We can position these hardware elements to ensure smooth movement while maintaining the pergola’s aesthetic appeal.
Fabric selection for our canopy affects both durability and visual impact of the overall pergola design. We should consider colors and patterns that complement our garden’s existing design elements while providing adequate sun protection.
Install a Pop-Up Canopy for Instant Shade

Pop-up canopies offer immediate weather protection when we need quick garden shelter answers. These portable structures unfold within minutes and deliver instant shade for outdoor events, family gatherings, or daily garden activities.
Compare Different Fabric Types and UV Protection
Polyester fabrics dominate the pop-up canopy market due to their lightweight properties and moderate durability. These materials resist fading and provide decent water resistance for light rain conditions.
Nylon options deliver superior strength and tear resistance compared to polyester alternatives. We’ll find these fabrics particularly useful in high-traffic areas where the canopy might experience frequent setup and breakdown.
Canvas materials offer premium durability and natural UV resistance but add important weight to our portable shelter setup. Heavy-duty canvas canopies withstand harsh weather conditions better than synthetic alternatives.
UV protection ratings vary dramatically between fabric types and manufacturers. Look for canopies with UPF 50+ ratings that block 98% of harmful UV rays, especially when planning extended outdoor exposure.
Coated fabrics feature specialized UV-resistant treatments that enhance protection beyond the base material properties. These treatments typically include silver backing or chemical coatings that reflect solar radiation effectively.
Evaluate Portability and Storage Requirements
Weight considerations become crucial when we plan to transport our pop-up canopy frequently. Standard 10×10 foot canopies typically weigh between 25-45 pounds, with lighter models using aluminum frames instead of steel construction.
Compact storage dimensions allow us to fit most pop-up canopies in car trunks or garage corners. Folded canopies usually measure 4-6 feet in length and 8-12 inches in width when properly collapsed.
Carrying cases and wheels significantly improve transportation convenience for heavier canopy models. We recommend investing in canopies that include wheeled bags or backpack-style carriers for easy movement.
Storage conditions directly impact canopy longevity and performance over time. Dry storage prevents mold, mildew, and fabric degradation that occurs when moisture remains trapped in folded materials.
Setup time varies from 2-10 minutes depending on canopy design and user experience. Quick-release mechanisms and color-coded assembly points help streamline the installation process for busy outdoor events.
Choose Anchoring Systems for Windy Conditions
Stakes work effectively in soft ground conditions like grass, sand, or loose soil surfaces. Metal stakes penetrate deeper than plastic alternatives and provide superior holding power in moderate wind conditions.
Sandbags deliver reliable anchoring on hard surfaces where stakes cannot penetrate concrete, asphalt, or packed earth. We recommend using 20-25 pound sandbags at each corner for optimal stability.
Weight plates offer permanent anchoring answers for frequently used canopy locations. These heavy-duty options typically weigh 35-50 pounds each and eliminate the need for ground penetration.
Guy lines and tensioning systems distribute wind loads across multiple anchor points. Adjustable rope systems with built-in tensioners help maintain proper canopy shape during variable wind conditions.
Wind ratings indicate maximum safe operating conditions for different canopy models. Most residential pop-up canopies handle winds up to 15-20 mph safely, while commercial-grade units withstand 25-35 mph gusts with proper anchoring.
Reinforced frame designs feature additional cross-bracing and thicker materials at stress points. These enhanced structures resist frame collapse and fabric tearing during unexpected wind events.
Construct a Garden Arbor as a Decorative Entry

Garden arbors create stunning entrance points that transform ordinary pathways into enchanting passages. We’ll explore how to design an arbor that welcomes guests while supporting beautiful climbing plants throughout the seasons.
Plan the Perfect Width for Walkways
Determining the right arbor width ensures comfortable passage while maintaining visual proportions. Standard walkway arbors should measure between 4 to 6 feet wide to accommodate two people walking side by side. Single person passages work well at 3 to 4 feet wide, creating an intimate garden experience.
Consider your garden’s scale when selecting arbor dimensions. Large gardens benefit from wider arbors measuring 6 to 8 feet, which create dramatic focal points without overwhelming the space. Smaller gardens require narrower structures around 3 to 4 feet to maintain proper proportions.
Height measurements should complement the width for balanced aesthetics. We recommend 7 to 8 feet tall arbors for standard widths, allowing climbing plants adequate growing space. Taller structures measuring 8 to 10 feet work best with wider arbors exceeding 6 feet.
Select Climbing Plant Varieties
Choosing appropriate climbing plants ensures your arbor remains beautiful year after year. Fast growing varieties like clematis and honeysuckle establish quickly, providing coverage within one to two growing seasons. Slower growing options such as climbing roses create long lasting displays but require patience for full coverage.
Match plant selection to your local climate conditions for optimal growth. Cold hardy varieties like Boston ivy and Virginia creeper thrive in northern regions, withstanding temperatures below freezing. Warm climate gardeners benefit from bougainvillea and jasmine, which flourish in temperatures above 50°F.
Consider maintenance requirements when selecting climbing plant varieties. Low maintenance options include trumpet vine and grape vines, requiring minimal pruning and care. High maintenance choices like climbing roses need regular pruning, fertilizing, and pest management throughout the growing season.
Design for Year-Round Visual Appeal
Incorporating evergreen elements maintains arbor interest during winter months. Evergreen climbers such as English ivy and wintercreeper provide consistent foliage coverage throughout all seasons. Deciduous plants offer seasonal variety but leave bare structures during dormant periods.
Adding architectural details enhances the arbor’s appearance when plants are dormant. Decorative brackets, carved posts, and lattice panels create visual interest beyond climbing plant coverage. Metal accents and copper elements develop attractive patinas over time, adding character to the structure.
Strategic lighting transforms arbors into evening focal points throughout the year. Solar powered LED strips wrapped around posts provide gentle illumination without electrical installation. String lights draped across the top create magical ambiance for nighttime garden enjoyment.
Design a Living Willow Shelter for Natural Beauty

Creating a living willow shelter brings organic elegance to our garden while providing functional outdoor protection. These sustainable structures grow more beautiful over time as the willow branches take root and flourish naturally.
Source Fresh Willow Branches for Weaving
Harvesting timing makes all the difference when we’re collecting willow branches for our shelter project. Late winter and early spring offer the optimal window for gathering branches since they’re most flexible and easier to weave during this dormant season.
Species selection determines the success of our weaving project from the start. Salix alba and Salix viminalis provide excellent pliability and durability for shelter construction. We’ll want to choose branches that are young, straight, and approximately 6 to 8 feet long for best results.
Freshness preservation ensures our willow branches remain workable throughout the building process. Store cut branches in water or moist sand if we can’t use them immediately. This keeps them supple and prevents cracking during the weaving process.
Learn Basic Weaving Techniques
Foundation establishment starts with planting sturdy willow rods directly into moist ground or securing them to a metal frame for additional support. Space the vertical supports 12 to 18 inches apart to create a strong base structure for our shelter.
Weaving patterns transform our basic framework into beautiful curved shapes like arches or domes. Start at the bottom and work upward, bending each horizontal branch behind one vertical rod and in front of the next. We’ll alternate the pattern with each new row to create stability.
Shape formation requires patience as we gradually bend the branches into our desired shelter design. Work slowly to avoid snapping the willow, and use gentle pressure to guide each branch into position. The natural flexibility of fresh willow makes even complex curves achievable with practice.
Plan for Growth and Maintenance
Pruning schedules keep our living willow shelter healthy and properly shaped throughout the growing season. Trim new growth every 4 to 6 weeks during spring and summer to maintain the structure’s form and encourage bushier growth patterns.
Support systems become crucial as our shelter matures and the willow branches grow heavier. Install additional stakes or wire supports where needed to prevent sagging or structural collapse. Check these supports regularly and adjust them as the shelter develops.
Growth management requires ongoing attention to ensure our shelter remains both beautiful and functional. Remove any dead or diseased branches immediately, and guide new growth along our desired pathways. We’ll need to water the shelter during dry periods since the rooted willow branches require consistent moisture to thrive.
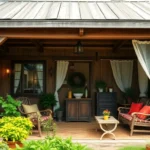
Build a Rustic Garden Lean-To Structure

Building on our exploration of various garden shelter options, we’ll now examine one of the most charming and practical answers for creating cozy outdoor spaces. A rustic garden lean-to structure offers the perfect blend of functionality and natural appeal while maintaining simplicity in both design and construction.
Use Reclaimed Materials for Cost Savings
Reclaimed wood and salvaged materials transform your garden lean-to project into an affordable, sustainable try that captures authentic rustic character. Old barn wood, weathered fence posts, and recycled metal roofing create unique textures and tell stories through their natural patina and wear patterns. These materials cost significantly less than new lumber while adding genuine historical charm that new materials simply can’t replicate.
Salvaged timber naturally weathers over time, developing the organic aging process that enhances the structure’s integration with your garden environment. We recommend sourcing materials from local demolition sites, salvage yards, or online marketplaces where reclaimed wood often sells for 50-70% less than new construction materials. Recycled metal sheeting works exceptionally well for roofing, providing durability while maintaining the rustic aesthetic through its weathered appearance.
Position Against Existing Walls or Fences
Positioning your lean-to shelter against an existing wall or fence maximizes structural stability while minimizing construction complexity and material requirements. The solid backdrop provides essential support for your lean-to roof framework, eliminating the need for additional vertical posts and reducing overall building time by approximately 40%.
Strategic placement against sturdy structures like garage walls, property fences, or garden walls creates seamless integration between your shelter and existing industry features. This approach saves valuable yard space compared to freestanding structures while creating natural wind protection from prevailing weather patterns. We suggest choosing walls that face away from dominant storm directions to enhance the shelter’s protective capabilities.
Existing structures also provide convenient attachment points for roof rafters and side panels, simplifying the construction process for DIY builders with basic carpentry skills.
Add Storage Features for Garden Tools
Storage integration transforms your rustic lean-to from simple shelter into a highly functional garden workspace that keeps tools organized and easily accessible. Built-in shelving systems, tool hooks, and compartmentalized storage areas maximize the structure’s utility while maintaining clean, uncluttered outdoor spaces.
Wall-mounted shelves crafted from reclaimed wood accommodate pots, gardening supplies, and seasonal decorations while preserving floor space for larger equipment like wheelbarrows or lawn mowers. Metal hooks salvaged from old farm equipment or repurposed from other projects create authentic storage answers for hand tools, hoses, and extension cords.
Corner compartments and under-roof storage areas provide weather-protected spaces for fertilizers, seeds, and other materials that require dry conditions. These storage elements integrate seamlessly with the rustic design when constructed from matching reclaimed materials, ensuring your lean-to maintains its cohesive aesthetic while serving multiple practical functions throughout the growing season.
Install Shade Sails for Modern Garden Coverage

Installing shade sails transforms our garden spaces with contemporary style while delivering superior weather protection. These sleek fabric structures offer a perfect complement to the rustic charm of lean-to shelters we’ve explored.
Calculate Proper Tension and Angle
Proper tension creates the foundation for durable shade sail installation that withstands various weather conditions. We recommend achieving 15-20% fabric stretch during installation to prevent sagging while avoiding over-tensioning that could damage the material. Angles between 20-40 degrees provide optimal water runoff and wind resistance for most residential applications.
Measuring the distance between anchor points ensures we select appropriately sized sails with adequate tensioning capability. Hardware selection becomes critical, with stainless steel turnbuckles and D-shackles providing the adjustability needed for seasonal tension modifications. Wind load calculations help determine anchor point strength requirements, typically requiring 300-500 pounds of pull strength per corner depending on sail size.
Choose UV-Resistant Fabric Materials
UV-resistant fabric materials extend shade sail lifespan while maintaining vibrant colors throughout multiple seasons. High-density polyethylene (HDPE) fabrics offer superior UV protection ratings of UPF 50+ while providing 85-95% shade coverage for optimal comfort. Breathable knit construction allows air circulation that reduces wind stress and prevents fabric ballooning during storms.
Waterproof PVC options deliver complete rain protection but require steeper installation angles to prevent water pooling. We’ve found that solution-dyed acrylic fabrics maintain color integrity better than post-dyed alternatives, though they typically cost 20-30% more initially. Reinforced corner construction with multiple layers prevents tearing at high-stress connection points where hardware attaches.
Plan Multiple Sail Configurations
Multiple sail configurations maximize garden coverage while creating ever-changing visual interest throughout our outdoor spaces. Layered installations at varying heights generate natural air circulation patterns that enhance cooling effectiveness by up to 25% compared to single-sail setups. Overlapping triangular and square sails create interesting geometric patterns while eliminating coverage gaps.
Strategic spacing between sails prevents wind tunneling effects that could destabilize individual fabric panels during storms. We recommend maintaining 2-3 feet between sail edges to allow independent movement while preserving overall system stability. Color coordination across multiple sails creates cohesive design themes, with neutral tones like sand and charcoal providing timeless appeal that complements various garden styles.
Modular installation approaches allow seasonal adjustments, letting us remove or reposition individual sails based on changing sun patterns and weather requirements throughout the year.
Create a Garden Room with Glass or Polycarbonate Panels

Building a comprehensive garden room transforms any outdoor space into a functional retreat we can enjoy throughout the year. These enclosed structures offer the perfect balance between indoor comfort and outdoor connection to nature.
Consider Foundation and Drainage Requirements
Foundation selection directly impacts the longevity and stability of our garden room shelter. Concrete slabs provide the most durable base for larger structures, while gravel foundations offer excellent drainage for smaller installations. Paved surfaces work well for medium-sized garden rooms, especially when we’re working with existing hardscaping elements.
Proper drainage prevents costly structural damage and moisture-related issues that can compromise our investment. We need to ensure water flows away from the foundation by creating a slight slope or installing drainage channels around the perimeter. Ground preparation should include removing vegetation and compacting the soil to prevent settling over time.
Consider the terrain when selecting foundation materials based on your garden’s exact conditions. Sloped areas may require additional excavation or retaining walls, while level ground simplifies the installation process. Professional consultation helps determine load requirements for areas with heavy snowfall or high wind exposure.
Plan for Ventilation and Temperature Control
Ventilation systems prevent condensation buildup that can damage both the structure and stored items inside. Roof vents create natural air circulation by allowing hot air to escape while drawing cooler air through lower openings. Operable windows provide manual control over airflow and offer emergency exits when needed.
Temperature regulation extends the usable seasons for our garden room throughout the year. Double-glazed panels provide superior insulation compared to single-pane options, reducing heat loss in winter and heat gain in summer. Insulated roofing materials further improve thermal performance and reduce energy costs for heating or cooling.
Strategic placement of vents maximizes cross-ventilation while minimizing weather exposure during storms. Ridge vents work particularly well for peaked roofs, while wall-mounted vents suit flat or shed-style designs. Automated vent openers respond to temperature changes without requiring manual adjustment.
Design for Multi-Season Garden Use
Flexible design elements allow us to adapt our garden room for changing weather conditions throughout the year. Retractable side panels provide ventilation during warm months while sealing out cold drafts in winter. Overhangs and awnings create additional shade and rain protection without permanent structural changes.
Weather-resistant materials ensure our garden room withstands temperature extremes and moisture exposure. Polycarbonate panels offer excellent impact resistance and lighter weight compared to glass options, making them ideal for areas prone to hail or falling branches. Glass panels provide superior clarity and long-term durability for premium installations.
Interior heating options extend usability during colder months when natural sunlight isn’t sufficient. Electric heaters work well for occasional use, while radiant floor heating provides consistent comfort for frequent winter use. Ceiling fans improve air circulation and reduce cooling costs during hot summer periods.
Adaptable features maximize our investment by serving multiple purposes across seasons. Removable furniture allows the space to function as a greenhouse in winter and entertainment area in summer. Built-in storage keeps seasonal items organized while maintaining a clean, uncluttered appearance year-round.
Build a Simple Garden Tent Frame Structure

Creating our own garden tent provides flexibility and customization options that pre-made structures can’t match. We’ll explore the essential components that make these temporary shelters both durable and practical for various outdoor needs.
Select Weather-Resistant Frame Materials
Wood frames offer natural beauty and strength when we choose pressure-treated lumber or durable hardwoods like teak and cedar. These materials resist moisture damage and insect infestation while providing excellent structural integrity for temporary garden shelters.
Metal options deliver superior durability through aluminum or steel construction with powder coating protection against rust and corrosion. Aluminum frames remain lightweight for easy transport while steel provides maximum strength for windy conditions.
Plastic and PVC materials create budget-friendly answers that resist weather damage without requiring maintenance treatments. These lightweight options work perfectly for seasonal shelters that we’ll assemble and store multiple times throughout the year.
| Material Type | Weight | Durability | Cost | Best Use |
|---|---|---|---|---|
| Pressure-treated wood | Heavy | High | Medium | Permanent seasonal setup |
| Aluminum | Light | Very High | High | Frequent assembly/storage |
| Steel | Heavy | Very High | Medium | High wind areas |
| PVC | Very Light | Medium | Low | Occasional use |
Choose Appropriate Covering Materials
Waterproof canvas and nylon fabrics provide excellent protection from rain and sun while maintaining breathability for comfortable interior conditions. UV-resistant materials extend the lifespan significantly and prevent color fading during extended outdoor exposure.
Clear plastic sheets allow natural sunlight to penetrate while keeping precipitation out of our garden workspace or seating area. These transparent covers work well for plant protection but may require additional UV protection for long-term use.
Natural materials like thatched or bamboo coverings create rustic aesthetics that blend seamlessly with garden environments. These eco-friendly options provide moderate weather protection while adding organic texture and visual interest to our outdoor spaces.
Fabric weight and weave determine performance levels for different weather conditions and usage patterns. Heavy-duty canvas withstands harsh conditions while lighter nylon works well for mild weather applications and frequent setup changes.
Design for Easy Assembly and Disassembly
Interlocking components eliminate the need for tools during setup by using snap-together joints and twist-lock connections. These systems reduce assembly time significantly while ensuring secure connections that won’t loosen during use.
Lightweight construction enables single-person assembly without sacrificing structural strength or weather resistance. We can achieve this balance by selecting hollow metal tubes or engineered wood components that maintain rigidity while reducing overall weight.
Color-coded parts simplify the assembly process by marking corresponding components with matching colors or labels. This system prevents confusion during setup and helps us identify proper placement quickly without consulting instruction manuals.
Tool-free fasteners include wing nuts, thumb screws, and spring-loaded pins that secure without requiring wrenches or screwdrivers. These user-friendly connections speed up both assembly and disassembly while ensuring we won’t lose essential hardware during storage.
Conclusion
Creating the perfect garden shelter doesn’t have to be overwhelming or expensive. We’ve explored many options that cater to every skill level budget and garden style—from elegant gazebos and living willow structures to practical pop-up canopies and modern shade sails.
The key is choosing a solution that matches your exact needs and outdoor space. Whether you’re looking for permanent architectural elements or flexible temporary options there’s a shelter design that’ll transform your garden into a year-round sanctuary.
Start with one project that excites you most and gradually build your outdoor retreat. With the right shelter in place you’ll maximize your garden’s potential and create lasting memories in your enhanced outdoor living space.
Frequently Asked Questions
What are the most cost-effective materials for building a garden gazebo?
Pressure-treated pine offers the most budget-friendly option for wooden gazebos, while aluminum provides an affordable metal alternative. Vinyl gazebos require higher upfront costs but offer long-term savings through minimal maintenance requirements. For maximum value, consider the total cost of ownership including maintenance over time.
How do I choose the right size gazebo for my garden?
For small gardens, opt for 8×8 feet gazebos. Medium gardens accommodate 10×12 feet structures, while larger spaces can handle 12×16 feet or bigger. Consider leaving at least 3-4 feet of clearance around the gazebo and ensure it doesn’t overwhelm your garden’s proportions or block important views.
What climbing plants work best for garden pergolas and arbors?
Fast-growing options include clematis, honeysuckle, and morning glories for quick coverage. Climbing roses provide beautiful blooms but grow slower and require more maintenance. Consider your local climate conditions and choose plants that match your maintenance preferences and desired visual impact throughout the seasons.
How do I properly anchor pop-up canopies in windy conditions?
Use a combination of stakes, sandbags, and weight plates for maximum stability. Stakes work best in soft ground, while sandbags and weights are ideal for hard surfaces. Look for canopies with wind ratings and reinforced frames. Always check weather conditions and consider taking down canopies during severe weather warnings.
What’s the difference between shade sails and traditional canopies?
Shade sails offer modern aesthetics with superior UV protection and can be installed at various angles for better coverage. They’re more permanent than pop-up canopies but require proper tensioning and anchor points. Traditional canopies are more portable and easier to set up but may offer less customization and durability.
How much maintenance do living willow shelters require?
Living willow shelters need regular pruning during dormant seasons and occasional watering during dry periods. You’ll need to weave new growth back into the structure and monitor for pests or diseases. While maintenance is ongoing, these shelters become more beautiful and stable as they mature over time.
What foundation is needed for a garden room with glass panels?
Larger garden rooms require concrete slab foundations for stability and proper weight distribution. Smaller structures can use compacted gravel bases with proper drainage. Ensure adequate drainage around the foundation to prevent moisture issues and consider local building codes that may require permits for permanent structures.
Can I build a garden lean-to without construction experience?
Yes, lean-tos are beginner-friendly projects, especially when built against existing walls or fences for support. Use simple post-and-beam construction with basic tools. Start with smaller dimensions and reclaimed materials to keep costs low while gaining experience. Many designs require only basic carpentry skills and common hardware store materials.
What’s the best fabric for retractable pergola canopies?
Solution-dyed acrylic fabrics offer the best combination of UV resistance, water repellency, and color retention. Canvas provides durability but may require more maintenance. Avoid basic polyester for permanent installations as it degrades quickly under UV exposure. Consider fabrics with at least UPF 50+ rating for optimal sun protection.
How do I winterize my garden shelter structures?
Remove fabric elements like canopies and screens to prevent snow damage. Apply wood preservatives to wooden structures before winter. Secure loose components and clear gutters or drainage areas. For metal structures, check for rust and apply protective coatings. Store removable elements in dry locations to prevent mold and deterioration.