We’ve all been there – watching our beautiful garden turn into a soggy mess after heavy rainfall, with precious plants drowning in standing water. Poor drainage doesn’t just kill your plants; it creates breeding grounds for pests and makes your outdoor space unusable for days or even weeks.
The good news? Effective garden drainage isn’t rocket science, and you don’t need to hire expensive contractors to fix the problem. With the right drainage answers, we can transform waterlogged areas into thriving garden spaces that handle even the heaviest downpours.
Whether you’re dealing with clay soil that won’t absorb water, low-lying areas that collect runoff, or slopes that cause erosion, we’ll show you proven drainage techniques that actually work. From simple DIY fixes to more comprehensive systems, these garden drainage ideas will help you reclaim your outdoor space and protect your investment in plants and landscaping.
Assess Your Garden’s Drainage Problems Before Choosing Solutions
Understanding your exact drainage challenges helps us select the most effective answers for your garden’s unique conditions.
Identify Standing Water Areas
Walk through your garden 24 to 48 hours after heavy rainfall to locate areas where water remains pooled on the surface. These wet spots indicate poor soil drainage and require immediate attention to prevent root rot and plant damage.
Mark these problem zones with garden stakes or spray paint to track their locations throughout different weather conditions. Low lying areas, spots near downspouts, and sections with compacted soil typically show the most persistent water accumulation.
Document the size and depth of each standing water area using measurements and photos. Small puddles under 2 feet wide often need simple answers like soil amendments, while larger waterlogged zones exceeding 10 feet may require French drains or catch basins.
Test Soil Permeability Rates
Dig test holes 12 inches deep and 6 inches wide in various garden locations, especially where you’ve noticed drainage issues. Fill each hole completely with water and time how long it takes to drain completely.
Measure drainage rates to determine soil permeability levels throughout your garden space. Well draining soil should empty within 4 to 6 hours, while clay heavy soil may take 12 to 24 hours or longer to drain properly.
Record your findings in a simple chart noting location, soil type, and drainage time for each test hole. Areas draining slower than 8 hours per foot of depth need drainage improvements before planting sensitive vegetation.
| Drainage Time | Soil Condition | Action Needed |
|---|---|---|
| Under 4 hours | Excellent drainage | Monitor only |
| 4-8 hours | Good drainage | Minor amendments |
| 8-24 hours | Poor drainage | Drainage system required |
| Over 24 hours | Very poor drainage | Major intervention needed |
Observe Water Flow Patterns During Rain
Watch how rainwater moves across your industry during the next moderate to heavy storm to understand natural drainage patterns. Water always follows the path of least resistance, revealing slopes and problem areas you might not notice during dry conditions.
Notice where runoff collects and where it flows freely to identify both problem spots and potential drainage outlets. Areas where water rushes too quickly may cause erosion, while locations where flow stagnates need intervention to prevent flooding.
Track the direction and speed of water movement from higher elevations toward lower areas of your property. This information helps us design drainage answers that work with natural water flow rather than against it, creating more effective and sustainable systems.
Install French Drains for Effective Water Redirection
 1")
French drains redirect water away from problematic areas, preventing the waterlogging we’ve identified in our assessment. We’ll create an effective drainage system by following these essential steps.
Choose Appropriate Pipe Materials and Sizes
PVC pipes offer the most reliable foundation for our French drain system. These durable materials resist corrosion and maintain their structural integrity for decades. Corrugated plastic pipes provide an alternative option that’s easier to handle during installation while delivering comparable performance.
Pipe sizing depends on the volume of water we need to redirect from our drainage area. Standard 4-inch diameter pipes work well for most residential garden applications. Larger areas or regions with heavy rainfall may require 6-inch pipes to handle increased water flow effectively.
Quality materials ensure our drainage investment performs optimally over time. We should select pipes with adequate perforation spacing, typically 3/8-inch holes placed every 6 to 12 inches around the circumference.
Determine Optimal Drain Placement and Slope
Strategic placement at the lowest accumulation points maximizes our drain’s effectiveness. Water naturally flows to these depression areas, making them ideal locations for our drainage system entry points. We position drains where standing water consistently appears after our 24 to 48-hour observation period.
Proper slope ensures continuous water movement through our drainage system. The optimal gradient measures approximately 1% or 1 inch of drop per 100 feet of pipe length. This gentle slope prevents water from backing up while avoiding excessive flow speeds that could cause erosion.
Discharge points require careful consideration to direct water away from structures and planted areas. We route our drains toward natural drainage paths, storm drains, or designated runoff areas that won’t create new problems elsewhere on our property.
Add Gravel and Industry Fabric Layers
Gravel layers create the foundation that enables proper water filtration and flow. We place 3 to 4 inches of coarse gravel at the bottom of our 12 to 18-inch deep trench before installing the pipe. This base layer prevents the pipe from settling and provides excellent drainage capacity.
Industry fabric wrapping protects our system from long-term clogging issues. We wrap the perforated pipe completely in geotextile fabric before placing it in the trench with holes facing downward. This barrier prevents soil particles from entering the pipe while allowing water to pass through freely.
Additional gravel coverage completes our filtration system before backfilling. We surround the wrapped pipe with more coarse gravel, filling the trench to within 6 inches of ground level. The final layer of topsoil or sod restores the surface appearance while maintaining access to our drainage system.
Create Rain Gardens to Manage Excess Water Naturally
 2")
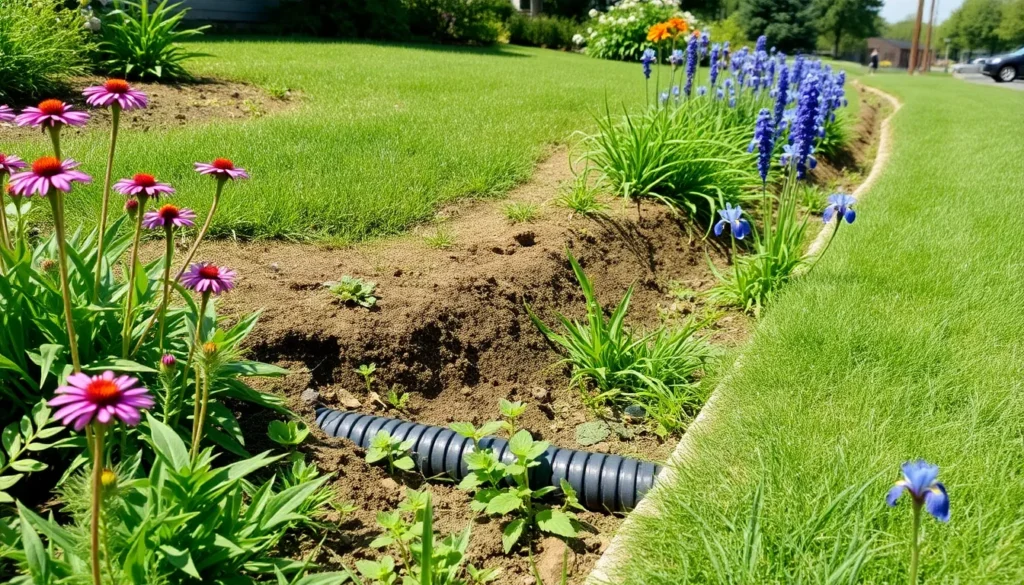
Rain gardens offer a sustainable alternative to traditional drainage systems by capturing and absorbing stormwater runoff naturally. These shallow, planted depressions transform excess water into a valuable resource while reducing flooding and water pollution in our landscapes.
Select Native Plants for Water Absorption
Native plants form the foundation of effective rain garden design because they’re naturally adapted to local climate conditions and soil types. Their deeper root systems create channels that improve soil permeability and dramatically increase water absorption rates compared to non-native alternatives.
We recommend selecting plants like purple coneflower, cardinal flower, and blue flag iris for their exceptional water-handling capabilities. These native species require minimal maintenance once established and actively promote healthy network development in our gardens.
Root systems of native plants also stabilize soil structure and prevent erosion during heavy rainfall events. Their natural adaptation means they’ll thrive in the alternating wet and dry conditions that rain gardens experience throughout the seasons.
Design Proper Garden Depth and Shape
Rain garden depth should measure between 4 to 8 inches to achieve optimal water collection and infiltration rates. This shallow depression design allows water to pool temporarily while preventing the standing water issues that can damage plants and create mosquito breeding grounds.
Shape your rain garden as a gently sloped basin with a flat bottom to distribute water evenly across the planted area. We avoid steep sides or deep pockets that concentrate water flow in single locations, which can cause erosion and plant stress.
The ideal rain garden shape directs runoff smoothly into the depression while maintaining proper drainage balance. This design protects both plant health and soil structure by managing water retention without creating waterlogged conditions.
Position Rain Gardens in Strategic Locations
Strategic positioning maximizes your rain garden’s water absorption potential and protects vulnerable industry areas from erosion damage. We recommend placing rain gardens at downspout discharge points where roof runoff naturally concentrates.
Low spots in your yard where water already collects present ideal opportunities for rain garden installation. These natural depressions require minimal excavation while providing maximum water interception benefits.
Areas near driveways, patios, and other impervious surfaces generate important runoff that rain gardens can effectively capture. Positioning rain gardens to intercept this water flow prevents erosion in other parts of your industry while reducing the burden on municipal storm drain systems.
Build Raised Garden Beds for Improved Drainage
 3")
Raised garden beds offer one of the most effective answers for drainage problems since their elevated design naturally prevents waterlogging that can harm plants. Creating these beds with proper materials and dimensions ensures our plants thrive in well-draining conditions.
Select Materials for Long-Lasting Construction
Cedar planks provide exceptional durability and natural rot resistance, making them our top choice for constructing raised beds that’ll withstand years of moisture exposure. Brick offers another excellent option with its timeless appearance and ability to handle wet conditions without deteriorating. Corten steel delivers modern aesthetics while providing superior weather resistance and structural integrity for larger bed designs.
Choosing materials that resist pest damage saves us from costly replacements down the road. Wood varieties like cedar naturally repel insects and moisture, while metal options eliminate concerns about termites or boring beetles entirely.
Calculate Ideal Bed Height and Width
Six inches represents the minimum height we recommend for basic drainage improvement, though this shallow depth limits our plant options significantly. Beds measuring 18 inches deep or more provide optimal drainage benefits while accommodating root vegetables, perennials, and deeper rooted plants effectively.
Width calculations should prioritize easy maintenance access from all sides of our raised beds. Three to four feet works perfectly for most gardeners since this dimension allows us to reach the center without stepping into the bed. Narrower beds work well against walls or fences where we can only access one side comfortably.
Fill Beds with Well-Draining Soil Mixtures
Topsoil mixed with compost and perlite creates the ideal foundation for our raised beds since this combination balances drainage with nutrient retention. Vermiculite serves as an excellent alternative to perlite when we want slightly more moisture retention without sacrificing drainage quality.
Organic matter like aged compost improves our soil structure by creating air pockets that allow excess water to drain while holding essential nutrients for plant growth. Adding a layer of gravel or small rocks at the bottom of our beds enhances drainage further by preventing water from pooling at the root level.
Perforated PVC pipes installed at the base of deeper beds ensure efficient water movement during heavy rainfall periods. These drainage systems maintain ideal moisture levels automatically, preventing both waterlogging and excessive drying that can stress our plants.
Implement Permeable Hardscaping Solutions
 4")
We can transform our gardens’ drainage challenges by incorporating hardscaping materials that allow water to naturally infiltrate the soil. These answers work alongside our existing drainage systems while creating functional pathways and surfaces.
Install Permeable Pavers for Walkways
Permeable pavers offer an excellent alternative to traditional solid surfaces while maintaining the polished look we want for our garden walkways. Water passes directly through these specialized pavers, reducing runoff and improving drainage throughout our industry. Unlike conventional pavers, permeable options decrease stormwater flow significantly while helping maintain consistent soil moisture levels around our plants.
We should select pavers with adequate spacing between units to maximize water infiltration. Installation requires a proper base of graded gravel and sand to ensure long-term functionality. These pavers work particularly well in high-traffic areas where we need durability without sacrificing drainage performance.
Use Gravel Paths Instead of Solid Surfaces
Gravel paths provide immediate drainage benefits while directing water flow away from areas where we don’t want accumulation. Water infiltrates directly into the soil through gravel surfaces, eliminating the runoff problems associated with solid walkways and patios. We can use different gravel sizes to create attractive pathways that complement our garden design while serving a practical drainage function.
Strategic placement of gravel paths helps channel water toward our rain gardens or away from vulnerable plant areas. Crushed stone or pea gravel works best for foot traffic, while larger decorative stones can define borders and direct water movement. Regular maintenance involves occasional raking to maintain even surfaces and optimal water flow patterns.
Create Stepping Stone Pathways
Stepping stones with intentional gaps between them help excellent water infiltration while providing stable walking surfaces throughout our gardens. Similar to gravel paths, this approach maintains soil health by allowing natural water absorption and reducing surface runoff. We can space stones strategically to accommodate both comfortable walking distances and optimal drainage performance.
The gaps between stones should measure 6 to 12 inches to balance accessibility with water management needs. Natural stone, concrete pavers, or recycled materials all work effectively for this purpose. Plant low-growing ground covers between stones to enhance soil stability and create attractive pathways that double as drainage answers.
Add Drainage Pipes and Channel Systems
 5")
Professional drainage systems offer comprehensive answers for managing water flow throughout your garden industry. These engineered approaches provide long-term effectiveness for persistent drainage challenges.
Install Underground Drainage Networks
French drains represent our most versatile underground solution for water management. We construct these systems using perforated pipes surrounded by gravel in carefully excavated trenches, creating efficient pathways for water collection and redirection. The process involves digging trenches with proper slope gradients, typically 1% to 2%, ensuring water flows naturally toward designated outlets.
Dry wells serve as underground collection points that capture and gradually disperse water into surrounding soil. We position these structures at key drainage convergence points, where multiple water sources meet. Construction requires excavating cylindrical chambers approximately 3 to 4 feet deep, then filling them with graded gravel materials that allow water infiltration while preventing structural collapse.
Network connectivity becomes crucial when installing multiple underground systems throughout larger properties. We connect individual French drains using solid pipe sections, creating comprehensive drainage networks that transport water efficiently across different garden zones. This approach prevents water accumulation in low-lying areas while maintaining consistent flow rates during heavy rainfall events.
Create Surface Water Channels
Swales function as shallow, vegetated channels that redirect surface water to desired locations within your industry. We design these features with gentle slopes between 1% and 5%, preventing erosion while encouraging steady water movement toward rain gardens or natural drainage outlets. Native grasses and sedges work particularly well for swale vegetation, as they tolerate both wet and dry conditions.
Dry creek beds combine aesthetic appeal with practical water management capabilities. We construct these features using various sized rocks and stones, creating natural-looking pathways that guide water flow during rainfall events. River rock ranging from 2 to 6 inches provides excellent water channeling, while decorative boulders add visual interest and help slow water velocity on steeper grades.
Channel systems offer more structured approaches to surface water management. We install PVC or aluminum channels with removable grates, allowing easy maintenance while preventing debris accumulation. These systems work exceptionally well along driveways, patios, and other hardscaped areas where precise water control becomes essential for preventing erosion or structural damage.
Connect Systems to Proper Outlets
Rain garden connections transform drainage system endpoints into beneficial industry features. We direct channel outlets into shallow depressions planted with native species that absorb and filter runoff naturally. This approach reduces stormwater volume while creating attractive garden focal points that support local biodiversity and soil health.
Storm drain integration ensures proper water disposal without overwhelming municipal systems. We connect our drainage networks to designated stormwater management infrastructure, following local regulations and permit requirements. This connection prevents flooding while contributing to community-wide water management efforts.
Natural discharge points provide sustainable alternatives for drainage system outlets. We identify existing low areas, seasonal streams, or permeable soil zones where water can safely infiltrate without causing erosion or property damage. These connections work particularly well in rural or suburban settings where natural drainage patterns already exist within the industry.
Improve Soil Composition for Better Water Flow
 6")
Addressing soil composition directly tackles the root cause of many drainage problems. Transforming compacted or poorly structured soil creates lasting improvements that benefit your entire garden network.
Incorporate Organic Matter and Compost
Organic matter acts as nature’s soil conditioner, dramatically improving water penetration and drainage capacity. We recommend mixing compost into existing soil at a ratio of 1:3 for optimal results. This amendment creates larger pore spaces between soil particles, allowing water to move freely rather than pooling on the surface.
Compost enhances soil structure by binding particles together into stable aggregates that resist compaction. Adding 2 to 4 inches of quality compost annually maintains these improvements over time. Well decomposed materials like leaf mold, aged manure, and kitchen compost work exceptionally well for drainage enhancement.
Add Sand and Perlite to Heavy Clay Soils
Clay soils present unique challenges due to their dense particle structure that traps water and restricts root growth. Incorporating coarse sand at a 20% ratio helps break up clay’s tight composition, creating channels for improved water movement. We specifically recommend builder’s sand or horticultural sand rather than fine sand, which can actually worsen drainage by creating a concrete like mixture.
Perlite offers another excellent amendment for heavy soils, providing lightweight aeration that doesn’t compact over time. Mix perlite into clay soil at approximately 10 to 15% by volume for noticeable drainage improvements. These volcanic glass particles maintain their structure indefinitely, offering permanent soil enhancement.
Combining both sand and perlite creates the most effective solution for transforming problematic clay soils into well draining growing mediums.
Test and Adjust Soil pH Levels
Soil pH directly impacts microbial activity that’s essential for maintaining healthy soil structure and drainage. Testing your soil’s pH levels reveals whether conditions support the beneficial organisms that break down organic matter and create stable soil aggregates.
Most garden plants and soil microbes thrive in slightly acidic to neutral conditions between 6.0 and 7.0 pH. Maintaining optimal pH levels enhances microbial activity, which helps decompose organic matter and improve overall soil structure. We recommend testing soil pH twice yearly using digital meters or test strips for accurate monitoring.
Adjusting pH involves adding lime to raise acidic soils or sulfur to lower alkaline conditions. These modifications support the biological processes that naturally improve soil drainage over time. Proper pH balance allows beneficial bacteria and fungi to flourish, creating the porous soil structure necessary for excellent water flow.
Utilize Natural Landscape Grading Techniques
 7")
Working with your industry’s natural topography offers the most sustainable approach to drainage management. Strategic grading techniques help direct water flow efficiently while preserving your garden’s aesthetic appeal.
Create Gentle Slopes Away from Structures
Establishing proper slope gradients prevents water from pooling near buildings and foundations. We recommend maintaining a gradient between 3% to 10% to ensure effective water movement without creating erosion problems. Steeper slopes can cause water to rush too quickly, while gentler gradients may not provide adequate drainage.
Directing water flow away from your home’s foundation protects both the structure and surrounding industry. Underground downspout systems offer an excellent solution for moving water further from buildings while maintaining clean sight lines. These buried drainage extensions can transport water 10 to 20 feet away from structures before releasing it into appropriate areas.
Plant selection plays a crucial role in slope stabilization and water management. Native species like succulents and ferns naturally absorb excess moisture while preventing soil erosion on graded surfaces. These plants establish strong root systems that hold soil in place during heavy rainfall events.
Build Swales and Berms for Water Direction
Swales function as natural channels that collect and direct surface water runoff toward desired locations. These shallow depressions work particularly well in areas with poor existing drainage where water tends to accumulate. Building swales requires careful attention to depth and width ratios to ensure proper water flow without creating stagnant areas.
Berms complement swales by creating elevated barriers that redirect water flow patterns. We position these earthen mounds strategically to guide water away from sensitive areas and toward collection points. Combining swales and berms creates an effective water management system that handles varying rainfall intensities.
Channel drains provide additional support for swale systems in areas requiring more precise water control. These linear drainage answers collect excess water from multiple sources and direct it through underground pipes to appropriate discharge points. Installing channel drains at key transition points enhances the overall effectiveness of natural grading techniques.
Reshape Problem Areas with Proper Contouring
Low lying spots require targeted reshaping to eliminate standing water problems. We identify these areas by observing water accumulation patterns 24 to 48 hours after rainfall events. Marking these zones helps determine the most effective contouring approach for each exact location.
French drains offer excellent answers for areas where surface grading alone cannot resolve drainage issues. These underground systems capture water from problem areas and transport it to better drainage locations through perforated pipes surrounded by gravel. Installing French drains along with surface contouring creates comprehensive drainage improvement.
Catch basins serve as collection points for excess water in reshaped areas where multiple drainage flows converge. We position these structures at the lowest points of contoured areas to capture water before it can cause erosion or plant damage. Connecting catch basins to underground drainage networks ensures efficient water removal during heavy precipitation events.
Install Catch Basins and Dry Wells
 8")
Installing catch basins and dry wells creates a comprehensive drainage system that efficiently manages excess water in your garden. These engineered answers work together to collect, store, and gradually release water into the surrounding soil.
Position Catch Basins in Low-Lying Areas
Positioning catch basins at the lowest points of water accumulation ensures maximum efficiency in your drainage system. We recommend identifying these natural collection points by observing where water gathers after heavy rainfall events. Mark these locations during your initial drainage assessment to create a strategic installation plan.
Installing catch basins requires adding gravel to the base and drilling small holes for optimal drainage performance. Connect each basin to a drain line that redirects water away from the surface toward your designated discharge area. This positioning strategy prevents water from pooling in vulnerable garden areas where plants might suffer from waterlogged conditions.
Size Dry Wells According to Water Volume
Sizing dry wells properly depends on calculating the volume of water they need to handle during peak rainfall events. We suggest measuring your roof area and calculating runoff volumes to determine the appropriate well capacity for your exact situation. Larger properties with extensive hard surfaces require correspondingly larger dry wells to manage increased water flow.
Dry wells function as discharge points for underground drainage systems, allowing collected water to percolate naturally into the ground. Design your dry well dimensions based on soil permeability rates and expected water volumes during heavy storms. This sizing approach ensures your system can handle runoff without overflowing during intense weather conditions.
Connect Systems with Underground Piping
Connecting catch basins and dry wells through underground piping creates a seamless water management network throughout your garden. We recommend using perforated pipes wrapped in industry fabric to prevent clogging while maintaining efficient water collection and redirection. Place these pipes in trenches filled with gravel to enhance drainage performance and system longevity.
Underground piping systems ensure smooth water flow from collection points to discharge locations without disrupting your garden’s surface appearance. Install these connections with proper slope gradients to maintain consistent water movement through the entire network. This integrated approach maximizes the effectiveness of both catch basins and dry wells working together as a unified drainage solution.
Maintain Your Garden Drainage System Long-Term
 9")
Once you’ve installed your drainage answers, establishing a consistent maintenance routine ensures optimal performance for years to come. Regular upkeep prevents costly repairs and keeps water flowing freely away from your garden’s vulnerable areas.
Schedule Regular Cleaning and Inspections
Annual inspections form the backbone of effective drainage maintenance, particularly for systems in areas prone to heavy rainfall or older installations. We recommend conducting thorough system checks during spring and fall seasons to identify potential problems before they escalate into major issues.
Semi-annual assessments allow us to catch debris buildup, pipe damage, or settling issues that could compromise system efficiency. During these inspections, we use garden hoses or shop vacuums to clear accumulated material from drains and pipes, ensuring unobstructed water flow throughout the network.
Documentation of each inspection helps track system performance over time, noting any recurring problem areas that may require additional attention or modifications.
Clear Debris from Drains and Channels
Leaf management requires consistent attention throughout the growing season, as organic debris represents the primary threat to drainage system functionality. We regularly rake yards to remove leaves and twigs before they can migrate into drains and create blockages.
Protective measures like installing grates or covers over drain openings prevent debris from entering the system in the first place. These simple additions significantly reduce maintenance requirements while maintaining system performance.
Catch basins and debris filters trap organic material before it reaches drainage lines, making cleanup more manageable and preventing downstream clogs. We position these components strategically at high-debris collection points for maximum effectiveness.
Monitor Plant Growth and System Performance
Root management becomes critical as landscaping matures around drainage installations, since aggressive root systems can infiltrate and damage underground components. We monitor plant growth patterns and trim back vegetation that threatens system integrity.
Termination point checks ensure water exits the system properly at designated discharge areas, preventing backup issues that could flood protected spaces. These outlet areas must remain clear of obstructions to maintain system effectiveness.
Performance monitoring during heavy rainfall events helps us identify areas where water still pools or flows improperly, indicating potential system modifications or additional drainage answers may be needed.
Soil aeration around drainage components enhances water absorption and reduces surface runoff, supporting the overall effectiveness of our installed systems while promoting healthier soil conditions for plant growth.
Conclusion
Transforming your waterlogged garden into a thriving outdoor space doesn’t have to drain your budget or overwhelm your schedule. With the right combination of assessment techniques and targeted answers we’ve outlined you’ll create effective drainage that protects your plants and property investment.
Whether you choose French drains for immediate water redirection rain gardens for sustainable management or raised beds for elevated growing success depends on your exact challenges and goals. Each method offers unique benefits that can be adapted to work with your industry’s natural characteristics.
Remember that proper drainage isn’t just about moving water away—it’s about creating an environment where your plants can flourish while preventing costly damage to your home’s foundation. Start with simple answers and gradually build a comprehensive system that keeps your garden healthy year-round.
Frequently Asked Questions
What are the most common signs of poor garden drainage?
The most obvious signs include standing water that remains 24-48 hours after rainfall, muddy or soggy areas that never seem to dry out, and unhealthy plants with yellowing leaves or root rot. You may also notice pest problems like mosquitoes breeding in stagnant water, or erosion patterns where water flows improperly across your landscape.
How do I test my soil’s drainage capacity before installing solutions?
Dig test holes about 12 inches deep in problem areas and fill them with water. Measure how quickly the water drains – good drainage should empty within 4-6 hours. Clay soil may take 24+ hours, indicating poor drainage. Check multiple spots across your garden and mark areas that drain slowly for targeted treatment.
What’s the difference between a French drain and a rain garden?
A French drain is an underground perforated pipe system that redirects water away from problem areas using gravel and proper slope. A rain garden is a shallow, planted depression (4-8 inches deep) that naturally absorbs and filters stormwater runoff using native plants, creating a sustainable drainage solution that enhances biodiversity.
How deep should raised garden beds be for proper drainage?
For basic drainage improvement, raised beds should be at least 6 inches high. However, 18 inches is optimal for accommodating various plant root systems and ensuring excellent drainage. Fill beds with well-draining soil mixture combining topsoil, compost, and perlite or vermiculite for best results.
What native plants work best in rain gardens?
Choose native species adapted to your local climate that can handle both wet and dry conditions. Purple coneflower, blue flag iris, cardinal flower, and native sedges are excellent choices. These plants have deep root systems that improve soil permeability and require minimal maintenance once established.
How much slope do I need for effective water drainage?
Create gentle slopes with a gradient of 3-10% away from structures and problem areas. This translates to approximately 3-10 inches of drop per 10 feet of distance. Proper grading prevents water from pooling near foundations while ensuring water flows naturally toward designated drainage areas.
When should I consider professional drainage solutions?
Consider professional help for persistent flooding, extensive clay soil areas, or when DIY solutions haven’t resolved the problem after one growing season. Complex situations involving structural damage, septic systems, or municipal drainage connections also warrant professional assessment and installation.
How often should I maintain my drainage system?
Inspect your drainage system twice yearly during spring and fall. Clean debris from catch basins, check for clogs in pipes, and trim vegetation around drainage components. Regular maintenance prevents costly repairs and ensures optimal performance during heavy rainfall periods.
Can permeable hardscaping really improve drainage?
Yes, permeable pavers, gravel paths, and stepping stones with gaps allow water to infiltrate soil rather than running off hard surfaces. When properly installed with graded gravel bases, these solutions provide immediate drainage benefits while maintaining attractive, functional walkways and patios.
What’s the most cost-effective drainage solution for beginners?
Start with improving soil composition by adding organic matter and creating gentle grading away from problem areas. Rain gardens offer excellent value, combining natural water management with attractive landscaping. These solutions require minimal investment but provide significant drainage improvement for most common issues.