Sloping gardens present unique challenges that can transform into stunning industry opportunities with the right approach. We’ve all stood at the top of a downward slope wondering how to turn this tricky terrain into a beautiful outdoor space that’s both functional and visually appealing.
Downward sloping gardens aren’t obstacles – they’re blank canvases waiting for creative answers. From terraced vegetable beds to cascading flower displays we’ll show you how to work with gravity instead of against it. These slopes offer natural drainage advantages and create ever-changing visual interest that flat gardens simply can’t match.
Whether you’re dealing with a gentle decline or a steep hillside we’ve gathered the most effective design strategies to help you maximize every inch of your sloped space. Let’s explore how to transform your challenging terrain into the garden of your dreams.
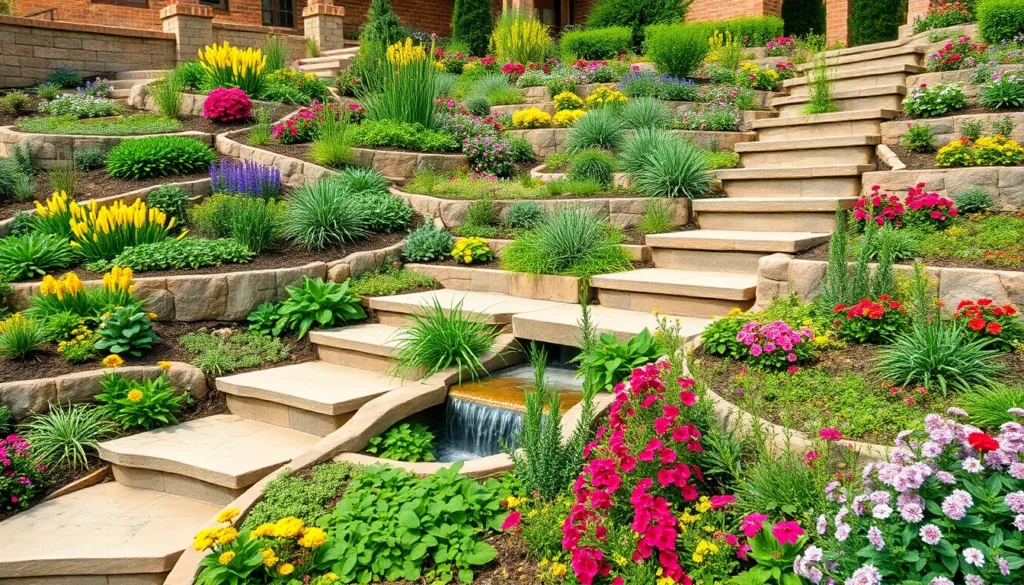
Create Terraced Garden Beds for Maximum Visual Impact
Terraced gardens transform challenging slopes into stunning multi-level displays that catch the eye from every angle. We’ve found that well-designed terraces not only solve drainage issues but also create dramatic focal points that add depth and dimension to any downward sloping space.
Choose Retaining Wall Materials
Natural stone offers the most authentic look for terraced garden beds, with fieldstone and limestone providing excellent durability for slopes up to 4 feet high. We recommend using stones that are 6-8 inches thick for optimal stability and visual appeal.
Concrete blocks work exceptionally well for steeper slopes, with interlocking systems supporting walls up to 6 feet tall while maintaining clean geometric lines. These blocks come in various textures like split-face and smooth finishes to match different garden styles.
Timber retaining walls create warm, organic-looking terraces perfect for cottage gardens and natural landscapes. Cedar and pressure-treated lumber last 15-20 years when properly installed with adequate drainage behind the wall.
Gabion baskets filled with local stones offer modern industrial appeal while providing excellent drainage for terraced beds. We’ve seen these wire mesh containers support slopes effectively while allowing water to flow through naturally.
Plan Level Spacing and Heights
Measure the total slope to determine how many terraces you’ll need, with each level typically ranging from 18-36 inches in height for comfortable maintenance access. Steeper slopes require more levels with shorter vertical drops between each terrace.
Space terraces 4-8 feet apart to create adequate planting space while maintaining proper proportions for visual balance. Wider terraces work better for vegetable gardens, while narrower ones suit ornamental plantings and ground covers.
Calculate the depth of each terrace based on your intended plants, with shallow-rooted flowers needing 12-18 inches while shrubs and small trees require 24-36 inches of soil depth. Deep terraces also provide better soil retention during heavy rains.
Create gentle slopes between retaining walls rather than steep drops, using a 2:1 ratio where the horizontal distance is twice the vertical height. This approach reduces erosion while making transitions between levels more natural looking.
Select Plants for Each Tier
Upper terraces benefit from drought-tolerant plants like lavender, rosemary, and ornamental grasses since these areas drain fastest and receive the most sun exposure throughout the day.
Middle levels work perfectly for perennial flowers such as daylilies, hostas, and astilbe that appreciate moderate moisture and partial shade from plants above. We plant these areas with seasonal bloomers to maintain year-round interest.
Bottom terraces collect the most water and suit moisture-loving plants like ferns, heuchera, and Japanese painted ferns that thrive in consistently damp soil conditions.
Cascading plants like creeping phlox, vinca, and trailing nasturtiums soften retaining wall edges while creating flowing connections between terraced levels. These spillover plants blur harsh lines and add movement to the overall design.
Install Cascading Water Features to Enhance Natural Flow

Downward sloping gardens provide the perfect opportunity to harness gravity’s natural power for creating stunning water features. These elements transform challenging terrain into ever-changing landscapes that offer both visual appeal and soothing sounds.
Design a Multi-Level Waterfall
Multi-level waterfalls become dramatic focal points when built into existing terraced garden beds. We recommend constructing these features using your established retaining walls as natural foundations for waterfall structures. Water cascades from one level to the next, creating movement and preventing erosion while stabilizing the slope naturally.
Each terrace can accommodate flat catch basins or ponds that receive flowing water from upper levels. Stone placement around each level creates naturalistic edges that blend seamlessly with surrounding plantings. The varying heights of your terraces provide perfect staging areas for different waterfall components, from source springs to collection pools.
Add a Stream Running Down the Slope
Gently winding streams mimic natural hillside creeks while managing water runoff effectively. We suggest starting your stream at a pond or spring positioned at the top of your slope, allowing water to follow the natural contours downward. Rock placement along the stream’s path creates pools and eddies that slow water flow and increase visual interest.
Strategic plantings alongside the stream banks help prevent erosion and attract beneficial wildlife to your garden. Moisture-loving plants thrive in these areas, complementing the drought-tolerant species you’ve placed on upper terraces. The stream connects different garden levels organically, creating a cohesive design that enhances your terraced industry.
Create Pond Systems at Different Elevations
Cascading pond systems balance sloped landscapes while providing diverse habitats for wildlife. We recommend positioning larger ponds at the base of your slope with smaller basins at various elevations above. Water flows between these ponds through spillways or small waterfalls, maintaining constant circulation and preventing stagnation.
Each pond serves different functions within your garden network. Upper ponds catch and slow rainwater runoff, middle elevation basins provide transitional zones, and lower ponds collect and filter water before it exits your property. Linking these water features creates a comprehensive system that manages drainage while adding beauty to every level of your sloped garden.
Build Stepped Pathways for Safe and Stylish Navigation

Stepped pathways transform challenging downward slopes into accessible routes that connect different garden levels seamlessly. We’ll explore three essential approaches to creating these functional and attractive navigation answers.
Use Natural Stone Steps
Natural stone steps offer unmatched durability while blending harmoniously with surrounding garden elements. We recommend selecting materials like limestone, sandstone, or slate that complement your existing industry features and provide reliable traction in wet conditions.
Stone steps create an earthy aesthetic that improves with age, developing natural patina and moss growth over time. We suggest incorporating plants like creeping thyme, sedum, or small hostas around each step to soften harsh edges and create visual continuity throughout your downward sloping garden design.
Proper installation requires setting stones on a stable foundation with adequate drainage to prevent shifting during freeze-thaw cycles. We position each step with a slight forward slope to encourage water runoff while maintaining comfortable rise and run proportions for safe navigation.
Create Curved Switchback Trails
Curved switchback trails reduce the perceived steepness of downward slopes by breaking long descents into manageable segments. We design these winding pathways to follow natural contours, creating scenic routes that showcase different garden areas while providing rest points along the way.
Switchback design allows us to incorporate diverse planting zones at each curve, featuring drought-tolerant species on upper sections and moisture-loving plants in lower areas. We line trails with ornamental grasses, flowering shrubs, or small trees that provide visual interest and help define the pathway boundaries.
Strategic placement of switchbacks creates opportunities for seating areas, viewing platforms, or decorative features that encourage visitors to pause and appreciate garden vistas. We space turns appropriately to maintain comfortable walking grades while maximizing the scenic experience throughout the descent.
Install Wooden Deck Platforms
Wooden deck platforms create level gathering spaces within downward sloping gardens, offering perfect spots for outdoor dining or relaxation areas. We construct these elevated surfaces using pressure-treated lumber, composite materials, or naturally rot-resistant woods like cedar or redwood for long-lasting performance.
Multi-level platform design allows us to create distinct outdoor rooms at different elevations, each offering unique perspectives of the surrounding industry. We connect platforms using stepped pathways or gentle ramps, ensuring smooth transitions between levels while maximizing usable space.
Platform placement takes advantage of natural slope breaks and existing mature trees, creating intimate spaces that feel integrated with the industry. We add built-in seating, planters, or pergolas to enhance functionality while maintaining the natural flow of the downward sloping garden environment.
Design Rock Gardens That Work With Your Slope’s Natural Contours

Rock gardens blend seamlessly with sloping terrain while providing excellent erosion control and visual appeal. We’ll show you how to create a natural-looking rock garden that stabilizes your slope and requires minimal maintenance.
Position Large Boulders as Anchors
Observe your slope’s natural landform before placing any stones to ensure the most authentic appearance. We recommend positioning boulders to mirror your slope’s existing angles, creating visual anchors that ground the entire garden design. Large stones serve as the foundation for soil stabilization while preventing downhill movement during heavy rains.
Arrange rocks of varying sizes to mimic natural rock formations found in mountainous regions. We suggest using the largest boulders as primary focal points, then surrounding them with medium and smaller stones. This creates visual interest while maintaining the authentic look of naturally occurring rock outcroppings.
Place stones strategically to break up the slope’s descent and create level planting pockets. We position our anchor rocks at different elevations to establish natural terracing without formal retaining walls. Each boulder placement should feel intentional yet organic to the industry.
Fill Gaps With Alpine Plants
Select hardy alpine varieties like sedum, creeping thyme, and sempervivum that thrive in well-drained rocky conditions. We choose these low-growing plants because their root systems bind soil effectively while requiring minimal water and maintenance. Alpine plants naturally adapt to the challenging conditions found between rocks.
Plant in the gaps between stones where soil naturally collects and drainage occurs efficiently. We fill these spaces with drought-tolerant ground covers that spread gradually to create living carpets. This approach reduces erosion while adding seasonal color and texture to the rock garden.
Prioritize plants with strong root systems that help stabilize the slope while preventing soil movement. We avoid invasive species or tall grasses that might destabilize the carefully arranged stones. Instead, we focus on ornamental perennials that complement the rocky environment without overwhelming it.
Create Drainage Answers Between Rocks
Install gravel or coarse sand beneath rocks to promote proper water flow and prevent pooling behind stone barriers. We layer these materials strategically to allow natural runoff pathways that follow the slope’s contours. This prevents water from collecting and potentially undermining the rock placement.
Allow for natural water movement by creating channels between larger stones that direct runoff safely down the slope. We design these pathways to handle heavy rainfall without causing erosion or washing away smaller plants. Proper drainage prevents root rot and maintains the garden’s structural integrity.
Avoid compacting drainage layers excessively so water can percolate through rather than running off the surface. We ensure that water reaches plant roots while excess moisture continues flowing downhill naturally. This balance supports plant health while managing the challenges of slope gardening effectively.
Plant Groundcover Solutions to Prevent Soil Erosion

Stabilizing our sloping garden requires strategic groundcover selections that work with nature rather than against it. We’ll explore effective plant answers that prevent erosion while creating beautiful industry layers.
Select Fast-Spreading Native Varieties
Fast-spreading groundcovers like creeping thyme serve as our first line of defense against soil erosion. Their extensive root systems create natural mesh networks that hold soil particles in place during heavy rainfall. Vinca minor (periwinkle) establishes quickly across slopes and produces attractive purple blooms while maintaining year-round coverage.
Sedum varieties offer drought-tolerant options that thrive in challenging slope conditions. Native groundcovers adapt better to local climate patterns and require minimal maintenance once established. These plants naturally suppress weeds while providing habitat for beneficial insects and pollinators.
Selecting varieties indigenous to our region ensures compatibility with existing soil conditions and weather patterns. Local nurseries can recommend exact native groundcovers that perform best in our area’s unique growing conditions.
Layer Different Heights and Textures
Creating tiered planting zones transforms steep slopes into visually ever-changing garden spaces. We position low-growing groundcovers at the base, medium-height perennials in the middle sections, and taller shrubs toward the top of the slope. This layered approach mimics natural plant communities while maximizing erosion control effectiveness.
Textural contrasts add visual interest through varied leaf shapes, sizes, and growth patterns. Combining fine-textured grasses with broad-leafed hostas creates compelling visual compositions that change throughout growing seasons. Different growth habits, from mat-forming to mounding plants, provide diverse coverage patterns across our slope.
Strategic placement of plants with varying bloom times ensures continuous color and interest. We can incorporate plants with different foliage colors, from silver lamb’s ear to burgundy heuchera, creating year-round visual appeal.
Establish Root Systems for Stability
Deep-rooted plants anchor our slope’s foundation and prevent large-scale soil movement. Trees and shrubs with extensive root systems, such as native dogwoods or elderberries, create permanent soil stabilization throughout the garden. Their roots penetrate deeply while spreading horizontally to bind soil layers together.
Fibrous root systems from ornamental grasses complement deep-rooted plants by creating dense surface networks. Plants like fountain grass or little bluestem develop extensive shallow root zones that capture surface water runoff. Combined plantings create multi-layered root structures that address erosion at different soil depths.
Installing plants during optimal growing seasons allows root systems to establish before facing challenging weather conditions. We space plants closer together on steeper slopes to achieve faster coverage and more immediate erosion protection. Regular watering during establishment periods ensures robust root development that will provide long-term slope stability.
Construct Raised Garden Boxes at Strategic Angles

Raised garden boxes transform challenging slopes into productive growing spaces while preventing soil erosion. Strategic placement along your slope’s contour lines maximizes water retention and creates manageable planting areas.
Calculate Proper Slope Angles
Understanding your slope’s gradient determines the construction approach for successful raised beds. Gentle inclines below 15 degrees allow standard box construction, while steeper slopes of 30 degrees or more require additional structural support and terracing techniques.
Measuring the angle helps us select appropriate materials and design elements that accommodate your exact gradient safely. We recommend using a digital inclinometer or smartphone app to determine precise measurements before beginning construction.
Planning box placement follows the natural contour lines to create a stepped terracing effect. This staggered arrangement provides level growing surfaces while following your slope’s natural flow, making maintenance easier and preventing water runoff.
Build with Durable Materials
Treated wood offers an affordable and versatile option for most slope conditions, providing 10-15 years of service when properly maintained. Cedar and redwood naturally resist moisture and insects, making them excellent choices for humid climates.
Stone construction delivers maximum longevity and visual appeal, with natural fieldstone or manufactured blocks creating permanent terraced structures. Large boulders serve as natural anchors while smaller stones fill gaps and provide drainage.
Concrete blocks provide structural strength for steeper slopes exceeding 25 degrees, offering modular construction that accommodates various box sizes. Timber sleepers create rustic appeal while delivering exceptional soil retention capabilities.
Material selection depends on your budget, desired aesthetics, and slope severity, but durability and structural integrity remain our top priorities for long term success.
Ensure Adequate Drainage Systems
Installing drainage channels prevents waterlogging at your slope’s base while controlling erosion throughout the garden. French drains alongside retaining structures manage heavy runoff during storms and seasonal wet periods.
Creating gravel layers beneath each raised bed promotes proper water movement and prevents soil compaction. We recommend 4-6 inches of coarse gravel topped with industry fabric before adding growing medium.
Adding overflow outlets in each box allows excess water to flow naturally downslope without washing away valuable topsoil. These strategically placed openings prevent standing water while maintaining soil moisture levels.
Mulching surfaces around raised beds reduces erosion impact and retains soil moisture between boxes. Groundcover plants like creeping thyme establish additional root networks that stabilize exposed soil areas naturally.
Incorporate Gravity-Fed Irrigation Systems

Downward sloping gardens present a unique opportunity to harness natural water flow for efficient irrigation without requiring pumps or additional energy costs. We can leverage gravity to distribute water effectively from elevated sources to lower garden sections, creating sustainable watering answers that work with our industry’s natural contours.
Install Drip Lines Following the Slope
Drip irrigation lines work exceptionally well when laid along slope contours, delivering water slowly and precisely where plants need it most. We position these lines to follow the natural grade of our garden, ensuring each plant receives targeted moisture while minimizing wasteful runoff and preventing soil erosion.
Water conservation becomes effortless when drip systems deliver moisture directly to root zones rather than broadcasting water across entire areas. Our gravity-fed setup connects seamlessly to drip lines, creating an automated irrigation network that requires minimal maintenance once properly installed.
Placement strategies involve running primary drip lines horizontally across the slope at regular intervals, then connecting secondary lines that feed individual plant zones. We can adjust water flow rates using pressure-compensating emitters, ensuring consistent watering even though elevation changes throughout our garden.
Create Rain Gardens at Collection Points
Natural water collection points form at the bottom of slopes, making these areas perfect locations for rain gardens that capture and absorb runoff effectively. We design these features to handle seasonal water variations while providing habitat for native water-tolerant plants that thrive in occasionally saturated conditions.
Rain gardens serve dual purposes by preventing erosion and improving overall soil moisture retention throughout our sloped industry. Strategic placement at natural collection points allows us to intercept runoff before it leaves our property, transforming potential drainage problems into attractive garden features.
Native plant selection for rain gardens includes species like cardinal flower, blue flag iris, and swamp milkweed that handle both wet and dry periods gracefully. Our rain garden design incorporates gentle berms and shallow depressions that slow water flow while allowing gradual infiltration into surrounding soil.
Design Automatic Watering Zones
Zone-based irrigation systems allow us to customize watering schedules according to exact slope areas and plant requirements throughout our garden. We divide our sloped industry into distinct watering zones based on sun exposure, plant types, and soil drainage characteristics to optimize water delivery.
Automated timers and moisture sensors integrate with our gravity-fed system to maintain ideal soil moisture levels without constant manual monitoring. Upper zones typically require less frequent watering due to faster drainage, while lower terraced areas may need more consistent moisture management.
Strategic zone planning considers seasonal changes and plant maturity, allowing us to adjust watering intensity and frequency as our garden evolves. We can install separate control valves for each zone, enabling independent operation that responds to exact microclimates created by our slope’s varying elevations and orientations.
Add Decorative Elements That Complement the Downward Flow

Decorative elements transform downward sloping gardens into visually stunning landscapes that celebrate their natural topography. Strategic placement of these features enhances the garden’s inherent beauty while working with gravity rather than against it.
Place Sculptures at Focal Points
Sculptures serve as visual anchors that draw the eye down the slope and create compelling focal points throughout different garden levels. We recommend positioning larger pieces at key transition areas where pathways change direction or where terraces meet, maximizing their impact from multiple viewing angles. Natural materials like stone or weathered metal work exceptionally well because they complement the organic feel of sloped gardens.
Strategic sculpture placement creates natural stopping points that encourage visitors to pause and appreciate exact garden sections. Large sculptural elements work best at the bottom of slopes where they serve as destination points, while smaller pieces can be scattered along pathways to maintain visual interest throughout the descent. Abstract forms that echo the garden’s flowing lines integrate seamlessly with the industry’s natural movement patterns.
Consider sculptures that interact with the slope’s existing features like retaining walls or rock formations to create cohesive design elements. Weather resistant materials ensure longevity in outdoor conditions, while pieces with interesting shadows add another dimension to the garden’s visual appeal throughout different times of day.
Install Lighting Along Pathways
Pathway lighting illuminates the garden’s natural flow while ensuring safe navigation during evening hours. We suggest installing low voltage LED fixtures that highlight each step and curve, creating a gentle ribbon of light that follows the slope’s natural contours. Solar powered options work particularly well in sloped gardens because they eliminate the need for complex electrical installations on challenging terrain.
Uplighting strategically placed near key plants or architectural features adds drama and depth to the nighttime garden experience. Different lighting zones create varied moods throughout the slope, with brighter task lighting for steps and softer ambient lighting for seating areas. Timer controls allow for automated lighting schedules that enhance security while conserving energy.
Consider lights that cast interesting patterns or shadows on adjacent walls or plant materials to create additional visual layers. Warm color temperatures between 2700K and 3000K provide welcoming illumination that complements most garden settings, while cooler temperatures can highlight water features or contemporary sculptural elements.
Create Seating Areas With Slope Views
Seating areas positioned at strategic points along the slope provide rest stops while showcasing the garden’s best views. We recommend building platforms or decks at different elevations to create distinct vantage points that reveal new perspectives of the industry below. Natural materials like wood or stone integrate seamlessly with the garden’s organic character while providing durable surfaces for outdoor furniture.
Built in benches that follow the slope’s natural curves offer permanent seating answers that become integral parts of the industry design. These integrated elements eliminate the need for moveable furniture while creating clean lines that complement the garden’s flowing aesthetic. Strategic positioning near fragrant plants or water features enhances the sensory experience of these rest areas.
Multiple seating zones at various elevations allow visitors to experience the garden from different perspectives, each revealing unique combinations of plants, structures, and views. Comfortable seating encourages longer garden visits, while thoughtful placement ensures these areas remain usable throughout different seasons and weather conditions.
Conclusion
Transforming our downward sloping gardens doesn’t have to feel overwhelming. With the right combination of terracing, water features, pathways, and rock gardens, we can turn these challenging spaces into stunning outdoor retreats that work with nature rather than against it.
The key lies in embracing our slope’s natural characteristics while implementing smart design answers. Whether we’re installing stepped pathways for safe navigation or creating cascading water features for visual drama, each element should complement the others to create a cohesive industry.
Remember that successful sloped garden design is about patience and planning. By carefully selecting plants for each elevation level and incorporating decorative elements at strategic points, we’ll create outdoor spaces that not only solve drainage challenges but become the envy of every neighbor with a flat yard.
Frequently Asked Questions
What are the main advantages of having a sloped garden?
Sloped gardens offer excellent natural drainage, preventing water from pooling around plant roots. They create visual interest with multi-dimensional landscapes and provide opportunities for creative terraced designs. The varying elevations allow for diverse microclimates, enabling you to grow different types of plants at various levels based on their moisture and sunlight requirements.
What materials work best for building retaining walls on slopes?
Natural stone provides durability and aesthetic appeal, while concrete blocks offer affordability and strength. Timber creates a rustic look but requires regular maintenance. Gabion baskets filled with rocks are excellent for steep slopes and provide good drainage. Choose materials based on your slope’s steepness, soil conditions, and desired aesthetic.
How should I plan the spacing and height of garden terraces?
Plan terraces 3-4 feet apart for easy maintenance access, with retaining wall heights between 2-4 feet for structural stability. Consider the slope’s steepness when determining dimensions – steeper slopes may need closer spacing. Ensure each level is wide enough for your intended plants and maintenance activities while maintaining visual balance.
Which plants work best for different terrace levels?
Upper terraces suit drought-tolerant plants like succulents and Mediterranean herbs due to faster drainage. Middle levels work well for perennials and shrubs that prefer moderate moisture. Bottom terraces are ideal for moisture-loving plants like ferns and hostas. Use cascading plants like trailing petunias to soften edges between levels.
How can water features help manage slope drainage?
Cascading water features like multi-level waterfalls and winding streams effectively manage water runoff while preventing erosion. They direct water flow naturally down the slope, reducing soil displacement. Interconnected pond systems at different elevations help balance water distribution and create diverse habitats while enhancing the garden’s visual appeal.
What’s the best way to create safe pathways on slopes?
Install natural stone steps for durability and aesthetic integration with the landscape. Create curved switchback trails to reduce steepness and showcase different garden areas. Add wooden deck platforms at key points for level gathering spaces. Ensure all pathways have proper drainage and non-slip surfaces for safety.
How do I design an effective rock garden on a slope?
Position large boulders as anchors that mirror the slope’s natural angles for stability and visual appeal. Arrange rocks of varying sizes to mimic natural formations, creating level planting pockets between them. Install proper drainage with gravel beneath rocks and choose hardy alpine plants that thrive in rocky conditions and help prevent erosion.
What decorative elements enhance sloped gardens?
Place sculptures at focal points to create visual anchors and draw the eye through the landscape. Install pathway lighting to illuminate natural flow and ensure safe navigation at night. Create strategic seating areas using natural materials to provide rest stops and showcase the best views while integrating seamlessly with the slope’s design.
How do I prevent erosion on steep garden slopes?
Use terraced retaining walls to break up the slope and hold soil in place. Plant ground cover and deep-rooted plants to stabilize soil naturally. Install proper drainage systems to manage water flow. Rock gardens and gabion walls provide excellent erosion control while adding visual interest to steep areas.
Can I grow vegetables on a sloped garden?
Yes, sloped gardens are excellent for vegetables when properly terraced. Create level planting beds with retaining walls for root vegetables and larger plants. Upper terraces work well for herbs and drought-tolerant vegetables, while lower levels suit moisture-loving crops. The improved drainage and varied sun exposure can actually benefit many vegetable varieties.