We’ve all felt that urge to transform our outdoor spaces into something truly magical. Your garden isn’t just a collection of plants – it’s a blank canvas waiting for your creative touch. With the right DIY projects you can turn any yard into a personalized sanctuary that reflects your unique style.
Garden crafts offer the perfect blend of functionality and artistry. From repurposed planters that breathe new life into old containers to handmade garden markers that add whimsical charm we’ll show you how simple materials can create stunning focal points. These projects don’t require professional skills or expensive tools – just enthusiasm and a willingness to get your hands dirty.
Whether you’re working with a sprawling backyard or a cozy balcony garden we’ve gathered creative ideas that’ll make your neighbors stop and stare. Get ready to discover how everyday items can become extraordinary garden features that showcase your personality while improving your outdoor living space.
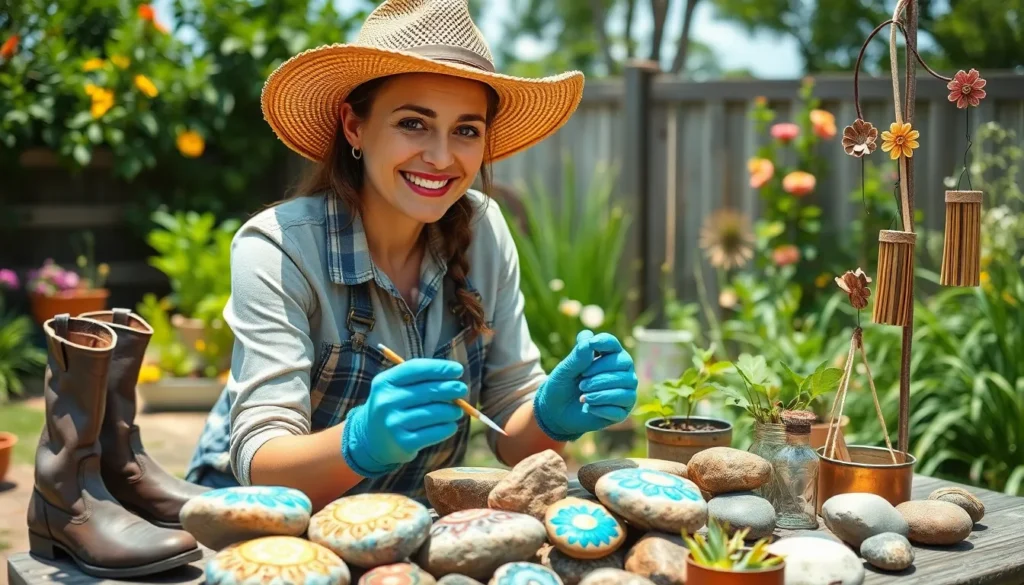
Create Colorful Garden Markers Using Painted Stones
Painted stone markers offer one of the most budget-friendly ways to label and beautify garden spaces. We’ll transform ordinary rocks into vibrant plant labels that withstand outdoor elements while adding personality to garden beds.
Choose the Right Stones for Painting
Smooth river rocks work best for painted garden markers because their flat surfaces provide ideal canvases for detailed designs. We recommend selecting stones between 2-4 inches in diameter for optimal visibility and writing space.
Flat stones create the most stable markers when placed in soil or mulch. Look for rocks with minimal texture and few cracks, as these imperfections can cause paint to chip or fade prematurely.
Local garden centers often sell bags of decorative stones specifically chosen for crafting projects. Beach stones collected during family outings also make excellent markers, though we should clean them thoroughly before painting.
Weight matters when selecting stones for windy garden locations. Heavier rocks stay in place better during storms, while lighter stones work well for indoor herb gardens or protected outdoor spaces.
Select Weather-Resistant Paint and Brushes
Acrylic paints formulated for outdoor use provide the durability needed for garden markers exposed to sun, rain, and temperature changes. We prefer brands like FolkArt Outdoor or DecoArt Patio Paint for their proven weather resistance.
Primer application ensures paint adhesion on smooth stone surfaces. Spray primers designed for multiple surfaces work efficiently on batches of stones, creating uniform base coats in minutes.
Small detail brushes ranging from sizes 0-4 handle lettering and fine design work with precision. Flat brushes in 1/2 inch and 1 inch widths cover larger stone areas quickly and evenly.
Sealers extend the life of painted garden markers significantly. Polyurethane outdoor sealers or marine varnishes protect against fading and moisture damage for multiple growing seasons.
Design Ideas for Plant Labels and Decorative Accents
Plant name labels serve both functional and aesthetic purposes in organized gardens. We write plant names in bold, contrasting colors using stencils or freehand lettering for easy identification from walking paths.
Seasonal designs add visual interest throughout the growing year. Spring markers featuring tiny flowers, summer stones with bright geometric patterns, and autumn rocks painted with leaf motifs create rotating garden displays.
Color coding systems help organize different plant types or garden zones. We paint vegetable markers in green tones, herb stones in purple shades, and flower labels in rainbow colors for instant visual sorting.
Decorative accent stones without text create focal points in garden beds. Abstract patterns, mandala designs, or simple geometric shapes in complementary colors enhance garden aesthetics without overwhelming plant displays.
Glow-in-the-dark paint adds magical nighttime appeal to garden pathways. We apply this special paint over base colors to create markers that guide evening garden walks while maintaining daytime beauty.
Build DIY Planters From Recycled Materials

We can extend our garden crafting beyond painted stone markers by transforming everyday discarded items into stunning planters. Recycled materials offer endless possibilities for creating unique containers that add character while reducing waste.
Transform Old Boots and Shoes Into Unique Containers
Old boots make surprisingly charming planters that bring whimsical touches to our garden spaces. Wellington boots, hiking boots, and even worn sneakers work perfectly for this project.
First, we’ll clean our chosen footwear thoroughly with soap and water, removing all dirt and debris. Next, we’ll drill several drainage holes in the soles using a drill bit appropriate for the material. Rubber boots need 4-5 holes, while leather shoes require fewer due to their natural breathability.
Fill the boots with quality potting soil, leaving about an inch from the top. Small plants like succulents, herbs, or trailing flowers work best since boots have limited space. We can arrange multiple boot planters along pathways, hang them from fence posts, or group them together for visual impact.
Weatherproof spray helps preserve leather boots, while rubber ones naturally withstand outdoor conditions. Seasonal plantings keep these quirky containers looking fresh throughout the year.
Repurpose Tin Cans and Mason Jars
Tin cans and mason jars transform into elegant planters with minimal effort and maximum visual appeal. Large coffee cans, soup cans, and various jar sizes offer different planting options for our recycled garden projects.
Remove all labels from cans and wash thoroughly to eliminate residue. Sand any rough edges smooth to prevent cuts during handling. Drill drainage holes in the bottom using a metal bit for cans or a glass bit for jars.
Paint transforms plain containers into decorative elements that complement our garden’s color scheme. Spray paint provides even coverage, while brush painting allows for detailed designs. Weather resistant acrylic paints ensure longevity in outdoor conditions.
Mason jars create beautiful hanging planters when fitted with wire hangers or macrame holders. Tin cans stack vertically to form tower gardens perfect for herbs or small vegetables. Group multiple containers of varying heights to create ever-changing displays along garden borders.
Create Mosaic Planters Using Broken Tiles
Broken tiles offer opportunities to create stunning mosaic planters that serve as garden focal points. Ceramic tiles, mirror pieces, and decorative pottery shards all work effectively for this artistic project.
Gather tile pieces in coordinating colors or create contrast with bold combinations. Safety glasses and gloves protect us while breaking larger tiles into workable pieces using a hammer and cloth bag. Smooth any sharp edges with sandpaper before beginning assembly.
Apply tile adhesive to clean planter surfaces in small sections to prevent drying. Press tile pieces firmly into place, leaving consistent gaps for grout lines. Work from the center outward to maintain balanced patterns and visual flow.
Mix grout according to package directions and spread over completed mosaic using a rubber float. Clean excess grout from tile surfaces with a damp sponge before it fully sets. Allow 24-48 hours for complete curing before planting.
Seal completed mosaics with appropriate sealant to protect against weather damage and extend their lifespan. These artistic planters work beautifully as statement pieces near entryways or as centerpieces in garden beds.
Craft Whimsical Garden Wind Chimes

We’ll transform your garden into a multi-sensory sanctuary with handcrafted wind chimes that create both visual beauty and soothing melodies. These projects repurpose everyday materials into functional art pieces that catch breezes and enhance your outdoor space.
Gather Natural Materials Like Bamboo and Shells
Natural materials provide the foundation for durable and aesthetically pleasing wind chimes. Bamboo stands out as an excellent choice due to its weather resistance and ability to produce gentle, hollow tones when pieces strike together. We recommend cutting bamboo stalks into varying lengths between 6 to 12 inches to create different pitch variations.
Shells offer coastal charm and unique sound qualities for your wind chime project. Large scallop shells work particularly well as they’re sturdy enough to withstand outdoor conditions while producing soft clicking sounds. We suggest collecting shells of different sizes and shapes to add visual interest and tonal variety.
Wood pieces complement bamboo beautifully and provide rustic appeal. Driftwood creates naturally weathered elements that blend seamlessly with garden environments. We find that cedar and teak work best for their natural oils that resist moisture and insects.
Stones add weight and grounding elements to your wind chime design. Smooth river rocks serve as excellent wind catchers at the bottom of your chimes, while smaller pebbles can be incorporated throughout for additional sound elements. We prefer stones with natural holes or those we can drill easily for threading.
Design Metal Spoon and Fork Wind Chimes
Repurposed kitchenware creates wind chimes with clear, resonant tones that carry beautifully across garden spaces. Old metal spoons produce the most melodic sounds when they strike against each other, especially vintage silver-plated pieces that have developed patina over time. We recommend using spoons of different sizes to create varied pitch ranges.
Forks offer distinctive sound qualities and visual appeal for unique wind chime designs. Their prongs create multiple contact points that produce complex tonal combinations when moved by breezes. We find that stainless steel forks work best for durability and consistent sound production.
Preparation involves cleaning and drilling small holes for attachment points. We start by thoroughly cleaning each utensil and removing any rust or tarnish that might affect sound quality. Drilling holes near the handle ends requires a metal drill bit and steady pressure to avoid cracking.
Assembly requires strategic spacing to ensure proper movement and sound generation. We attach utensils to a central ring or crosspiece using durable fishing line, spacing them approximately 2 inches apart to prevent tangling while allowing free movement. The key lies in balancing weight distribution so pieces move independently yet harmoniously.
Add Colorful Beads and Glass Elements
Colorful beads enhance both visual appeal and sound variation in wind chime designs. Glass beads reflect sunlight beautifully throughout the day, creating dancing light patterns in your garden while adding gentle tinkling sounds. We prefer using weather-resistant glass beads that won’t fade or crack under UV exposure.
Stained glass pieces transform wind chimes into stunning light catchers. Small stained glass fragments can be incorporated between other elements or clustered at the top for maximum light refraction. We recommend using tempered glass pieces with smooth edges to ensure safety during assembly and maintenance.
Threading techniques determine both aesthetic flow and functional movement. We string beads between primary elements like shells or utensils to create color transitions while adding subtle sound layers. Strategic placement of larger glass ornaments serves as focal points that catch both light and wind effectively.
Glass ornaments provide substantial visual impact and wind catching capability. Small glass balls or decorative shapes positioned throughout the wind chime create movement that triggers sound from other elements. We find that clear and translucent pieces work best as they don’t compete visually with natural materials while maximizing light effects.
Attachment methods ensure longevity and weather resistance. We use marine-grade fishing line or thin wire to secure glass elements, as these materials resist UV degradation and moisture damage. Double knotting at each attachment point prevents pieces from shifting or falling during strong winds.
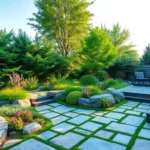
Design Eye-Catching Garden Stepping Stones

Garden stepping stones serve as both functional pathways and artistic focal points that can transform any outdoor space. Creating your own stepping stones allows for complete customization while adding a personal touch to your garden design.
Mix and Pour Concrete for Custom Shapes
Mixing concrete for custom shaped stepping stones offers unlimited creative possibilities for your garden pathway. We recommend creating templates or using existing molds to shape your concrete into nature-inspired designs like leaves, flowers, or geometric patterns. Pouring the concrete mixture into custom shapes requires preparing your molds beforehand and ensuring they’re level for even thickness.
Basic concrete mix consists of one part cement, two parts sand, and three parts gravel combined with water until you achieve a thick, workable consistency. Templates can be made from cardboard for simple shapes or wooden frames for more complex designs. Allow 24 to 48 hours for proper curing before removing your stepping stones from their molds.
Embed Decorative Elements Like Marbles and Leaves
Embedding decorative elements transforms plain concrete stepping stones into stunning garden artwork. Marbles and glass beads create colorful, textured surfaces that catch sunlight and add visual interest to your pathways. We suggest pressing these elements into the wet concrete when it’s partially set but still workable.
Seashells and natural stones provide an earthy, organic appearance that complements garden landscapes perfectly. Fresh leaves can be pressed into the surface to create permanent impressions, while small pebbles arranged in patterns add texture and grip. Place decorative elements within the first hour after pouring to ensure they bond properly with the concrete.
Create Personalized Messages and Handprints
Personalizing stepping stones with messages and handprints makes your garden pathway uniquely yours. Writing names, dates, or inspirational messages into wet concrete creates lasting memories that withstand weather conditions. We recommend using a pointed stick or specialized concrete tool to etch clear, readable text into the surface.
Handprint impressions add a personal touch that’s especially meaningful for family gardens or memorial spaces. Press hands firmly into the concrete when it’s slightly firm but still impressionable, typically 30 to 60 minutes after pouring. Children’s handprints alongside adult ones create touching family keepsakes that become more precious over time.
Make Adorable Garden Creature Sculptures

Garden sculptures bring personality and charm to outdoor spaces, transforming ordinary areas into enchanting displays. We’ll explore three creative approaches using natural materials, painted rocks, and wire crafting techniques.
Create Painted Rock Animals and Insects
Painted rock animals and insects add whimsical touches to garden beds and pathways. We select smooth, flat rocks that provide stable surfaces for detailed artwork and visibility among plants.
Outdoor acrylic paint works best for these projects since it withstands weather conditions better than regular create paint. We recommend using small brushes for intricate details and foam brushes for base coats to achieve smooth coverage.
Ladybugs remain the most popular choice because their simple red and black design appeals to beginners. We paint the entire rock red first, add a black stripe down the middle, then dot black spots across the wings for authentic appearance.
Bees offer another captivating option with their distinctive yellow and black stripes. We start with a yellow base coat, add horizontal black stripes using painter’s tape for clean lines, then paint small wings extending from the sides.
Butterflies provide opportunities for creative color combinations and patterns. We use bright oranges, blues, and purples to create eye-catching wing designs that complement surrounding flowers.
Applying clear acrylic sealer extends the life of painted rocks by protecting against rain, sun, and temperature changes. We brush on two thin coats rather than one thick application to prevent dripping and ensure even coverage.
Build Wire and Bead Butterfly Garden Stakes
Wire and bead butterfly stakes create movement and sparkle throughout garden spaces. We use 14-gauge create wire for the main structure since it’s sturdy enough to hold shapes while remaining flexible for detailed work.
Creating the butterfly shape starts with forming two wing loops of different sizes. We twist the wire at the center to form the body, leaving extra length for the stake portion that anchors into soil.
Glass beads catch sunlight and add brilliant color accents to wire frames. We thread large beads onto the body section first, then smaller seed beads along the wing edges for delicate detailing.
Natural materials like small pebbles and shells provide earthy textures that complement garden settings. We secure these elements by wrapping thin wire around them or threading them onto existing frame sections.
Weather-resistant finishes protect wire sculptures from rust and corrosion. We apply clear protective spray designed for outdoor metal crafts, covering all wire surfaces including joints and wrapped areas.
Positioning stakes among flowering plants creates the illusion of real butterflies visiting blooms. We place them at varying heights to mimic natural flight patterns and movement through garden spaces.
Create Fairy Houses From Natural Materials
Fairy houses from natural materials blend seamlessly into garden environments while sparking imagination. We gather twigs, leaves, pinecones, and moss during nature walks to build these miniature structures.
Selecting the right foundation ensures stability for fairy house construction. We choose flat stones or thick bark pieces that provide solid bases and natural platforms for building upward.
Twig walls form the main structure using branches of similar thickness. We break twigs to desired lengths and stack them log cabin style, using clay or natural adhesive to secure joints between pieces.
Pinecone roofs create charming peaked tops that shed water naturally. We position larger cones point-up for traditional house shapes or arrange smaller cones in overlapping patterns for textured appearances.
Moss carpeting adds soft, realistic ground cover around fairy houses. We press damp moss gently into place around foundations and pathways, creating lush green spaces that attract beneficial insects.
Shell and stone decorations provide finishing touches that reflect personal style. We arrange small shells as stepping stones or press colorful pebbles into clay window frames for authentic architectural details.
Seasonal updates keep fairy houses captivating throughout the year. We add tiny flowers in spring, miniature pumpkins in fall, and evergreen sprigs during winter months to maintain year-round appeal.
Construct Functional Garden Tool Organizers

Creating efficient storage answers keeps our gardening tools accessible while maintaining a tidy outdoor workspace. Well organized tools save time and extend equipment lifespan through proper protection and easy retrieval.
Build Rustic Tool Racks From Reclaimed Wood
Upcycled crates offer versatile storage options that transform discarded materials into functional organizers. Stack these containers vertically for maximum space efficiency or mount them directly on shed walls for easy access. Freestanding arrangements work perfectly for larger gardens where tools need to remain portable between growing areas.
Bamboo racks create naturally weather resistant storage using sturdy poles secured with marine grade screws or heavy duty twine. Assemble these sustainable organizers by connecting vertical supports with horizontal crossbars spaced 12 inches apart. Natural bamboo blends seamlessly with garden aesthetics while providing durable tool support for years of outdoor use.
Design Portable Garden Caddies and Carriers
Rolling organizers transform tool transportation with wheeled wagons featuring multiple compartments for efficient equipment sorting. Most quality rolling systems include dedicated sections for hand tools, watering supplies, and harvesting containers. These mobile answers eliminate multiple trips between storage areas and active garden beds.
Garden caddies provide compact portability for essential tools and supplies during focused gardening sessions. Construct custom carriers using sturdy canvas or repurposed containers with comfortable handles and divided compartments. Small tool organization becomes effortless when everything needed fits in one easily transported container.
Make Weather Resistant Storage Answers
PVC pipe storage delivers inherent weather protection that withstands rain, snow, and UV exposure without deterioration. Build custom racks using standard pipe connectors and sections cut to accommodate exact tool lengths. This material requires no maintenance while providing reliable outdoor storage year after year.
Sealed containers protect valuable tools from moisture damage and rust formation through airtight construction. Mount weatherproof bins on shed walls or position them strategically throughout garden areas for convenient access. Quality sealed storage extends tool lifespan significantly compared to exposed outdoor storage methods.
Assemble Beautiful Garden Lighting Features

Garden lighting transforms outdoor spaces into enchanting evening retreats while providing practical illumination for pathways and gathering areas. We’ll explore three cost-effective DIY projects that combine functionality with stunning visual appeal.
Create Solar-Powered Mason Jar Lanterns
Solar-powered mason jar lanterns offer an eco-friendly lighting solution that requires no electrical connections. Fill a standard mason jar with water and add several small pebbles to create weight and visual interest. Place a compact solar-powered tea light or fairy light string inside the jar, ensuring the solar panel remains accessible for charging.
Hang these charming lanterns from tree branches using sturdy wire or twine for overhead illumination. Position them on patio tables or garden surfaces to create intimate ambient lighting. The water inside the jar acts as a magnifier, amplifying the light output while the pebbles add decorative texture.
Mason jar lanterns work exceptionally well in clusters of three or five for maximum visual impact. They automatically illuminate at dusk and provide up to 8 hours of gentle lighting on a full solar charge.
Design Tiki Torches From Bamboo Poles
Bamboo tiki torches bring tropical flair to garden pathways and entertaining areas with minimal construction effort. Cut bamboo poles to your desired height, typically 4-6 feet for optimal visibility and safety. Insert a tiki torch wick assembly or small lantern fixture into the hollow top of each bamboo pole.
Secure the wick holder using weather-resistant adhesive or small screws to prevent movement during windy conditions. Position these tropical-inspired torches along walkways, around seating areas, or near water features to create dramatic evening ambiance.
Bamboo’s natural weather resistance makes it ideal for outdoor use, while its lightweight construction allows for easy repositioning. Space tiki torches 6-8 feet apart for consistent pathway illumination and enhanced safety during evening garden activities.
Make Glow-in-the-Dark Garden Pathway Markers
Glow-in-the-dark pathway markers provide safety lighting without electricity while adding whimsical charm to garden walkways. Apply glow-in-the-dark paint to smooth stones or pebbles using a small brush for even coverage. Allow the paint to cure completely before handling, typically 2-4 hours depending on humidity conditions.
Place painted stones along garden paths, spacing them 2-3 feet apart for continuous guidance. The stones absorb sunlight during the day and emit a soft green glow for several hours after sunset. This natural charging cycle eliminates the need for batteries or electrical connections.
Choose stones that are 3-4 inches in diameter for maximum visibility and impact. Reapply glow paint annually to maintain brightness, as outdoor weather conditions gradually diminish the luminescent properties over time.
Craft Decorative Garden Fence and Trellis Art

Transforming plain garden boundaries into artistic focal points allows us to create stunning visual impact while maximizing our outdoor space potential. These fence and trellis create projects combine functionality with creative expression to elevate any garden design.
Paint Wooden Fence Panels With Garden Scenes
Bold acrylic paints transform ordinary wooden fence panels into vibrant artistic canvases that showcase our personal garden style. We can create detailed garden scenes featuring flowers, birds, and butterflies that complement our existing industry design. Bright colors add playful energy to outdoor spaces while weather-resistant acrylics ensure our artwork withstands seasonal changes.
Weather protection becomes essential for maintaining painted fence art throughout multiple seasons. Applying clear exterior sealant over dried acrylic paint extends the lifespan of our garden scenes significantly. Base coating wooden panels with primer creates better paint adhesion and prevents moisture damage over time.
Design inspiration draws from our garden’s natural elements to create cohesive artistic themes. Seasonal motifs allow us to update fence panels throughout the year with spring blossoms, summer foliage, autumn leaves, and winter landscapes. Stencils provide consistent shapes for beginners while freehand painting offers unlimited creative possibilities.
Create Living Wall Art With Climbing Plants
Climbing trellis systems support vigorous plants like ivy, clematis, and wisteria to form natural living walls that provide privacy and beauty. We position trellises strategically to guide plant growth while creating architectural interest along fence lines. Bamboo poles and wire mesh offer sustainable materials for constructing custom trellis designs.
Espalier privacy screens combine traditional gardening techniques with modern fence applications to maximize vertical growing space. Training plants along horizontal wires creates geometric patterns that serve as living art installations. Fruit trees, flowering vines, and evergreen climbers adapt well to espalier methods for year-round visual interest.
Plant selection determines the success and maintenance requirements of our living wall projects. Fast-growing annuals like morning glories provide quick coverage during growing seasons. Perennial climbers establish permanent structures that mature and improve over multiple years. Native climbing species attract beneficial wildlife while requiring minimal irrigation and care.
Design Colorful Bottle and Can Wind Screens
Recycled bottles and metal cans create vibrant wind screens that add movement and sound to our garden spaces while promoting environmental sustainability. We drill strategic holes in metal cans before stringing them together with weather-resistant wire or rope. Glass bottles require careful handling and secure mounting to prevent breakage during strong winds.
Musical wind chimes emerge when we attach small bells or pebbles inside containers to create gentle sounds during breezes. Different sized containers produce varying tones that combine into pleasant melodic arrangements. Positioning wind screens near seating areas enhances relaxation through natural sound therapy.
Color coordination ties recycled wind screens into our overall garden design scheme effectively. Spray painting metal cans in complementary colors creates cohesive visual themes throughout outdoor spaces. Transparent colored bottles filter sunlight to cast beautiful shadows and reflections across nearby surfaces. Wire mesh backing provides structural support while allowing wind to flow through our decorative screens freely.
Conclusion
These creative garden crafts prove that beautiful outdoor spaces don’t require expensive materials or professional expertise. We’ve shown you how everyday items can become stunning garden features that reflect your personal style.
Each project we’ve shared offers both functionality and visual appeal. From organizing tools efficiently to creating ambient lighting that extends your garden enjoyment into evening hours.
The best part? These DIY answers grow more beautiful with time as plants mature and weather naturally ages your handcrafted elements. Your garden becomes a living testament to creativity and resourcefulness.
We encourage you to start with one project that excites you most. Mix and match these ideas to create a truly unique outdoor sanctuary that welcomes both family and friends throughout the seasons.
Frequently Asked Questions
What are some easy DIY garden projects for beginners?
Start with painted stone garden markers using smooth river rocks and weather-resistant paint. Create simple planters from recycled materials like old boots or tin cans. These projects require minimal tools and materials while adding personality to your garden space.
How do I make garden markers that will last outdoors?
Use smooth river rocks for stability and choose weather-resistant acrylic paints. Apply a clear outdoor sealer after painting to protect against rain and UV damage. This ensures your markers remain vibrant and readable throughout multiple seasons.
What recycled materials work best for DIY planters?
Old boots, tin cans, mason jars, and containers with drainage potential work excellent. Ensure proper drainage holes and use weather-resistant materials. Broken tiles can create beautiful mosaic designs, while larger items like old wheelbarrows make statement planters.
How can I organize my garden tools using DIY solutions?
Build rustic tool racks from reclaimed wood or bamboo for wall-mounted storage. Create portable garden caddies for easy tool transportation. Use PVC pipes and sealed containers for weather-resistant storage that protects tools from moisture and extends their lifespan.
What are some budget-friendly garden lighting ideas?
Solar-powered mason jar lanterns, bamboo tiki torches, and glow-in-the-dark pathway markers are cost-effective options. These projects combine functionality with visual appeal while providing eco-friendly lighting solutions that enhance your garden’s ambiance after dark.
How do I create decorative garden fence art?
Paint wooden fence panels with garden scenes using bold acrylic paints and apply weather-resistant sealers. Create living wall art with climbing plants on trellis systems. Both approaches transform plain boundaries into artistic focal points that enhance your garden’s visual appeal.
What materials work best for DIY wind chimes?
Natural materials like bamboo, shells, and driftwood create pleasing sounds. Repurposed kitchenware like spoons and small pots add unique tones. Use weather-resistant threading materials and ensure proper weight distribution for optimal sound and durability in outdoor conditions.