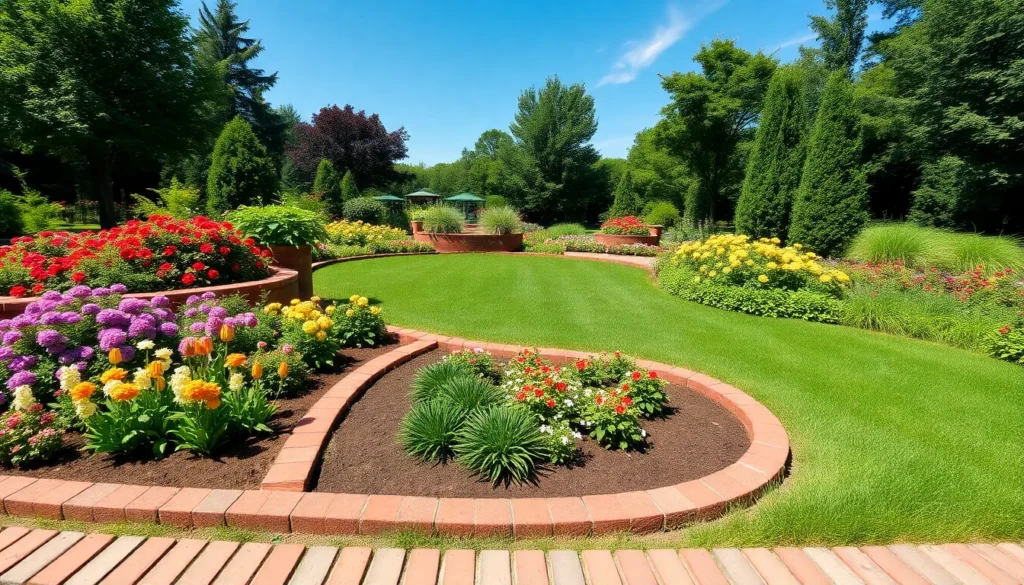
We’ve all walked past those stunning gardens where every flower bed looks perfectly defined and professionally maintained. What’s their secret? Brick edging – the timeless landscaping solution that transforms ordinary garden spaces into magazine-worthy masterpieces.
Brick garden edging isn’t just about aesthetics. It’s a practical investment that prevents soil erosion keeps mulch in place and creates clean lines that make lawn maintenance effortless. Whether you’re working with a sprawling backyard or a cozy urban garden we’ll show you how brick edging can elevate your outdoor space.
From classic red clay borders to innovative herringbone patterns the possibilities are endless. We’ll explore creative brick edging ideas that suit every budget style and skill level – helping you achieve that polished look you’ve been dreaming of without very costly.
Classic Straight Brick Edging for Clean Garden Lines
Straight brick edging creates the foundation for organized garden design. We’ll explore the most popular classic arrangements that deliver professional results.
Traditional Running Bond Pattern
Running bond patterns stack bricks in offset rows where each brick centers over the joint between two bricks below. We position standard bricks end to end with their long sides facing outward to create continuous garden borders. This pattern requires approximately 4.5 bricks per linear foot for typical garden edging applications.
Installation begins with digging a trench 4 inches deep and 6 inches wide along your desired border line. We place the first row of bricks with their narrow ends touching and check alignment using a string line. The second row offsets by half a brick length to create the distinctive staggered appearance that prevents cracking and adds structural stability.
Soldier Course Arrangement
Soldier course arrangements position bricks vertically with their narrow ends planted in the ground. We space standard bricks approximately 1 inch apart to allow for proper drainage while maintaining visual continuity. This upright positioning creates a fence like appearance that works well for formal garden settings.
Depth requirements increase to 6 inches for soldier course installations since bricks stand on their ends. We compact sand or gravel in the trench bottom before positioning each brick to ensure uniform height across the entire border. The exposed brick height typically measures 4 to 5 inches above ground level depending on your aesthetic preferences.
Benefits of Straight Edge Design
Straight edge designs offer the lowest maintenance requirements among all brick edging styles. We achieve clean lawn mowing lines that eliminate the need for detailed trimming around curved borders. The geometric precision complements formal industry designs and architectural elements like walkways and patios.
Cost effectiveness makes straight brick edging accessible for large garden projects since the pattern requires minimal cutting and waste. We calculate material needs accurately using simple multiplication based on linear feet measurements. Installation time decreases significantly compared to complex patterns since each brick placement follows the same alignment principles.
Curved Brick Garden Borders for Organic Flow

Curved brick borders transform rigid garden lines into flowing, natural edges that complement your industry’s organic shapes. We’ll show you how to master this elegant technique that adds visual softness while maintaining practical functionality.
Creating Smooth Curved Lines
Laying bricks end to end creates the foundation for seamless curved borders. Position each brick tightly against the next along your garden bed edge to maintain continuity. Gentle curves require slightly fanned bricks that open small gaps between edges. Sharp turns demand angled keystone bricks to fill triangular spaces where regular bricks can’t fit properly.
Mark your curve layout using rope to follow the garden bed contour before placing any bricks. This planning step ensures your border flows naturally with existing industry features. Cut bricks precisely at gap points using a masonry pencil for accurate measurements. Keep the widest gap no larger than a standard brick width to maintain visual cohesion.
Triangular gaps in tight curves need careful attention to prevent unsightly spaces. Fill these areas with custom cut keystone bricks that match your border’s pattern. The result creates smooth transitions that appear professionally installed rather than improvised.
Best Brick Types for Curves
Clay pavers offer superior durability for curved garden edging projects. These materials withstand outdoor elements better than standard construction bricks. Severe weather rated bricks provide additional protection against freeze thaw cycles that can crack inferior materials.
Standard width bricks (typically 4 inches) simplify measurement and ordering for curved projects. This consistent sizing makes calculating quantities straightforward while ensuring uniform appearance. Order approximately 10% extra bricks to account for cutting requirements and potential breakage during installation.
Weather resistant properties matter more for garden edging than decorative appeal alone. Choose bricks specifically designed for industry applications rather than indoor construction materials. These specialized options maintain their appearance and structural integrity through multiple seasons of exposure.
Installation Tips for Curved Edging
Prepare your foundation by digging a trench deep enough to bury one third of each brick. This depth provides stability that prevents shifting over time. Level the ground completely and remove all debris before placing any materials.
Add a compacted sand layer beneath bricks to prevent movement and settling. This base creates proper drainage while maintaining brick alignment. Tamp the sand firmly to eliminate air pockets that could cause uneven settling.
Plan your layout carefully using these exact techniques:
- Follow garden bed contours with rope to mark exact placement
- Position bricks tightly with minimal sand gaps between edges
- Cut angled keystone pieces for triangular spaces in sharp curves
- Mark cutting lines with masonry pencil for precision
- Test fit all pieces before final installation
Combine brick edging with gravel for enhanced texture and improved drainage. This pairing reduces maintenance requirements while adding visual interest. The gravel also makes mowing easier by creating clear boundaries between lawn and garden areas.
Raised Brick Edging for Elevated Garden Beds

Building upward with brick edging creates dimensional garden boundaries that hold soil and mulch while adding structural interest to your outdoor space.
Single-Height Raised Borders
Classic Red Brick Border delivers timeless appeal with its understated design that keeps plants as the main focal point. We recommend laying these traditional bricks horizontally for a subtle containment effect that works beautifully in both cottage and contemporary garden styles. Positioning bricks vertically creates a more defined edge that adds visual height without overwhelming delicate plantings.
Single-height installation requires digging a shallow trench along your garden bed perimeter and securing bricks with packed soil or sand for stability. This approach offers excellent value for larger projects while maintaining clean mowing lines that simplify lawn maintenance tasks.
Multi-Level Brick Walls
Double-Stacked Bricks provide enhanced structure by creating raised border effects that securely contain soil, mulch, and decorative elements within garden beds. Stacking bricks in offset rows using the running bond pattern ensures structural stability while accommodating both traditional and contemporary garden designs.
Tiered Edging transforms sloping areas into functional garden zones through multi-level brick walls that add depth and visual interest. We find this design particularly effective for creating separate planting areas or managing grade changes across uneven terrain. Building upward in tiers allows you to maximize planting space while preventing soil erosion on hillsides.
Drainage Considerations
Water management becomes crucial when installing raised brick edging to prevent waterlogging around plant root systems. Laying bricks with a slight incline allows water runoff while using permeable materials underneath promotes proper absorption and prevents standing water issues.
Foundation preparation should include adequate spacing between bricks or incorporating gravel layers that help drainage while maintaining structural integrity. We recommend testing water flow patterns before final installation to ensure your raised brick borders direct moisture away from sensitive plantings effectively.
Decorative Brick Patterns for Unique Garden Appeal

Transform your garden boundaries from simple borders into stunning focal points with these sophisticated brick patterns. Each design offers distinct visual impact while maintaining the practical benefits of traditional edging.
Herringbone Edge Design
Creating a herringbone pattern adds sophisticated elegance to any garden border through its distinctive zigzag formation. We position bricks at 45-degree angles to the edge, forming repeating “V” shapes that catch the eye and add dimensional interest to straight or gently curved borders.
Installation becomes straightforward when we maintain consistent angles throughout the pattern. The interlocking design provides exceptional durability while delivering visual sophistication that complements both formal and contemporary garden styles.
Maintenance requirements stay minimal since the interlocked brick arrangement resists shifting better than straight-line installations. We recommend this pattern for high-traffic areas where both durability and visual appeal matter most.
Basket Weave Pattern
Basket weave arrangements create classic, orderly appearances through their systematic brick placement that mimics traditional woven patterns. We lay bricks side by side in pairs, then turn each subsequent pair perpendicular to create the distinctive woven look.
Flat, stable surfaces work best for this pattern since the alternating orientations require level foundations to prevent uneven settling. The systematic arrangement produces clean lines that work especially well with traditional garden designs and formal landscapes.
Planning becomes crucial when we use basket weave patterns since the repeating units need careful measurement to end properly at corners or curves. We suggest marking the layout before installation to ensure the pattern completes symmetrically.
Diamond Point Arrangement
Diamond point patterns create textured, decorative edges through diagonal brick placement that forms striking zigzag lines along garden borders. We set bricks with their corners pointing outward, creating diamond shapes that add dramatic visual interest to low borders and pathway edges.
Flower bed applications benefit greatly from this pattern since the pointed edges create natural plant pockets while maintaining clear boundary definition. The textured appearance stands out beautifully against smooth lawn areas and complements organic garden shapes.
Installation requires precise spacing to maintain the diamond effect throughout the entire border length. We recommend using string lines to keep the points aligned and ensure the zigzag pattern remains consistent from start to finish.
Reclaimed Brick Edging for Rustic Garden Charm

Building on decorative patterns, we’ll explore how reclaimed materials can transform your garden borders into charming vintage features that tell a story.
Sourcing Vintage Bricks
Finding authentic reclaimed bricks starts with local salvage yards where old buildings donate their weathered materials. We recommend checking demolition sites and architectural salvage companies that specialize in vintage building materials. Online marketplaces often feature sellers offering reclaimed bricks from historic structures, though transportation costs can add to your budget.
Antique shops frequently stock small quantities of vintage bricks perfect for smaller garden projects. We’ve found that contacting local contractors during renovation projects can yield excellent reclaimed brick sources at competitive prices. Estate sales sometimes include stockpiles of vintage bricks from previous homeowners’ projects.
Quality assessment becomes crucial when sourcing reclaimed materials since older bricks may have varying durability levels. We suggest examining each brick for cracks, excessive wear, or structural damage before purchase.
Weathered Brick Benefits
Natural aging creates unique character that new bricks simply can’t replicate in garden settings. We appreciate how weathered surfaces develop moss and lichen growth that enhances the rustic garden aesthetic over time. Color variations from decades of exposure provide visual depth that complements cottage garden styles and natural landscaping themes.
Texture differences in aged bricks create interesting shadow patterns throughout the day, adding dimensional interest to garden borders. We’ve observed that weathered bricks blend seamlessly with established plantings and mature garden features. Cost effectiveness often favors reclaimed options since vintage bricks frequently cost less than premium new materials.
Environmental benefits make weathered bricks an eco friendly choice that reduces construction waste while repurposing quality materials. We find that aged bricks require less maintenance than newer alternatives since they’ve already weathered natural elements for years.
Creating Aged Appearance
Accelerating the aging process on new bricks requires exact techniques that simulate natural weathering patterns. We recommend applying a water and sand mixture to brick surfaces, allowing the abrasive action to create worn edges and textured finishes. Buttermilk treatments encourage moss growth by providing nutrients that support natural colonization on brick surfaces.
Muriatic acid answers can etch new brick surfaces to create weathered textures, though we advise using proper safety equipment during application. We’ve successfully used yogurt and beer mixtures to promote organic growth that adds authentic aged character to fresh bricks.
Mechanical aging techniques include wire brushing and sandblasting to create worn appearances on smooth brick surfaces. We suggest varying the aging intensity across different bricks to achieve realistic weathering patterns that mimic natural aging processes.
Mortared Brick Edging for Permanent Garden Structure

Mortared brick edging creates a rock-solid foundation that transforms temporary garden borders into lasting architectural features. We use this technique when gardens demand structural integrity that withstands decades of weather and foot traffic.
When to Use Mortar
Mortar becomes essential in high traffic areas where loose bricks might shift or create safety hazards. Gardens near walkways, driveways, or children’s play areas benefit significantly from the stability that mortar provides.
Sloping landscapes require mortared edges to prevent erosion and maintain proper soil containment. We recommend mortar joints for any grade steeper than 5 degrees to ensure long term structural integrity.
Visual uniformity reaches its peak with mortared installations that create clean, professional lines throughout your industry design. The filled joints eliminate gaps and create seamless transitions between individual bricks.
Permanent garden rooms and formal designs demand the precision that only mortared edges can deliver. Estate gardens, memorial spaces, and showcase landscapes rely on this technique for their enduring appeal.
Installation Process
Planning begins with careful layout using stakes and mason’s line to guide precise brick placement and avoid unnecessary cuts. We measure twice and mark the entire perimeter before breaking ground.
Trench preparation involves digging straight walls with an edger or spade to create uniform depth throughout the installation area. Clean, vertical sides prevent future settling and misalignment issues.
Base preparation combines stone dust and Portland cement to establish a stable foundation that prevents future movement. This mixture provides superior drainage while maintaining structural support.
Brick placement requires consistent leveling using a quality level tool and rubber mallet to secure each piece without damage. We check alignment frequently and adjust immediately to maintain straight lines.
| Installation Step | Time Required | Tools Needed |
|---|---|---|
| Layout and Planning | 2-3 hours | Stakes, mason’s line, measuring tape |
| Trench Digging | 4-6 hours | Spade, edger, wheelbarrow |
| Base Preparation | 1-2 hours | Mixing tools, stone dust, cement |
| Brick Installation | 6-8 hours | Level, rubber mallet, trowel |
Long Term Durability
Weather resistance reaches maximum levels with mortared brick installations that withstand freeze thaw cycles, heavy rainfall, and extreme temperature fluctuations. These permanent structures maintain their integrity for 25 to 50 years with minimal intervention.
Foot traffic tolerance exceeds expectations when properly installed mortared edges handle regular use without shifting or cracking. High traffic garden areas remain stable and attractive throughout years of consistent use.
Maintenance requirements stay minimal with occasional cleaning and crack inspection being the primary upkeep tasks. We inspect joints annually and address small issues before they become major repairs.
Investment value increases significantly as mortared brick edging adds permanent industry improvements that enhance property values. Real estate professionals consistently recognize quality hardscape features during property evaluations.
Dry-Laid Brick Borders for Flexible Garden Design

Dry-laid brick edging offers gardeners the freedom to create beautiful borders without the permanent commitment of mortar. This installation method allows bricks to be placed directly against each other, creating stunning garden boundaries that can adapt to changing industry needs.
Benefits of Mortarless Installation
Cost savings make dry-laid brick borders an attractive option for budget-conscious gardeners, eliminating expenses for mortar materials and specialized tools. We find this method reduces project costs significantly while delivering professional-looking results.
Flexibility stands as the primary advantage, allowing us to rearrange or relocate bricks whenever garden designs change. Moving individual bricks becomes simple when seasonal plantings require different configurations or when expanding garden beds.
Environmental adaptability helps dry-laid borders accommodate natural soil movement and ground shifts without cracking. Unlike mortared installations, these flexible borders move with seasonal freeze-thaw cycles, preventing structural damage.
Easier repairs become possible when individual bricks shift or settle unevenly. We can quickly adjust problem areas by lifting and releveling exact bricks without demolishing entire sections.
Drainage benefits occur naturally as gaps between bricks allow water to flow freely, preventing pooling and waterlogged soil conditions that harm plant roots.
Maintenance Requirements
Regular sweeping removes debris, leaves, and soil that accumulate between brick joints throughout growing seasons. We recommend weekly cleaning during peak gardening months to maintain clean lines.
Releveling checks should happen twice yearly to identify bricks that have shifted or settled below grade. Spring and fall inspections help us catch issues before they affect the overall border appearance.
Weed prevention requires installing industry fabric beneath bricks during initial installation. This barrier blocks weed growth while allowing proper drainage through the edging system.
Sand replacement may become necessary when joint material washes away during heavy rains. We suggest keeping extra sand on hand for quick touch-ups throughout the season.
Edge alignment needs periodic attention as foot traffic and weather can cause bricks to shift outward from their intended positions.
Seasonal Adjustments
Winter protection involves ensuring proper drainage around brick borders to prevent ice damage and frost heaving. We clear debris from drainage areas before freezing temperatures arrive.
Spring reset activities include releveling any bricks that shifted during winter and replacing sand that washed away. This seasonal maintenance restores the crisp appearance of garden borders.
Summer monitoring focuses on controlling weeds that may sprout between bricks even though preventive measures. Regular inspection helps us catch growth early when removal stays manageable.
Fall preparation includes thorough cleaning and final adjustments before winter weather begins. We ensure all bricks sit level and stable to minimize frost-related movement.
Weather response may require temporary adjustments during extreme conditions, such as covering borders during severe storms or adjusting drainage during unusually wet periods.
Mixed Material Brick Edging for Contemporary Gardens

Modern gardens benefit from mixing bricks with complementary materials to create striking visual interest. Contemporary designs that combine different textures and elements elevate simple brick borders into sophisticated industry features.
Combining Brick with Stone
Stone and brick partnerships create ever-changing garden borders that blend durability with natural beauty. We recommend alternating traditional red bricks with flagstone or river rock to introduce varied colors and organic shapes that break visual monotony while maintaining structural integrity.
Drainage improves significantly when stones accompany brick edging because the combination allows better water flow through varied gaps and textures. Installation patterns offer flexibility too – stone edging with brick caps provides clean lines while bricks inset within stone borders create unique framing for garden beds and pathways.
Arrangement options include running stone alongside brick sections or creating alternating patterns where each material highlights the other’s characteristics. Color coordination becomes crucial when selecting stones that complement your brick choice, whether you’re using classic red clay or more neutral tones.
Metal and Brick Combinations
Metal elements transform traditional brick edging into sleek contemporary borders perfect for urban and minimalist garden designs. Thin metal strips embedded between brick rows or positioned as trim around garden perimeters add modern character while highlighting exact shapes and zones.
Contrast works beautifully when warm brick tones meet cool metal finishes, creating visual tension that draws attention to garden boundaries. Malleability in metal allows for flexible garden shapes that curved or angular designs demand, while brick provides the structural foundation needed for long term stability.
Installation requires precise measuring to ensure metal accents align properly with brick coursing patterns. Stainless steel and cor-ten steel offer the best weather resistance when paired with outdoor brick applications, maintaining their appearance through seasonal changes.
Plant Integration Techniques
Stacked brick arrangements create raised beds that naturally integrate with plantings while providing superior soil and mulch retention in defined growing zones. Gaps between bricks or staggered layouts allow creeping plants, moss, and ground covers to establish themselves naturally, softening hard edges and blending borders with surrounding greenery.
Spacing considerations become important when designing for plant integration – quarter inch to half inch gaps accommodate small root systems without compromising structural stability. Creeping thyme, moss, and small sedums work particularly well in these spaces, adding living color while requiring minimal maintenance.
Balance between structure and natural elements transforms functional borders into living features that change with seasons and plant growth. Plant selection should focus on low growing varieties that won’t overwhelm the brick elements or create maintenance challenges as they establish and spread.
Color Coordinated Brick Edging for Garden Harmony

Selecting the right brick colors transforms your garden edging from functional to fabulous by creating visual cohesion throughout your outdoor space. We’ll explore how strategic color choices can enhance your garden’s natural beauty while maintaining the practical benefits of brick borders.
Matching Brick to Garden Style
Classic red clay bricks work perfectly for traditional gardens where timeless appeal matters most. These bricks let colorful flowers take center stage while providing a warm, inviting backdrop that complements cottage gardens and formal landscapes alike.
Reclaimed bricks deliver rustic charm for vintage inspired gardens through their weathered patina and unique character marks. Their varied tones and textures create an authentic aged appearance that pairs beautifully with heritage plants and antique garden features.
Neutral colored bricks blend seamlessly with contemporary garden designs where clean lines and minimalist aesthetics dominate. Shades like gray, buff, and cream provide sophisticated backdrops that won’t compete with architectural plantings or modern hardscape elements.
Contrasting Color Effects
Dark bricks against light colored plants create striking visual drama that makes both elements more prominent in your garden design. This contrast technique works especially well with silver foliage plants, white flowering perennials, and pale ornamental grasses.
Light colored bricks stand out beautifully against darker foliage like purple leafed plants, deep green evergreens, and bronze colored ornamental varieties. This combination adds depth and prevents garden borders from disappearing into shadowy planting areas.
Warm toned bricks enhance cool colored plantings by creating complementary color relationships that feel natural and balanced. Cool gray or blue toned bricks similarly enhance warm colored flowers and foliage for eye catching garden transitions.
Seasonal Color Considerations
Spring and summer gardens benefit from brighter brick colors that complement blooming flowers and fresh green growth. Warmer brick tones like terra cotta and red enhance the vibrant energy of growing season displays.
Fall and winter landscapes pair beautifully with earthier brick tones that blend naturally with dormant plants and seasonal color changes. Browns, deep reds, and muted oranges echo autumn leaves while providing year round structure.
Evergreen plantings require careful brick color selection since these plants maintain consistent coloring throughout all seasons. Choose brick colors that complement both the evergreen foliage and any seasonal companion plants you’ll add throughout the year.
Budget-Friendly Brick Edging Solutions

Creating beautiful garden borders doesn’t require a important investment when you know the right techniques. Smart approaches to brick selection and installation can reduce costs by up to 60% compared to premium edging options.
Using Broken or Damaged Bricks
Reclaimed bricks transform waste materials into stunning garden features that tell a unique story. We’ve found that utilizing broken or damaged bricks creates a rustic, distressed appearance that adds character to any landscaping project while reducing material waste significantly.
Mosaic patterns showcase creativity while hiding imperfections in damaged bricks effectively. Arranging broken pieces in artistic formations allows complete creative freedom and transforms flawed materials into eye-catching borders that become conversation starters.
Weathered surfaces on damaged bricks provide authentic aged textures that new materials simply cannot replicate. These imperfections create visual interest and depth that complement natural garden elements beautifully.
DIY Installation Tips
Trench digging forms the foundation for stable brick edging that withstands weather and foot traffic over time. We recommend creating a shallow trench along garden beds to ensure bricks remain properly positioned and prevent shifting during seasonal changes.
Pattern flexibility allows homeowners to customize their edging appearance based on garden style preferences. Bricks can be laid horizontally for subtle definition or positioned vertically to create more pronounced boundaries that make bold statements.
Clay pavers offer exceptional durability and weather resistance that makes them ideal choices for long-lasting garden edging projects. Their consistent sizing and superior weather resistance ensure professional-looking results that maintain their appearance for years.
Cost-Saving Strategies
Accurate measuring prevents expensive overbuying mistakes that can significantly increase project costs. We calculate brick requirements by dividing the total bed length by individual brick width, then adding a 10% margin for cuts and potential errors.
Second-grade materials provide substantial savings without compromising quality or durability in garden applications. Shopping for discontinued or slightly imperfect bricks often yields 30-50% cost reductions compared to premium options.
Local sourcing reduces transportation expenses while supporting community suppliers and minimizing environmental impact. Using locally available materials cuts delivery costs and often provides better pricing through established regional relationships.
Conclusion
Brick edging offers endless possibilities for transforming your garden borders into beautiful functional features. Whether you’re drawn to classic straight lines curved borders raised beds or decorative patterns there’s a brick edging solution that’ll match your style and budget.
We’ve shown you how to work with both new and reclaimed materials create stunning color combinations and choose between mortared and dry-laid installations. The key is selecting the approach that best fits your garden’s needs and your maintenance preferences.
With these brick edging ideas you’re ready to create defined attractive borders that’ll enhance your outdoor space for years to come. Your garden deserves those polished finishing touches that make all the difference.
Frequently Asked Questions
What are the main benefits of using brick for garden edging?
Brick garden edging enhances your garden’s appearance while serving practical purposes like preventing soil erosion and simplifying lawn maintenance. It creates clean, organized lines that make mowing easier and help contain mulch and soil. Brick edging is also cost-effective, durable, and works well with various garden styles from traditional to modern designs.
What’s the difference between straight and curved brick edging?
Straight brick edging creates organized, formal garden lines using patterns like running bond or soldier course arrangements. It’s easier to install and maintain. Curved brick edging transforms rigid lines into flowing, natural borders that enhance organic garden shapes. Curved designs require more planning and precise cutting but create softer, more natural-looking boundaries.
Should I use mortar or dry-lay my brick edging?
Mortared brick edging creates permanent, stable structures ideal for high-traffic areas and slopes. It requires more investment but offers long-term durability and minimal maintenance. Dry-laid borders offer flexibility for design changes and seasonal adjustments without mortar’s permanence. Choose mortar for stability and permanence, dry-lay for flexibility and easy modifications.
How can I create decorative patterns with brick edging?
Popular decorative patterns include herringbone (zigzag formation), basket weave (orderly woven appearance), and diamond point arrangements. These patterns transform simple borders into stunning focal points. Each requires specific brick placement techniques and careful planning. Start with simpler patterns if you’re a beginner, then progress to more complex designs as your skills develop.
Can I use reclaimed bricks for garden edging?
Yes, reclaimed bricks add vintage charm and character to garden borders while being cost-effective and environmentally friendly. Source them from salvage yards, demolition sites, or online marketplaces. Always assess quality for durability. You can also create an aged appearance on new bricks using weathering techniques to achieve that rustic, reclaimed look.
How do I incorporate plants with brick edging?
Stacked brick arrangements can support creeping plants and ground covers, softening hard edges and creating harmony with surrounding greenery. Leave gaps between bricks for plant growth, or create planting pockets within the edging design. Choose plants that complement your brick color and garden style for the best visual integration.
What brick colors work best for different garden styles?
Classic red clay bricks suit traditional gardens perfectly. Reclaimed bricks add rustic charm to cottage-style gardens. Neutral tones like gray or buff complement contemporary designs. Consider your home’s exterior, existing landscape colors, and seasonal plantings when selecting brick colors. Contrasting colors can create dramatic effects, while matching tones provide subtle definition.
How can I create brick edging on a budget?
Use broken or damaged bricks to create unique mosaic patterns that hide imperfections. Measure accurately to avoid overbuying, source second-grade materials for savings, and buy locally to reduce transportation costs. DIY installation saves labor costs. Consider dry-laying instead of mortaring to reduce material expenses and allow for future adjustments.