We all know that crisp garden edges can transform any outdoor space from messy to magnificent, but professional landscaping costs can quickly drain your wallet. The good news? You don’t need to spend a fortune to create stunning garden borders that’ll make your neighbors stop and stare.
Budget-friendly edging answers are everywhere if you know where to look. From repurposed household items to clever DIY techniques, we’ve discovered dozens of creative ways to define your garden beds without very costly. Whether you’re working with a tiny herb garden or sprawling flower beds, there’s an affordable option that’ll suit your style and space.
We’re about to share the most effective cheap garden edging ideas that deliver maximum visual impact for minimal investment. These proven strategies will help you create professional-looking results while keeping your landscaping budget intact.
Recycled Material Edging Solutions
Recycled materials offer us endless possibilities for creating stunning garden borders while keeping costs minimal. We’ll transform everyday waste into beautiful edging that protects our plants and defines our garden spaces.
Repurposed Plastic Bottles and Containers
Plastic bottles create surprisingly durable garden edging when buried halfway into the soil. We recommend using 2-liter soda bottles or large detergent containers for the best stability. Cut the bottles to your desired height and paint them with outdoor spray paint to match your garden’s color scheme.
Large yogurt containers and ice cream tubs work perfectly for curved garden borders. These flexible containers bend easily around flower beds and tree bases. We’ve found that removing the labels and cleaning thoroughly prevents any unsightly residue from showing through the paint.
Milk jugs provide excellent edging for raised beds and vegetable gardens. Their wide base offers superior stability compared to smaller bottles. We suggest cutting them to 4-6 inches tall for optimal plant protection while maintaining an attractive appearance.
Old Tires and Rubber Materials
Tires create bold statement pieces that define large garden areas effectively. We can stack them to create raised planters or cut them in half for traditional ground-level edging. Painting with bright colors transforms old tires into eye-catching garden features.
Rubber mats from gyms or playgrounds offer flexible edging answers for winding pathways. These materials bend around curves naturally and provide excellent weed suppression. We’ve discovered that darker colors blend seamlessly with mulch and soil.
Inner tubes from bicycles or motorcycles work wonderfully for temporary seasonal edging. Fill them partially with sand or soil for weight and stability. We particularly love using these around annual flower beds that change each season.
Reclaimed Wood and Pallets
Wooden pallets disassemble into perfect edging boards for rustic garden designs. We can use the individual slats as they are or cut them to custom lengths. Sanding and applying a clear sealant extends their lifespan significantly.
Old fence pickets create charming cottage garden borders when planted vertically. These weathered pieces add character and history to our garden spaces. We recommend treating them with wood preservative to prevent rot and insect damage.
Shipping crates break down into sturdy planks ideal for raised bed construction. The thick wood provides excellent durability for permanent edging answers. We’ve found that these materials often feature interesting stamps and markings that add visual interest to our garden borders.
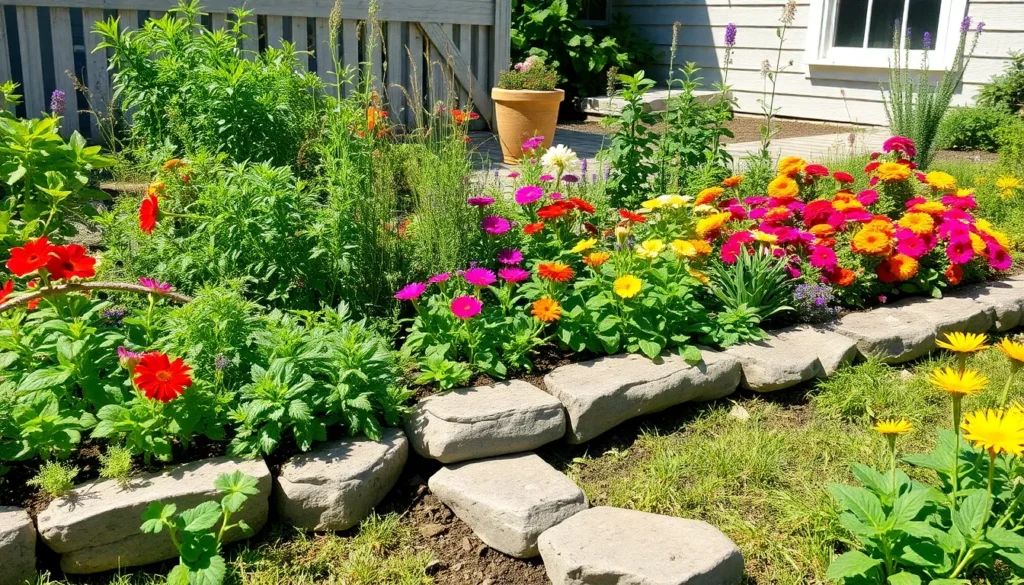
Natural Stone and Rock Borders
 1")
Stone edges bring timeless elegance to our gardens without requiring expensive materials or professional installation. We’ll explore three cost-effective approaches that deliver stunning results while keeping our budgets intact.
River Rocks and Pebbles
River rocks offer the most budget-friendly option for creating beautiful garden borders. We can purchase these smooth stones inexpensively at garden centers or collect them from natural water sources where permitted. Installing river rocks requires minimal effort since we simply place them along our desired border lines.
Drainage benefits make river rocks particularly valuable for gardens prone to water accumulation. We position larger rocks as anchor points, then fill spaces with smaller pebbles to create a natural, flowing appearance. The varied sizes and colors of river rocks allow us to design winding paths that guide the eye through our garden spaces.
Maintenance stays minimal with river rock borders since weeds struggle to grow through the stone barrier. We occasionally rinse the rocks with water to maintain their natural shine and remove accumulated debris.
Fieldstone and Natural Boulders
Fieldstone provides an authentic rustic appearance that complements cottage-style and naturalistic garden designs. We can source fieldstone from local quarries, construction sites, or farmers clearing their land, often at very reasonable prices. The irregular shapes and weathered surfaces create character that manufactured materials cannot replicate.
Natural boulders serve as dramatic focal points when strategically placed throughout our garden borders. We select boulders of varying sizes to create visual interest and natural-looking arrangements. Partially burying larger stones gives the impression they’ve always belonged in that location.
Creating fieldstone borders involves laying stones flat along our garden edges or stacking them to form low retaining walls. We fit irregular pieces together like puzzle pieces, using smaller stones to fill gaps and create stability.
Stacked Stone Techniques
Stacked stone walls offer the most dramatic visual impact among affordable natural edging options. We begin with a foundation row of our largest, flattest stones, ensuring they sit level and stable. Each subsequent layer requires careful selection of stones that fit securely together.
Building techniques range from simple two-stone-high borders to more elaborate multi-layer walls depending on our skill level and available materials. We use the “one over two, two over one” principle, positioning each stone to bridge the joint between two stones below it.
Dry stacking without mortar keeps costs minimal while allowing for easy adjustments and seasonal movement. We pack soil or small stone chips behind our stacked walls to provide additional support and prevent shifting during freeze-thaw cycles.
DIY Concrete and Cement Options
 2")
We’ve discovered that concrete offers some of the most affordable and versatile garden edging answers. These DIY approaches let us create professional-looking borders without the hefty price tag.
Homemade Concrete Blocks
Homemade concrete blocks give us complete control over size and shape while keeping costs incredibly low. We mix cement, sand, and water in a 1:3:1 ratio to create our custom blocks. Simple cardboard boxes or plastic containers work perfectly as molds for shaping these blocks.
Creating uniform blocks ensures our garden edges look professionally installed. We pour the mixture into our chosen molds and let them cure for 48 hours before demolding. These blocks can be placed directly along garden beds without any special tools or extensive preparation.
Stacking options multiply our design possibilities with these homemade blocks. We can create single-row borders for subtle definition or stack multiple rows for raised bed effects. The weight of concrete blocks provides excellent stability without requiring mortar or additional anchoring.
Decorative Stamped Concrete Edges
Decorative stamped concrete edges transform plain borders into eye-catching industry features. We pour concrete directly along our garden perimeter and use stamping tools while the surface remains workable. Brick patterns, stone textures, and leaf designs are popular stamping options that add visual interest.
Timing becomes crucial when working with stamped concrete edges. We apply stamps when the concrete reaches a firm but not hardened state, typically 2-4 hours after pouring. This technique requires practice, but the results rival expensive manufactured edging materials.
Pattern consistency throughout the entire border creates a cohesive and professional appearance. We overlap stamp impressions slightly to avoid gaps and maintain continuous patterns. Adding color hardener before stamping enhances the dimensional effect of our decorative edges.
Painted Concrete Borders
Painted concrete borders let us customize plain concrete edges with vibrant colors and unique designs. We apply primer specifically designed for concrete surfaces before adding our chosen paint colors. Exterior acrylic paints provide the best durability against weather and foot traffic.
Color schemes can complement our existing industry or create bold contrasts that make garden beds pop. We use stencils for geometric patterns or freehand techniques for artistic designs. Neutral earth tones blend naturally with most garden settings, while bright colors create focal points.
Maintenance becomes minimal once we apply a clear protective sealer over our painted borders. We touch up any chips or fading annually to keep our concrete edging looking fresh. This approach costs significantly less than purchasing pre-colored concrete products while offering unlimited design flexibility.
Budget-Friendly Plastic and Vinyl Edging
 3")
Plastic and vinyl edging options offer the perfect balance of affordability and functionality for gardeners working within tight budgets. These materials provide long-lasting answers that won’t expensive while delivering professional-looking results.
Flexible Plastic Strip Edging
Flexible plastic strip edging stands out as one of the most economical choices for creating clean garden borders. We find this material incredibly versatile since it bends easily around curved flower beds and straight walkways alike. Installation couldn’t be simpler – these strips require no digging and can be cut to fit any shape or size garden layout.
Benefits include their lightweight nature, making them easy to handle during installation. Cost savings become apparent immediately since there’s no need for professional installation or special tools. Maintenance stays minimal throughout the seasons, and replacement costs remain low when sections need updating.
Interlocking Vinyl Panels
Interlocking vinyl panels create seamless borders through their snap-together design system. Weather resistance makes these panels particularly valuable in harsh climates where other materials might deteriorate quickly. Durability ensures they’ll maintain their appearance season after season without fading or cracking.
Assembly requires no special skills or tools, making this option accessible to gardeners of all experience levels. Disassembly becomes equally straightforward when garden layouts need changing or panels require cleaning. Reassembly allows for complete flexibility in garden design modifications without purchasing new materials.
Decorative Plastic Brick Alternatives
Decorative plastic brick alternatives deliver the classic appearance of traditional brick without the associated weight and expense. These lightweight options handle easily during installation while mimicking authentic brick patterns convincingly. Manufacturing costs stay significantly lower than genuine brick, passing savings directly to gardeners.
Pattern variety allows for creative design choices that match existing industry themes. Weight reduction eliminates the need for extensive ground preparation or foundation work. Affordability makes it possible to edge entire garden areas without exceeding modest budgets, while durability ensures these alternatives withstand regular outdoor exposure.
Creative Repurposed Household Items
 4")
We’ve discovered that some of the most stunning garden edges come from items already sitting in our homes. Transforming household waste into beautiful borders creates unique landscaping while keeping costs minimal.
Wine Bottles and Glass Containers
Glass bottle edging transforms ordinary wine bottles into colorful garden features that catch sunlight beautifully. We recommend burying glass bottles halfway into the soil to create stability while showcasing their vibrant colors. Wine bottles work exceptionally well because their uniform size creates consistent height patterns along garden borders. Clear glass containers like mason jars or old beverage bottles add subtle elegance without overwhelming plant colors. Arranging bottles neck-down provides the cleanest appearance while ensuring they stay securely in place. Mixed colored bottles create rainbow effects that brighten shaded garden areas throughout the day.
Metal Cans and Containers
Metal can edging offers durable borders that withstand weather conditions better than many commercial options. Large metal cans like coffee containers or paint cans create substantial garden dividers when secured properly into the ground. We’ve found that hammering drainage holes prevents water accumulation that could cause rusting over time. Tin cans painted in vibrant colors add playful elements to herb gardens or children’s play areas. Galvanized containers provide industrial aesthetics that complement modern industry designs perfectly. Nesting different sized cans creates layered effects that add visual depth to garden borders.
Ceramic Dishes and Pottery
Ceramic dish borders bring elegant sophistication to garden edges using forgotten dinnerware and decorative pieces. Old ceramic dishes buried along garden perimeters create scalloped patterns that frame flower beds beautifully. We suggest using chipped or cracked pottery since ground contact eliminates concerns about perfect condition. Colorful ceramic bowls placed rim-up collect rainwater for small birds while defining planting areas. Broken pottery pieces arranged mosaic-style create artistic borders that reflect personal style and creativity. Large ceramic planters repositioned as edging stones provide substantial barriers between different garden zones.
Living Plant Borders
 5")
Living plant borders offer the most cost-effective and sustainable approach to garden edging. We can create beautiful boundaries using plants that serve dual purposes as both decorative elements and functional garden features.
Low-Growing Perennial Options
Creeping phlox creates a stunning mat of colorful flowers that returns year after year without replanting costs. This low-growing perennial spreads naturally to form dense coverage, eliminating gaps in your border design. We love how creeping phlox requires minimal maintenance once established and thrives in various soil conditions.
Vinca minor, commonly known as periwinkle, provides evergreen coverage that maintains its appearance throughout all seasons. This hardy perennial spreads quickly to establish a lush border that suppresses weeds naturally. Periwinkle adapts well to both sunny and shaded areas, making it versatile for different garden locations.
Both options cost significantly less than hardscaping materials while providing long-term beauty that improves with age. These perennials establish strong root systems that prevent soil erosion along garden edges.
Herb and Vegetable Plant Edging
Thyme creates a fragrant border that releases aromatic oils when brushed against during garden maintenance. This herb thrives in poor soil conditions and requires minimal watering once established. We appreciate how thyme provides culinary benefits while serving as an attractive low-growing edge.
Rosemary offers a more structured appearance with its upright growth habit and needle-like foliage. This drought-tolerant herb can be trimmed to maintain desired height and shape throughout the growing season. Rosemary’s woody stems create a more permanent border structure compared to softer herbs.
Lettuce and kale provide vibrant, edible borders that can be harvested regularly for fresh salads. These leafy greens create colorful edges that change with the seasons and succession plantings. We find that alternating different lettuce varieties creates visual interest while maximizing harvest potential.
Ornamental Grass Boundaries
Pampas grass creates dramatic vertical elements that add texture and movement to garden borders. This ornamental grass produces feathery plumes that catch light beautifully and provide year-round interest. We recommend spacing pampas grass plants appropriately since they can reach substantial sizes at maturity.
Blue oat grass offers a softer appearance with its fine-textured foliage and subtle blue coloration. This compact grass maintains its shape without aggressive spreading, making it ideal for smaller garden spaces. Blue oat grass complements both warm and cool-season plantings with its neutral color palette.
Both grass options require minimal water once established and provide natural wildlife habitat for beneficial insects. These ornamental grasses cost less than installing hardscape edging while delivering long-lasting beauty that increases property value.
Temporary and Seasonal Edging Ideas
 6")
We can create stunning garden borders that adapt to our changing seasons and evolving preferences without making permanent alterations to our industry. These flexible answers allow us to experiment with different looks while keeping costs minimal.
Mulch and Organic Material Borders
Wood chip mulch borders transform ordinary garden edges into professional-looking features while serving multiple purposes. We spread a 3-4 inch layer of wood chips along our garden perimeter to create a clean separation between lawn and planted areas. This organic material retains moisture in our soil and suppresses weed growth throughout the growing season.
Leaf mulch borders provide an equally effective alternative using nature’s own recycled materials. We rake autumn leaves from our yards and neighboring properties to create rich, textured borders that decompose slowly over time. Shredded leaves work best for creating neat edges, while whole leaves offer a more natural woodland appearance.
Bark mulch edging creates elegant borders using various sizes of bark pieces from fine nuggets to chunky strips. We purchase bark mulch in bulk to reduce costs and spread it 2-3 inches deep for optimal coverage. Different bark types like cedar or pine offer unique colors and textures to complement our garden’s aesthetic.
Seasonal Flower Arrangements
Annual flower borders bring vibrant color changes to our garden edges throughout each growing season. We plant marigolds, petunias, and impatiens in spring for summer blooms, then replace them with mums and pansies for fall displays. These flowers typically cost $2-4 per plant and create stunning 12-18 inch borders.
Perennial flower borders offer long-term value with plants that return year after year with minimal replanting costs. We choose hostas, daylilies, and black-eyed Susans for their reliable growth patterns and seasonal interest. These plants range from $8-15 initially but provide decades of beautiful edging.
Bulb rotation borders create spectacular seasonal displays using tulips, daffodils, and crocuses planted in fall for spring color. We plant 50-100 bulbs along our garden edges for dramatic impact, with most bulbs costing just $0.50-1.00 each. Summer bulbs like gladioli and dahlias extend the seasonal interest into warmer months.
Portable Container Answers
Planter box edging gives us complete flexibility to rearrange our garden borders whenever inspiration strikes. We build simple wooden boxes or repurpose plastic containers to create moveable borders filled with seasonal plants. These containers range from 12-24 inches wide and can be repositioned without disturbing existing plantings.
Tiered container gardens maximize visual impact using stacked pots and planters of varying heights along our garden edges. We arrange containers in groups of three or five for balanced compositions, using plants with different textures and colors. This approach works particularly well for renters who can’t make permanent industry changes.
Rolling planter edging incorporates wheels or casters on larger containers to make seasonal rearrangement effortless. We attach furniture casters to wooden planters or use wheeled plant dollies under heavy ceramic pots. This mobility allows us to move our borders for lawn maintenance or design changes throughout the year.
Installation Tips for Budget Edging
 7")
Proper installation makes all the difference in creating long lasting garden edges that look professional without the professional price tag. We’ll guide you through the essential steps to ensure your budget friendly edging delivers maximum visual impact.
Essential Tools and Materials
Gardening gloves protect your hands from sharp edges and debris during installation. We recommend keeping a sturdy pair specifically for edging projects since they’ll encounter rough materials and soil.
Spade or shovel becomes your primary digging tool for creating clean trenches. Choose a narrow spade for precise work around curved borders and tight spaces.
Pruning shears or snips handle trimming tasks for both edging materials and nearby vegetation. Sharp blades ensure clean cuts that won’t damage plastic or rubber materials.
Lawn edging material options include plastic strips starting at $15 for 50 feet, metal alternatives around $25 for similar lengths, and reclaimed wood pieces often available for free. Each material offers different durability levels and aesthetic appeals.
Edging stakes secure your installation against shifting soil and weather conditions. Metal stakes work best for permanent installations while plastic stakes suit temporary seasonal borders.
Hammer or mallet drives stakes into hard ground without damaging the edging material. Rubber mallets prevent cracking when working with brittle materials like ceramic or glass containers.
Step-by-Step Installation Guide
Measure and plan your edging layout using string lines or spray paint to mark the desired path. We suggest adding 10% extra material to account for curves and cutting waste.
Dig a trench approximately 3 to 6 inches deep using your spade, making it slightly wider than your chosen edging material. Consistent depth creates professional looking results that enhance your garden’s overall appearance.
Cut the edging material to fit your measured sections, leaving small gaps at joints for expansion. Sharp utility knives work well for plastic materials while metal edging requires tin snips or a hacksaw.
Install edging by placing materials in the prepared trench with decorative tops visible above ground level. Align sections carefully to maintain smooth curves and straight lines throughout your border.
Secure with stakes every 5 feet along the edging length, hammering them into firm soil behind the material. Additional stakes around curves and corners prevent shifting during freeze thaw cycles.
Backfill and pack soil tightly around the installed edging, removing air pockets that could cause settling. Water the backfilled area lightly to help soil settle naturally around your new border.
Maintenance and Longevity Tips
Regular inspection every few months catches loose sections before they become major problems. We check for frost heave damage in spring and drought related shifting during summer months.
Clear debris from around edging materials prevents organic buildup that can harbor pests and cause premature deterioration. Fallen leaves and grass clippings trap moisture against materials like wood and metal.
Avoid high traffic areas when planning permanent edging installations since foot traffic damages most budget materials over time. Consider stepping stone paths or alternative routes around delicate borders.
Refresh organic materials like mulch and wood chip borders annually to maintain their appearance and effectiveness. Fresh materials prevent decomposition from undermining your carefully planned garden edges.
Protect against weather by applying appropriate sealers to wood materials and checking plastic connections after extreme temperature changes. Simple preventive measures extend the life of budget installations significantly.
Conclusion
Creating stunning garden edges doesn’t require very costly or hiring expensive professionals. We’ve explored many budget-friendly options that transform ordinary spaces into beautiful landscapes using materials you likely already have at home.
From repurposed bottles and containers to natural stones and living plant borders these creative answers prove that effective garden edging is accessible to everyone. Whether you choose temporary seasonal displays or permanent concrete installations each approach offers unique benefits that enhance your outdoor space.
The key to success lies in proper installation and selecting materials that match your garden’s style and maintenance preferences. With these affordable strategies you’re well-equipped to create professional-looking borders that will make your neighbors wonder how you achieved such impressive results on a budget.
Frequently Asked Questions
What are the most affordable materials for garden edging?
The most cost-effective materials include repurposed household items like plastic bottles, wine bottles, and old tires. Natural options like river rocks, fieldstone, and DIY concrete made from basic cement mix are also budget-friendly. Flexible plastic strips and mulch borders offer excellent value while providing professional-looking results without breaking the bank.
Can I create garden edging using items I already have at home?
Absolutely! Common household items make excellent edging materials. Wine bottles, plastic containers, metal cans, ceramic dishes, and old tires can all be repurposed. Even wooden pallets, fence pickets, and glass containers work wonderfully. This approach not only saves money but also reduces waste while creating unique, personalized garden borders.
How do living plant borders compare to traditional edging materials?
Living plant borders are extremely cost-effective and sustainable. Low-growing perennials like creeping phlox, herbs like thyme and rosemary, and ornamental grasses require minimal maintenance once established. They provide natural beauty, prevent soil erosion, and some even offer edible benefits, making them both functional and aesthetically pleasing long-term solutions.
Are temporary edging solutions effective for budget gardening?
Yes, temporary solutions offer excellent flexibility and affordability. Mulch borders, seasonal flower arrangements, and portable container systems allow you to change designs without permanent alterations. These options are perfect for renters or those who like to frequently update their garden layout while maintaining low costs and easy maintenance.
What tools do I need for DIY garden edging installation?
Essential tools include gardening gloves, a sharp spade or edging tool, pruning shears, a measuring tape, and a level. Depending on your chosen material, you might need a rubber mallet, stakes, or string for guidelines. Most budget edging projects require only basic gardening tools that most homeowners already possess.
How can I make concrete edging look more decorative?
Homemade concrete can be enhanced through stamping patterns while wet, painting with outdoor paint, or adding decorative aggregates. You can create custom molds for unique shapes, use stencils for designs, or mix in colorants before pouring. These techniques transform plain concrete into attractive, personalized garden features at minimal additional cost.
Which edging materials require the least maintenance?
Stone borders, plastic strips, and established living borders require minimal upkeep. River rocks and fieldstone need occasional repositioning, while plastic edging simply needs periodic cleaning. Established perennial plant borders are virtually maintenance-free once they’re well-rooted, making them ideal for low-maintenance garden designs that remain beautiful year-round.
Can I install garden edging without professional help?
Most budget-friendly edging options are designed for DIY installation. Simple materials like plastic strips, mulch borders, and repurposed household items require no special skills. Following basic measurement, digging, and securing techniques ensures professional-looking results. The key is proper preparation, taking time for accurate measurements, and following step-by-step installation guidelines.


